Vertical under-desk cable organizer with hooks and trays, SolidHand-CM02S
GTIN: 5906935203255 · SKU: SolidHand-CM02S
Table of contents
Specifications
- Colour: matt black
- Material: steel, ABS
- Surface finish: powder coating
- Installation: screwed to the underside of the desktop
- Mounting location: back or side of the desk
- Panel orientation: vertical
- Construction: two joined panels, up to 768 mm wide in total
- Maximum load: up to 8 kg
- External dimensions: 76.8 × 6.4 × 25 cm
- Package dimensions: 40 × 21 × 4 cm
- Product weight: 2.36 kg
- Weight with packaging: 2.54 kg
- Certificate: RoHS
Kit contents
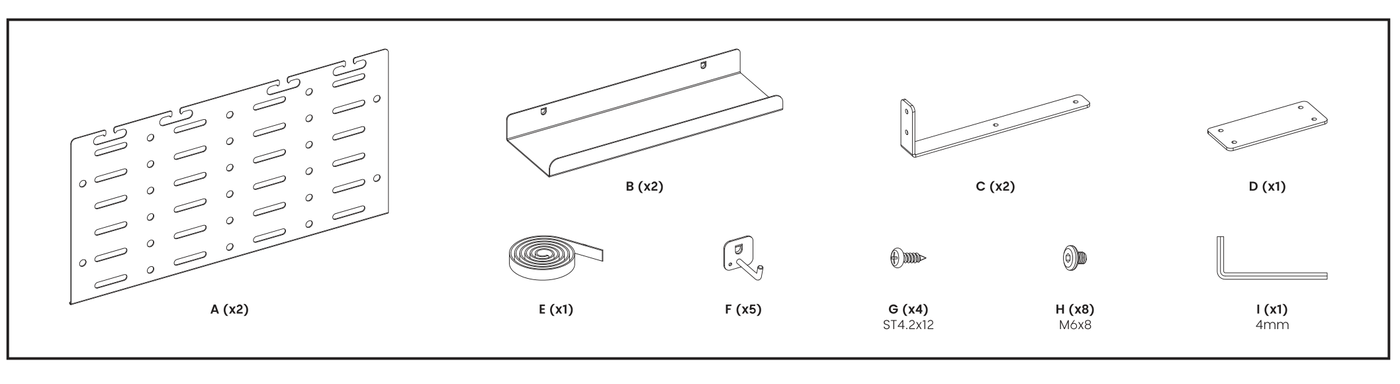
- A — perforated panel (× 2)
- B — tray (× 2)
- C — mounting bracket (× 2)
- D — joining plate (× 1)
- E — hook-and-loop cable tie (× 1)
- F — hook (× 5)
- G — ST4.2 × 12 screw (× 4)
- H — M6 × 8 screw (× 8)
- I — 4 mm Allen key (× 1)
Before you start
Assembly takes a few minutes, but mounting the organizer under the desktop is a two-person job. Prepare the following:
- A second person to hold the organizer against the underside of the desktop
- A drill with a Ø2.0 mm (3/32") bit for the pilot holes
- A screwdriver for the ST4.2 × 12 (G) screws
- A check that the desktop is thick and solid enough to carry the organizer together with everything you plan to put on it
Assembly
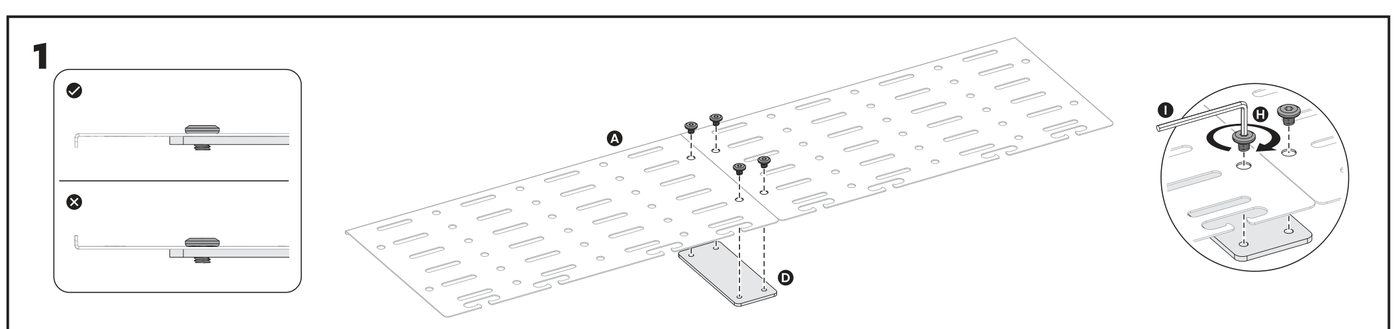
Step 1 — Join the two panels
- Lay both panels (A) face down on a flat surface and slide one over the other until you reach the width you need — the dense perforation lets you set the overlap freely, up to a total width of 768 mm.
- Place the joining plate (D) across the overlap and fasten it with four M6 × 8 (H) screws using the 4 mm Allen key (I).
- Tighten each screw until its head sits flush against the panel — the inset shows the correct (✔) and incorrect (✘) result.
Step 2 — Attach the mounting brackets
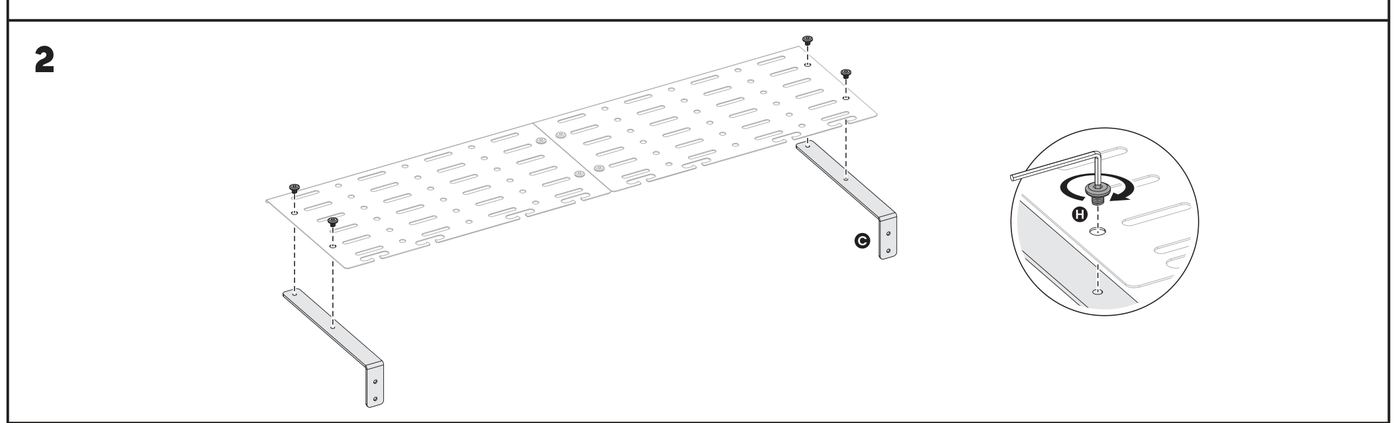
- Fit the two brackets (C) to the ends of the joined panel.
- Fasten each bracket with two M6 × 8 (H) screws, again using the 4 mm Allen key (I). All eight M6 screws are now used.
Step 3 — Mount the organizer under the desktop
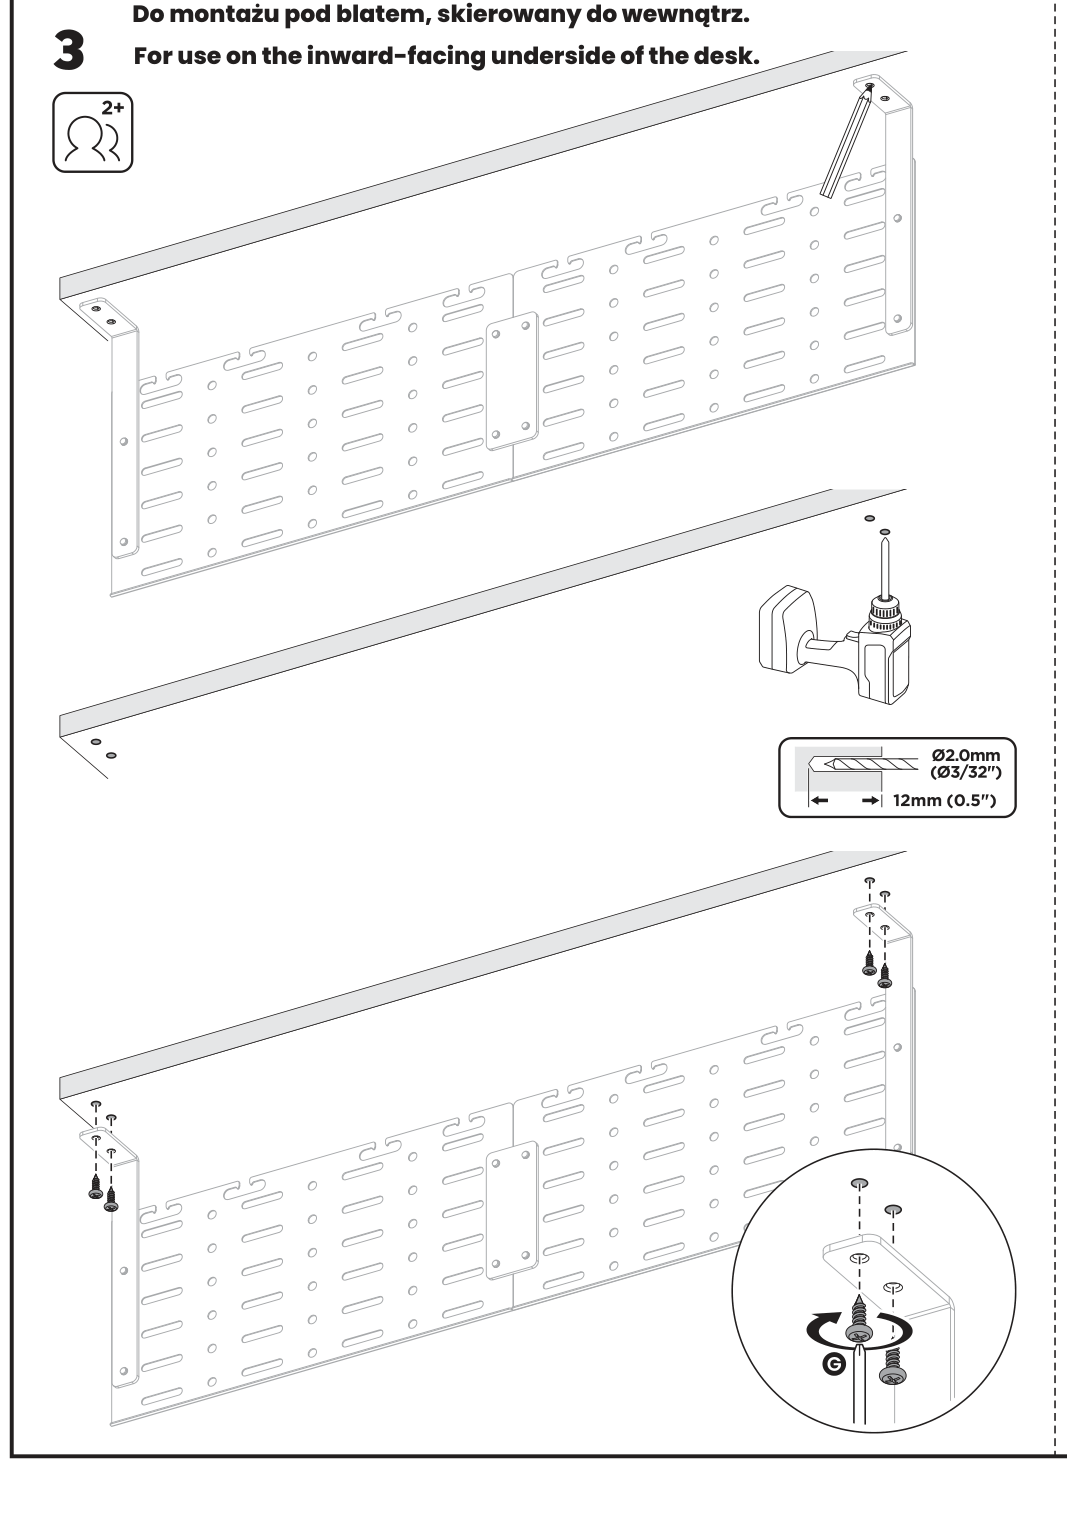
The organizer can be mounted in two orientations. Choose the one that matches the side of the desk your cables come from — the panel can face inwards (towards the user) or outwards (towards the back of the desk).
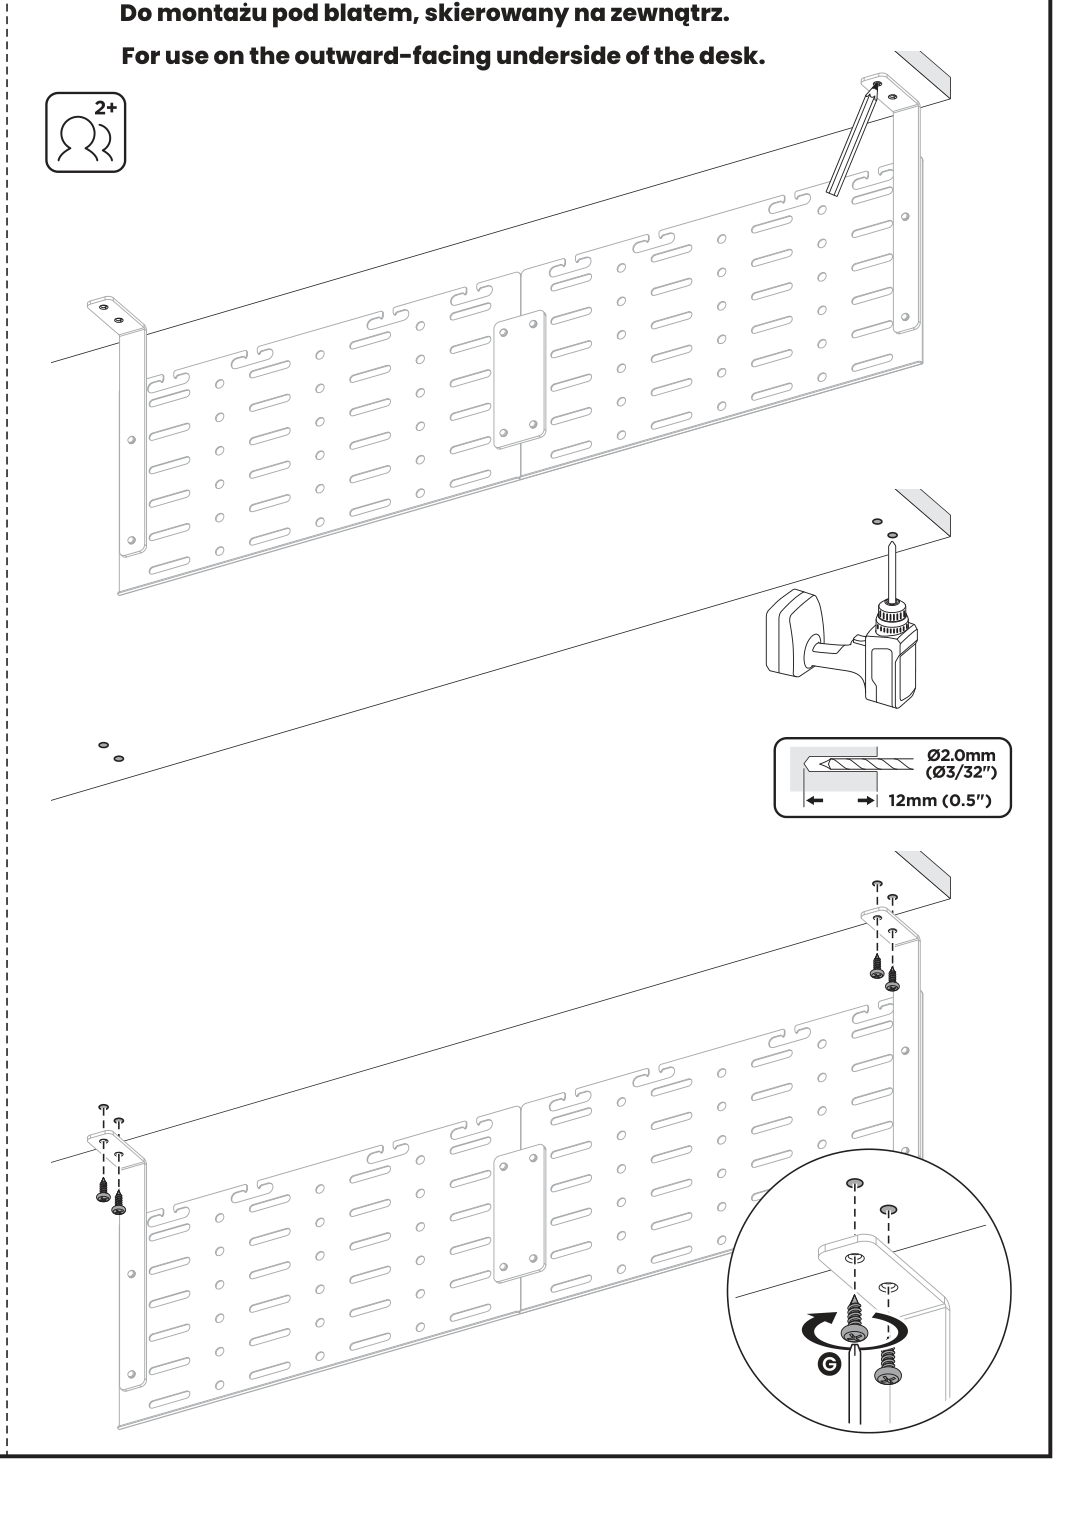
- With a second person holding the organizer in place, position it against the underside of the desktop and mark the bracket holes.
- Drill the pilot holes: Ø2.0 mm (3/32"), 12 mm (0.5") deep.
- Fasten the brackets with four ST4.2 × 12 (G) screws.
For use on the inward-facing underside of the desk
For use on the outward-facing underside of the desk
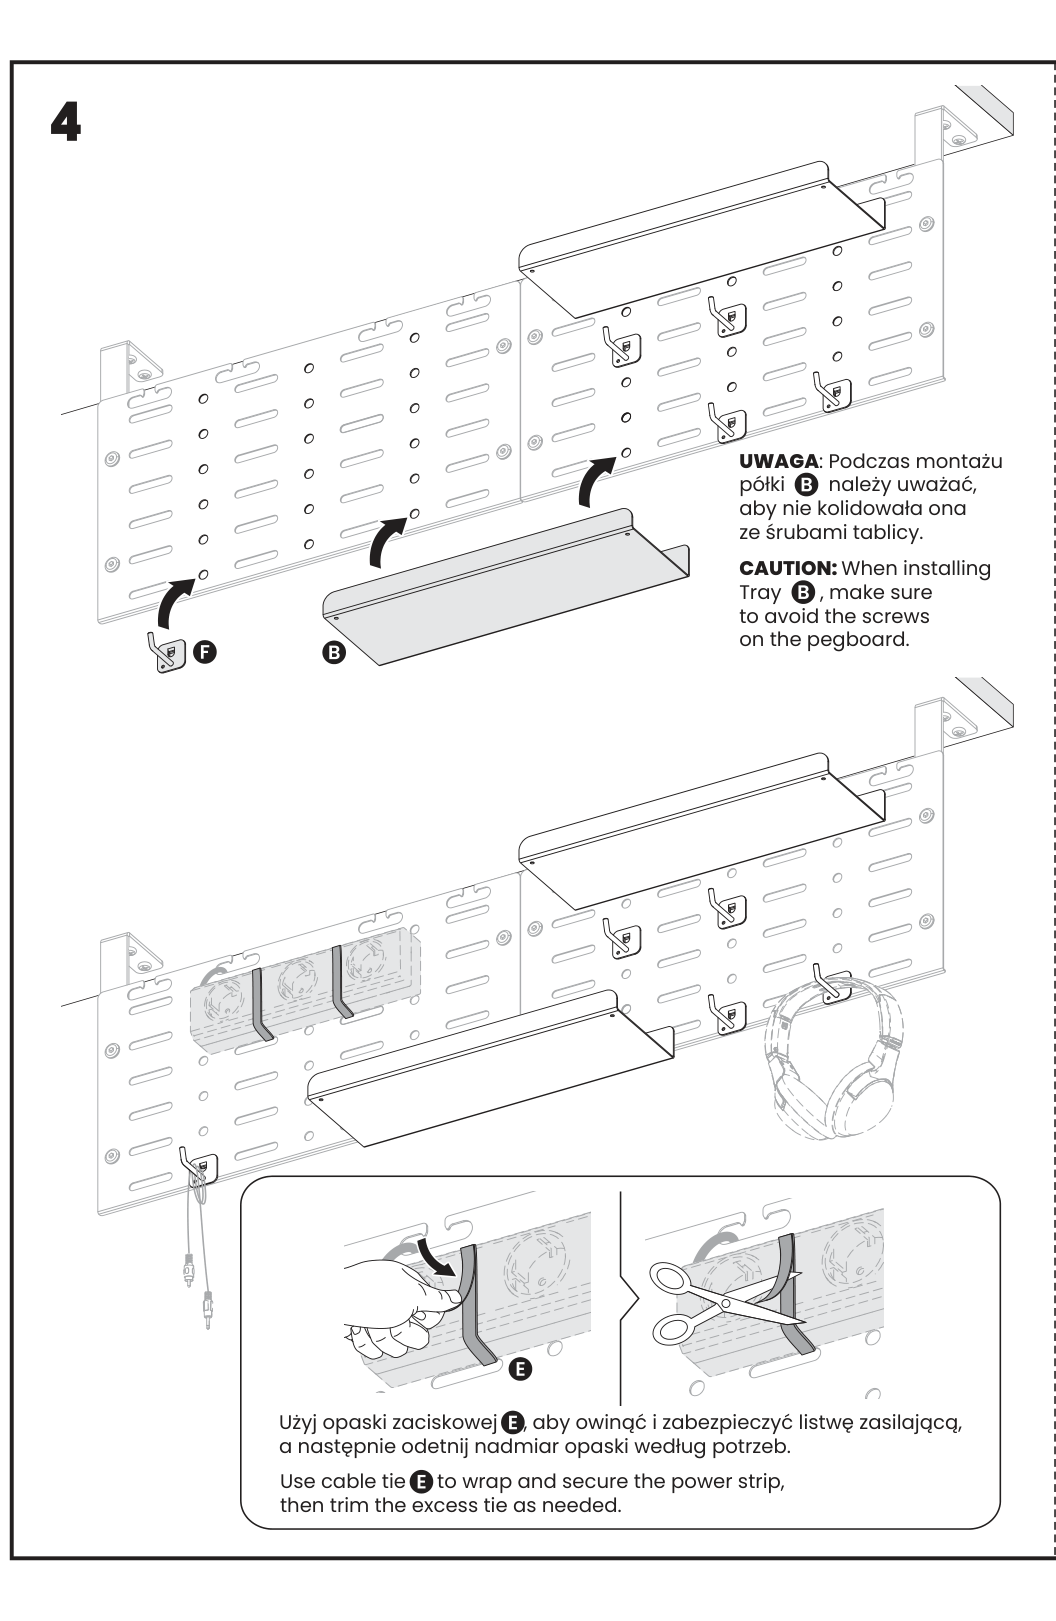
Step 4 — Fit the trays, hooks and cable tie
- Hook the five hooks (F) into the slots wherever you need them — they hold coiled cable, headphones or other light accessories.
- Fit the two trays (B) into the slots. They carry the power strip and power supplies.
- Use the hook-and-loop cable tie (E) to wrap and secure the power strip, then trim off the excess.
caution
When installing tray B, make sure it does not collide with the screws on the panel.
Using the organizer
- The organizer carries up to 8 kg — enough for a power strip with several power supplies and their cables.
- Place the power strip and the power supplies on the trays, coil the excess cable and hang it on a hook.
- Route individual cables through the round holes and the elongated slots so that each one has its own path.
- The open, perforated construction lets air circulate freely, which matters with power supplies and power strips that warm up in use.
- Cabling arranged this way stays easy to reach — swapping a cable or moving a plug does not require dismantling the whole organizer.
Safety instructions and warnings
Failure to read, thoroughly understand and follow all instructions can result in serious personal injury or damage to equipment.
- Ensure that the mounting surface is strong enough to support the combined weight of the product and the equipment placed on it.
- Do not exceed the maximum listed weight capacity.
- Always use an assistant or a mechanical lifting device to safely lift and position heavy products.
- Tighten screws firmly, but do not overtighten. Overtightening can cause damage that greatly reduces their holding power.
- Maintain a safe distance from moving parts when using the product.
- Use only as intended. Never stand on, hang from or climb on the product.
- This product is intended for indoor use only.
- Any unauthorised modification or reconstruction of this product is prohibited.
- This product may contain small items that could be a choking hazard if swallowed. Keep out of reach of children.
- Check that the product is secure and safe to use at regular intervals — at least every three months.
Frequently asked questions
How is the organizer mounted?
It is screwed to the underside of the desktop with two side brackets. No free desk edge and no clamp are needed.
How much can it hold?
Up to 8 kg — enough for a power strip with several power supplies and their cables.
Can the width be adjusted?
Yes. It consists of two joined panels; the dense perforation lets you set how far they overlap, up to a total width of 768 mm.
What is supplied with the organizer?
Two panels, two trays, two mounting brackets, a joining plate, five hooks, a hook-and-loop cable tie, a 4 mm Allen key and a set of mounting screws.