RFID label printer, direct thermal and thermal transfer, 203 dpi, LAN, HDWR OPrint-DA200NR
GTIN: 5906935204061 · SKU: OPrint-DA200NR
Table of contents
Introduction
The OPrint-DA200NR is a desktop label printer with a built-in UHF RFID module. It prints and encodes RFID labels in a single pass, so you can create smart tags for contactless identification, asset tracking and fast stocktaking without scanning each code separately. The printer works in both direct thermal and thermal transfer mode, prints at up to 203 mm/s with 203 dpi resolution on media up to 104 mm wide, and connects to a computer over USB or to the company network over Ethernet (LAN). A free-standing external label feeder is included for large media rolls.
Specifications
- Material: ABS plastic
- Printing method: direct thermal and thermal transfer
- Resolution: 203 dpi
- Maximum print speed: 203 mm/s (8"/s)
- Maximum print width: 104 mm
- Maximum print length: 15,000 mm
- CPU: 500 MHz, 32-bit, Cortex-M7
- RFID technology: UHF EPC Class 1 Gen 2 / ISO 18000-6C tags
- RFID functions: simultaneous printing and encoding, flexible anti-metal labels up to 1.3 mm thick, minimum label pitch 15 mm, Alien, NXP and Impinj chips, automatic marking of faulty tags, tag password lock/unlock
- Memory: 8 MB SDRAM / 16 MB Flash
- Interface: USB 2.0 High Speed, Ethernet (LAN, RJ45)
- Command languages: TSPL, ZPL, ZPL II
- Sensors: cover open sensor, ribbon sensor, transmissive (gap) sensor, reflective (black mark) sensor
- Controls and indicators: power switch, FEED / PAUSE button, LED indicators ONLINE (blue), ERROR (red), RIBBON (green), COMM (orange)
- Media types: continuous, die-cut, black mark, fan-fold
- Maximum ribbon length: 300 m (1" core, ink coated outside, maximum outer diameter 67 mm)
- Ribbon width: 30–110 mm (1.18"–4.3")
- Label roll width: 20–118 mm
- Media thickness: 0.06–1.3 mm
- Core diameter: 25.4 mm (1")
- Label roll capacity: 127 mm (5") outer diameter
- Rotation of fonts and barcodes: 0, 90, 180, 270°
- Printable 1D codes: Code 11, Code 39, Code 93, Code 128, UPC-A, UPC-E, UCC-128, Codabar, EAN/JAN-8, EAN/JAN-13, Interleaved 2 of 5, ITF-14, MSI Plessey, PostCode, Telepen
- Printable 2D codes: QR Code, PDF417, Micro QR Code, Micro PDF417, Grid Matrix, MaxiCode, Aztec Code, Data Matrix
- Device dimensions: 19 × 19.8 × 28 cm
- Package dimensions: 39.5 × 25.5 × 24 cm
- Device weight: 2.7 kg
- Weight with packaging: 3.2 kg
- Operating temperature: 5 to 40 °C
- Storage temperature: −40 to 60 °C
- Operating humidity: 25–85%, non-condensing
- Storage humidity: 10–90%, non-condensing
- Certificates: FCC, CE, CCC, BIS, CB
Set contents
- Label printer
- Free-standing external label feeder
- USB cable
- Power adapter with power cord
- 2 × ribbon spindle
- Test roll
Printer overview
Front panel
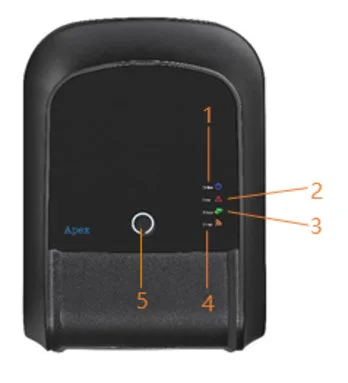
- ONLINE indicator
- ERROR indicator
- RIBBON indicator
- Communication (COMM) indicator
- FEED / PAUSE / ERROR CANCEL button
Inside the printer
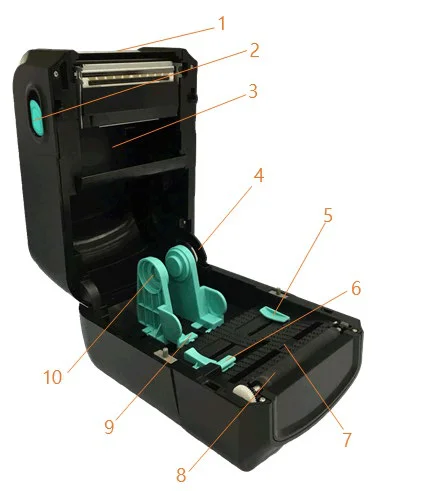
- Top cover
- Top cover release latch
- Ribbon compartment
- Top cover support
- Media guide
- Gap sensor
- Black mark sensor
- Platen roller
- Media holder compartment
- Media holders
Rear panel
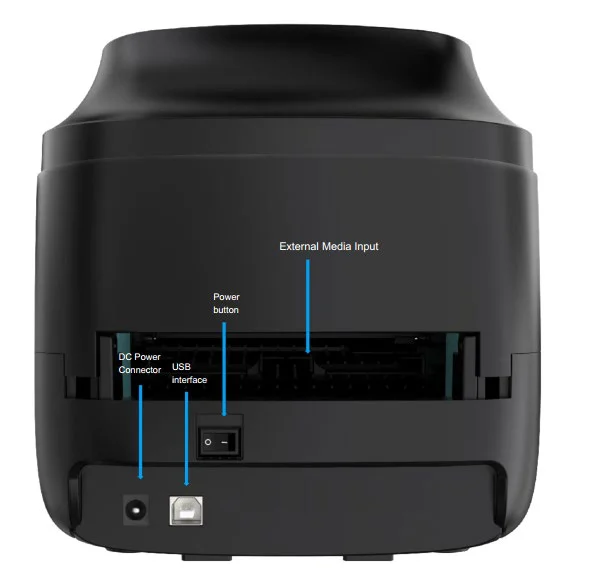
- USB — connection to a computer for driver installation, printing and printer diagnostics.
- Ethernet (LAN) — RJ45 port for connecting the printer to the company network; the printer can then be shared by several workstations. When the cable is connected and the link is correct, the orange COMM indicator blinks.
- Power switch and DC power connector for the supplied power adapter.
- External media input — slot for feeding large media rolls from outside the printer. Requires the external feeder. During use keep the media roll level with the printer; do not place it at an angle.
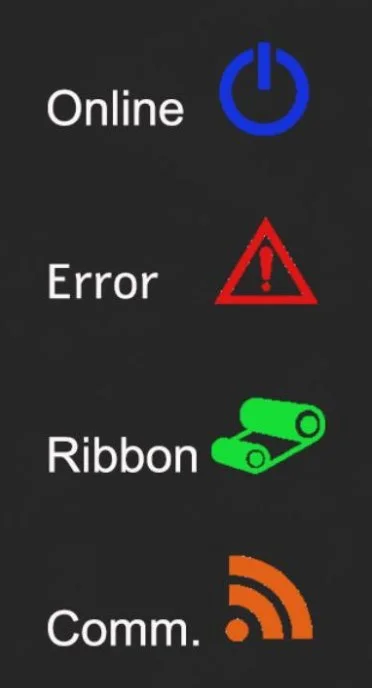
LED indicators
| Event | Description |
|---|---|
| Thermal transfer mode ready | Blue (ONLINE) and green (RIBBON) are on steadily — the printer is ready for use. |
| Direct thermal mode ready | Blue (ONLINE) is on steadily — the printer is ready for use. |
| Cover open | A beep sounds and blue (ONLINE), red (ERROR) and green (RIBBON) blink. |
| Pause | Press the PAUSE button. When blue (ONLINE) blinks, the printer is paused. |
| FEED | Press the FEED button to print on demand. Blue (ONLINE) blinks. |
| Out of paper | A beep sounds and red (ERROR) blinks. |
| Out of ribbon | A beep sounds, red (ERROR) is on steadily and green (RIBBON) blinks. |
| Label gap / black mark error | When the gap or black mark cannot be found, a beep sounds and red (ERROR) and blue (ONLINE) blink. |
| Cutter error | When the cutter cannot be found, a beep sounds and blue (ONLINE) and red (ERROR) blink alternately; green (RIBBON) blinks as well. |
| Print head overheated | A beep sounds and blue (ONLINE) and red (ERROR) blink alternately. |
| Other errors | A beep sounds and red (ERROR) and green (RIBBON) blink alternately. |
| Ethernet ready | When the RJ45 network cable is connected and the link is correct, orange (COMM) blinks. |
| Wi-Fi ready | When Wi-Fi is connected in AP or STA mode, orange (COMM) is on steadily (Wi-Fi version only). |
| Ethernet + Wi-Fi ready | When the RJ45 cable is connected with a correct link and Wi-Fi works in AP or STA mode, orange (COMM) is on steadily for 2 seconds and then blinks (Wi-Fi version only). |
Button functions
The printer has one button for feeding, pausing and cancelling errors. Its function depends on the printer status:
| Printer status | Function | Description |
|---|---|---|
| Ready | Feed | When the printer is ready (blue LED on), press the button — the media advances to the start of the next label. For continuous media the printer feeds by the preset height, for gap media to the next gap and for black mark media to the next black mark. |
| Waiting for the button | Print next | When the "Demand button" function is enabled, the printer stops after each printed label and waits for the button to be pressed before printing the next one. |
| Printing | Pause | While the printer is printing continuously, press the button (PAUSE) to pause the job. The blue indicator blinks. Press the button again to resume printing. |
| Error | Cancel error | When the red ERROR indicator is on, press the button (PAUSE) once after the cause has been removed — the printer cancels the error, resumes printing and reprints the label on which the error occurred. |
Power-on utilities
The printer has six power-on utilities for setting up and testing the hardware. To start one, hold the FEED button while switching the printer on and release it when the indicator described below lights up.
| Utility | Procedure | Indicator | Sound |
|---|---|---|---|
| Self-test | Switch the printer off. Make sure media is loaded and close the cover. Hold the FEED button and switch the printer on. Release the button when only the green RIBBON indicator is on. The printer prints a self-test page. | RIBBON (green) on | beep |
| USB mass storage mode | Switch the printer off. Make sure media is loaded and close the cover. Hold the FEED button and switch the printer on. Release the button when the orange COMM indicator is on steadily. The printer's memory appears on the computer as a storage device. | COMM (orange) on | beep |
| Dump mode | Switch the printer off. Make sure media is loaded and close the cover. Hold the FEED button and switch the printer on. Release the button when the blue ONLINE and red ERROR indicators are on at the same time. The printer beeps and prints "NOW IN DUMP MODE". | ONLINE (blue) + ERROR (red) on | beep |
| Skip AUTO.BAS | Switch the printer off. Hold the FEED button and switch the printer on. Release the button when the red ERROR indicator is on steadily. The printer beeps twice and skips the AUTO.BAS program. | ERROR (red) on | 2 beeps |
| Printer initialization | Switch the printer off. Hold the FEED button and switch the printer on. Release the button when only the blue ONLINE indicator is on steadily. The printer beeps five times, prints its parameters and restores the factory settings. | ONLINE (blue) on | 5 beeps |
| Ribbon inspection | The printer detects the ribbon status automatically after power-on and in every thermal transfer print job. | — | — |
Loading media
- Pull the release latch on the side of the printer and open the top cover.
- Place the media roll on the media holders, or feed the media from the external feeder through the external media input at the back of the printer. Keep the roll level with the printer.
- Route the media under the media guides and adjust the guides to the media width so that the media does not shift.
- Set the sensor position according to the media type:
- Standard die-cut labels — set the gap sensor so that its arrow sits in the gap between two labels.
- Labels on a transparent liner — set the gap sensor so that its arrow sits on the label area.
- Black mark media — set the black mark sensor directly under the black mark; the sensor must lie under the media.
- Flexible anti-metal RFID tags — set the gap sensor in the gap between two tags.
- For thermal transfer printing, mount the ribbon on the two spindles (ink side out) and route it under the print head.
- Close the top cover and press FEED — the printer feeds the media to the start of the next label. After changing the media type, run the self-test (see Power-on utilities) or calibrate the media in the configuration application.
RFID calibration and encoding
Before the first print run on a new type of RFID label, calibrate the printer in the configuration application (see Driver and software). Measure the label width, label height and gap first.
- Open the RFID calibration page of the configuration application.
- Enter the parameters of the labels in use (label size and gap) and click Start calibration. The red indicator lights up during calibration and goes off when it is finished.
- Click Read RFID info — the application shows the best read/write position and the read and write power determined during calibration.
- Click Save RFID info to save the configuration to a file named after the tag size and save time.
- When loading the same labels again, select the saved profile and click Set — the printer takes over the parameters without recalibrating. A profile belongs to the printer it was created on; recalibrate when the labels are used on another printer.
RFID encoding rules:
- The EPC write start position is 2.
- Data must be in hexadecimal format (e.g. 0001).
- The data length must be a multiple of 4 hexadecimal digits (4, 8, 12, …).
- The default tag access password is 0000; it can be changed or ignored.
During printing the printer automatically marks faulty tags and can retry writing a tag a set number of times. The built-in counter tracks correctly and incorrectly encoded labels.
Driver and software
-
Windows driver — install the driver, then connect the printer over USB or add it as a network printer by its IP address. The printer accepts TSPL, ZPL and ZPL II commands, so it works with popular label design programs.
-
Configuration application — printer settings, network (IP address) configuration, media calibration and RFID calibration.
- Windows label printer driver (EXE)
- Printer configuration application v3.2.19 (EXE)
Safety notes
Switch the printer off and unplug it immediately if it produces smoke, a strange odour or unusual noise, or if liquid gets inside. Continued use may cause fire. Contact your dealer.
- Never repair, disassemble or modify the printer yourself.
- Use only the specified power adapter and connect the cables only as described in this manual.
- Do not let foreign objects fall into the printer.
- Do not use flammable aerosol sprays inside or around the printer.
- Place the printer on a firm, stable, horizontal surface.
- Do not use the printer in very humid or dusty places.
- During a lightning storm, unplug the network cable, the power cable and all other connections.
- The print head gets hot during printing — let it cool down before touching it.
Frequently asked questions
Does the printer need a ribbon?
Which RFID tags can the OPrint-DA200NR encode?
Do I have to rewind the labels after encoding?
How do I connect the printer to the network?
The red ERROR indicator is on and the printer beeps — what should I do?
How do I restore the factory settings?
Which label design software can I use?
Downloads
Original PDF manuals kept available as a legacy reference. Everything from them is already covered on this page — use the PDFs only if you need an offline copy. The documents were issued for the OPrint-DA200R model, which this printer replaces; apart from the Ethernet (LAN) port the devices are identical.