Monitor wall mount with a spring-assisted arm, SolidHand-AW01
GTIN: 5907614666637 · SKU: SolidHand-AW01
The SolidHand-AW01 holds one monitor of 17 to 27 inches, 2 to 7 kg, on a spring-assisted arm fixed to the wall. The screen is raised, lowered, tilted, swivelled and turned to portrait by hand; the arm folds back against the wall when the screen is not in use. No desk space is taken at all.
Table of contents
Specifications
- Colour: matt black
- Material: aluminium, steel, plastic
- Surface finish: powder coating
- Number of monitors: 1
- Screen size: 17–27"
- VESA pattern: 75 × 75 mm, 100 × 100 mm
- Monitor weight: 2–7 kg
- Height adjustment: mechanical spring assisted, factory preset
- Arm swivel: ±90°
- Monitor rotation (pivot): ±180°
- Monitor tilt: +90° / −45°
- Maximum arm reach: 303 mm
- Mounting: wall
- Built-in USB ports: none
- Dimensions of the mount: 117 × 337 × 332 mm
- Package dimensions: 450 × 200 × 90 mm
- Weight with packaging: 1.8 kg
- Certificates: RoHS, REACH
Kit contents
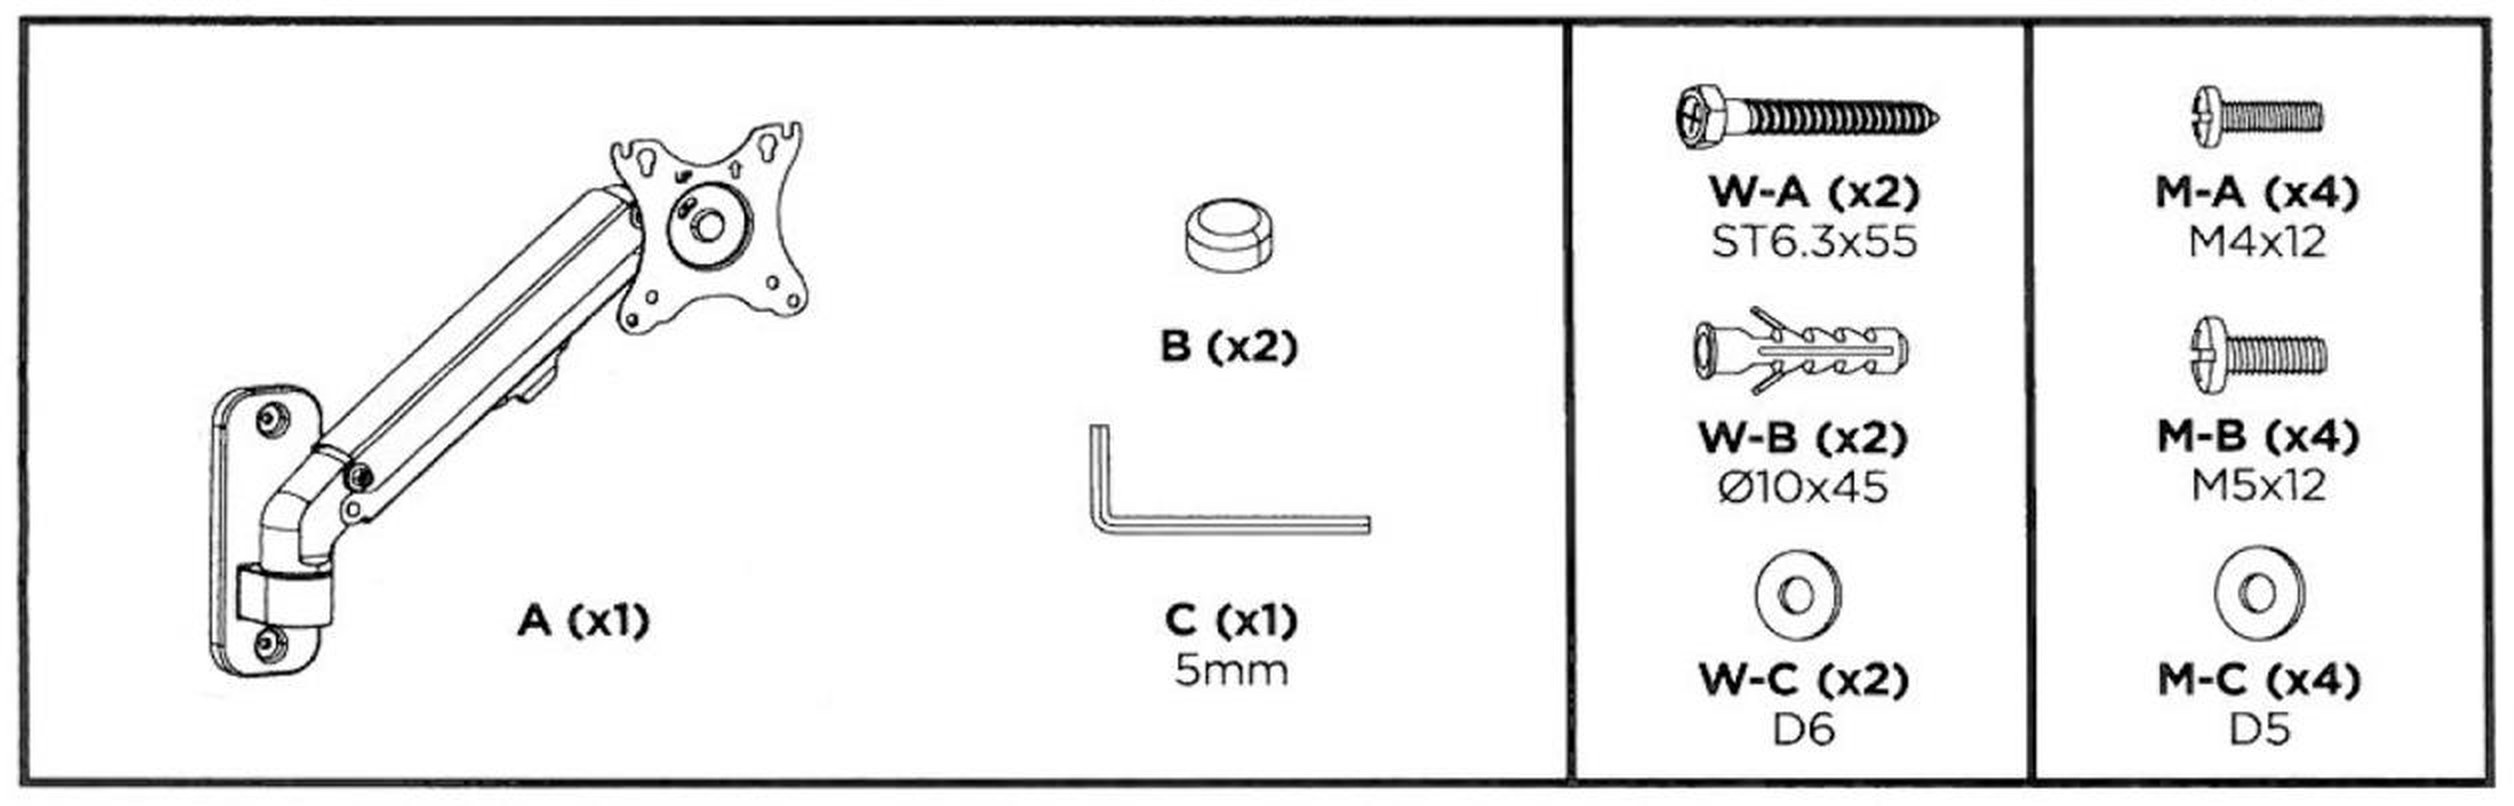
- A — arm with the wall plate and the VESA head (× 1)
- B — screw cover (× 2)
- C — 5 mm Allen key (× 1)
- W-A — ST6.3 × 55 wall screw (× 2)
- W-B — Ø10 × 45 wall plug (× 2)
- W-C — D6 washer (× 2)
- M-A — M4 × 12 monitor screw (× 4)
- M-B — M5 × 12 monitor screw (× 4)
- M-C — D5 washer (× 4)
Before you start
Assembly takes about twenty minutes. Prepare the following:
- A second person — hanging the monitor on the arm is a two-person job
- A stud finder, a spirit level and a pencil to mark the holes
- A drill with a Ø4.5 mm (3/16") wood bit or a Ø10 mm (3/8") masonry bit, depending on the wall
- A wrench and a Phillips screwdriver; the 5 mm Allen key is in the kit
- A check that the monitor is 17–27" and weighs 2–7 kg, and has VESA 75 × 75 or 100 × 100 holes
- A check that the wall is a solid masonry wall or has a timber stud behind the finish — plasterboard alone will not carry the mount

Check that you have received all the parts listed above before you start. If anything is missing or damaged, contact us before assembling the mount.
Assembly
Step 1 — Fix the wall plate
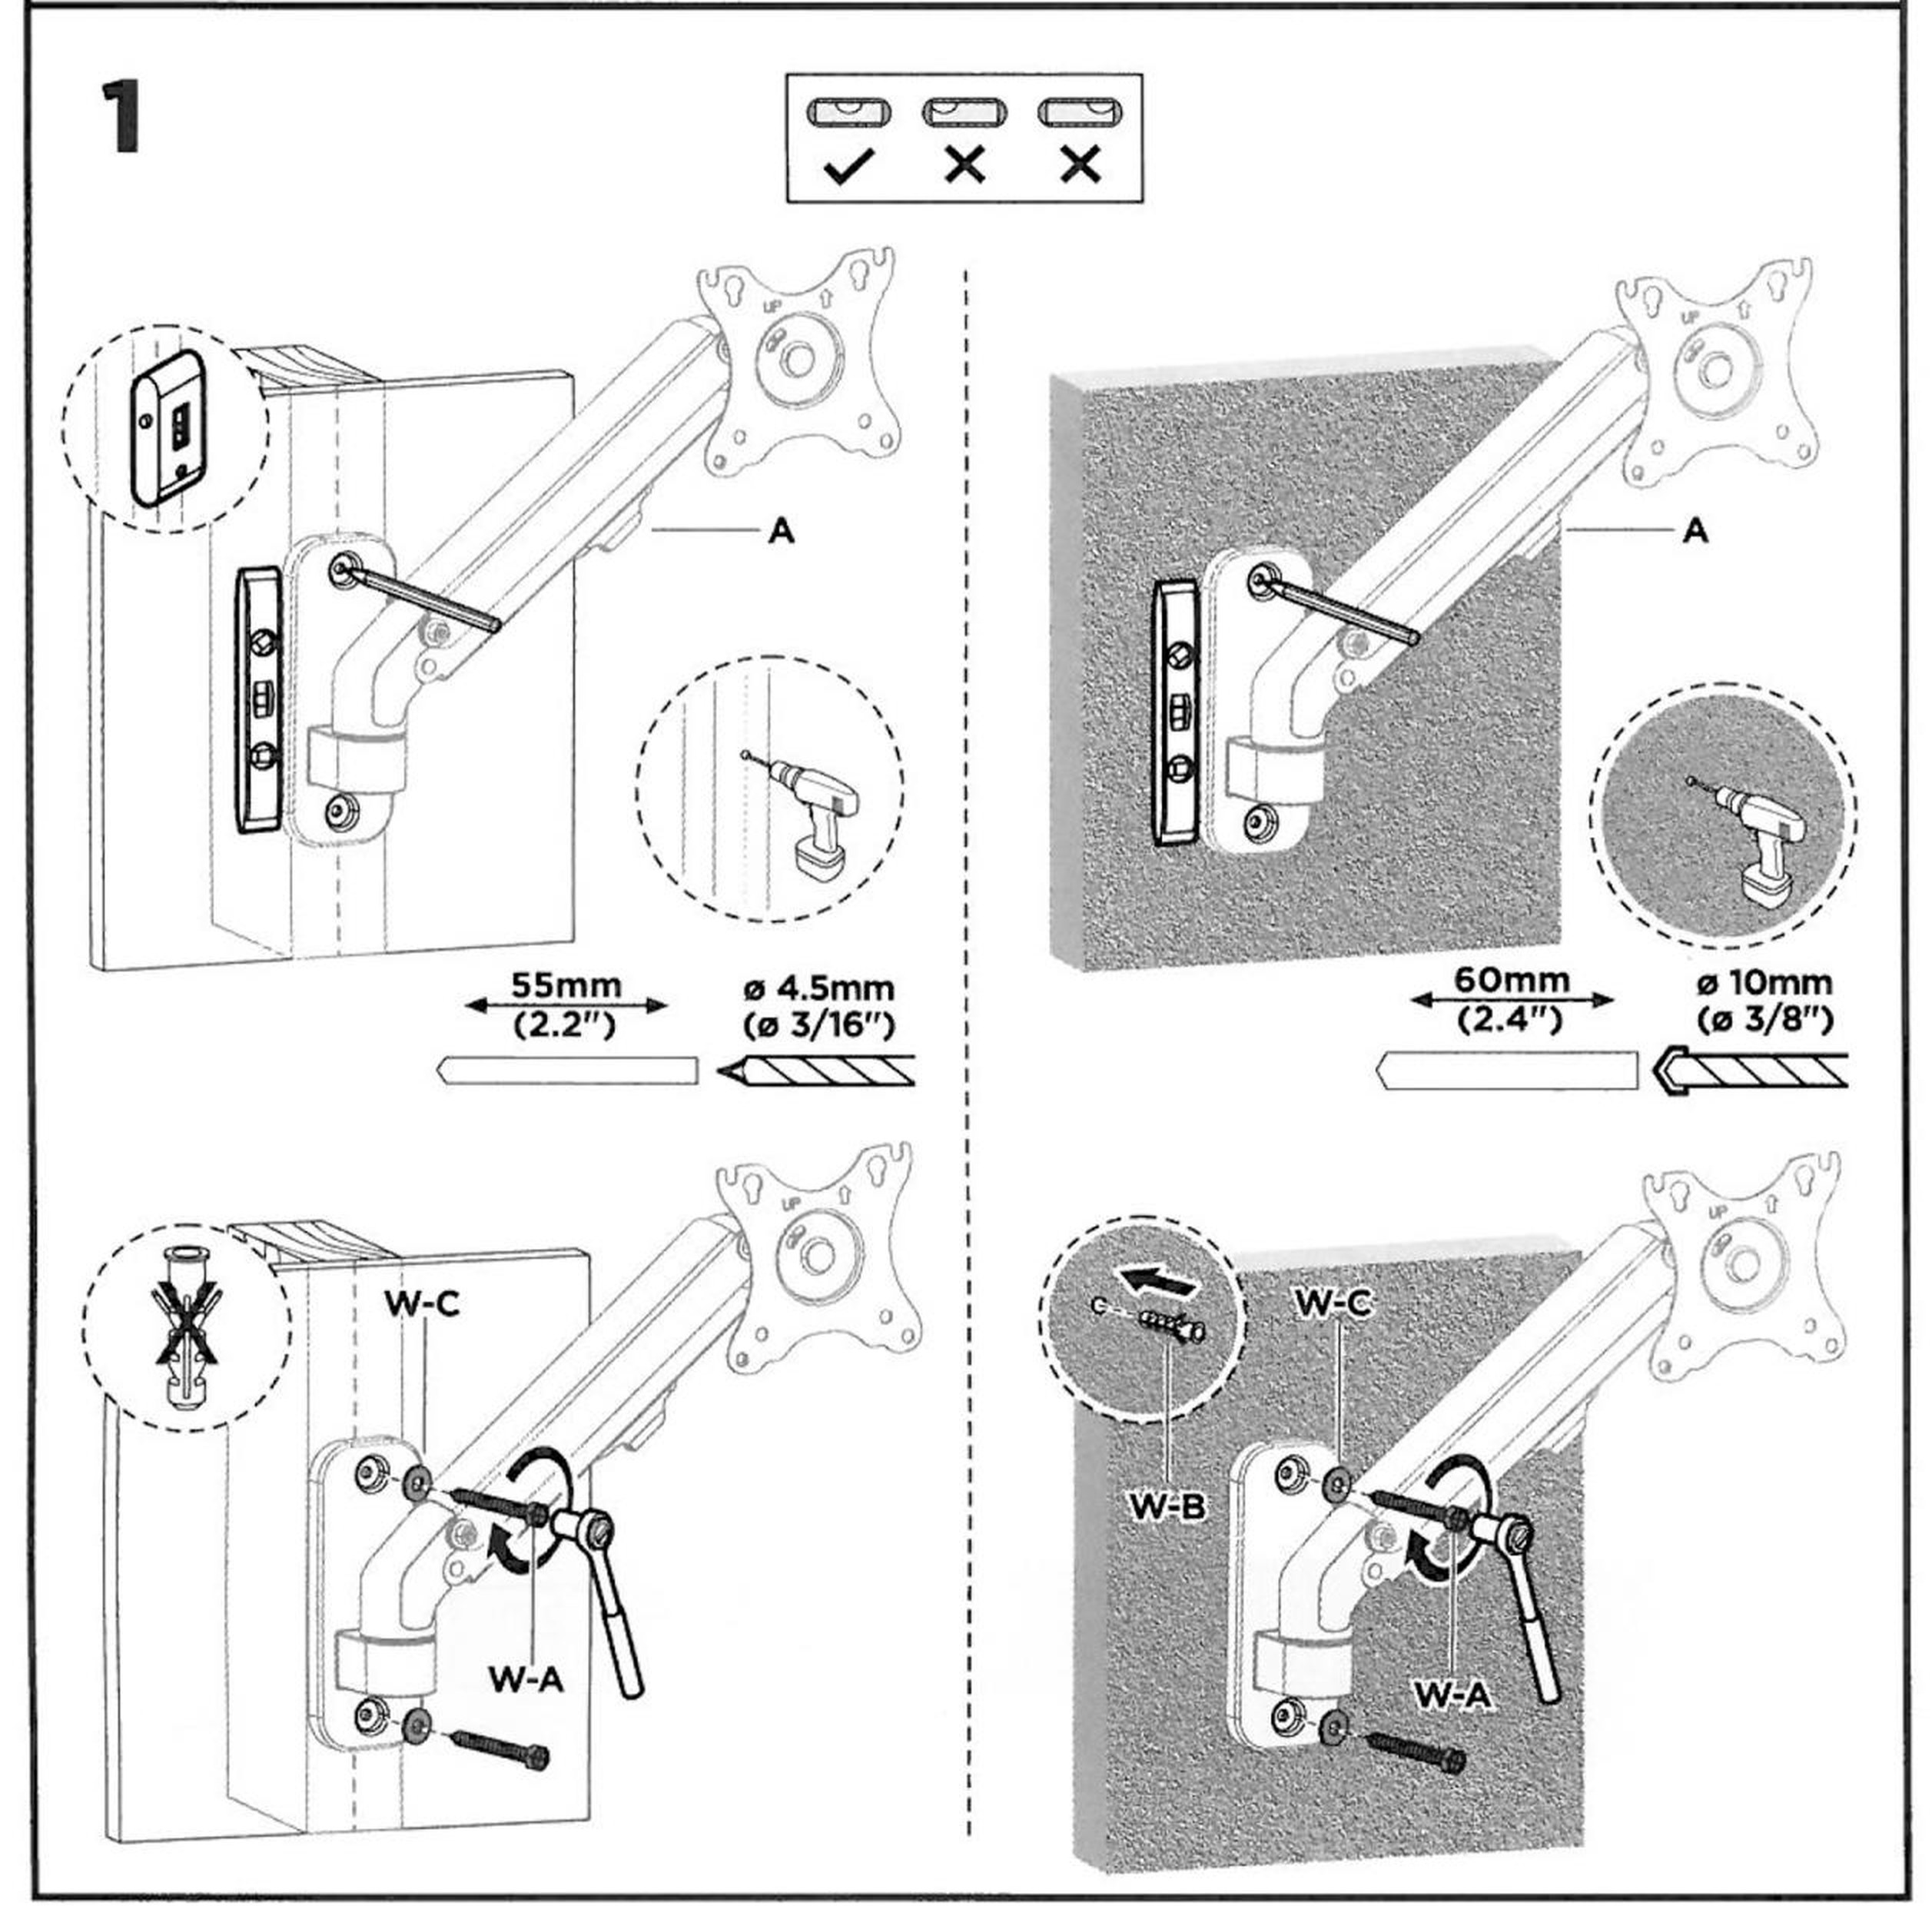
The wall plate is fixed either to a timber stud or to a solid masonry wall. Find the stud, hold the plate against the wall, level it with the spirit level — the bubble has to sit in the middle, as the inset shows — and mark the two holes.
Timber stud
- Drill the two holes with a Ø4.5 mm (3/16") bit, 55 mm deep, into the stud itself.
- Put a D6 washer (W-C) on each ST6.3 × 55 screw (W-A) and drive them straight into the timber. The wall plugs are not used here.
- Tighten both screws firmly and check the plate is still level.
Masonry wall
- Drill the two holes with a Ø10 mm (3/8") bit, 60 mm deep.
- Tap a Ø10 × 45 plug (W-B) into each hole.
- Put a D6 washer (W-C) on each ST6.3 × 55 screw (W-A), drive them into the plugs and tighten firmly.
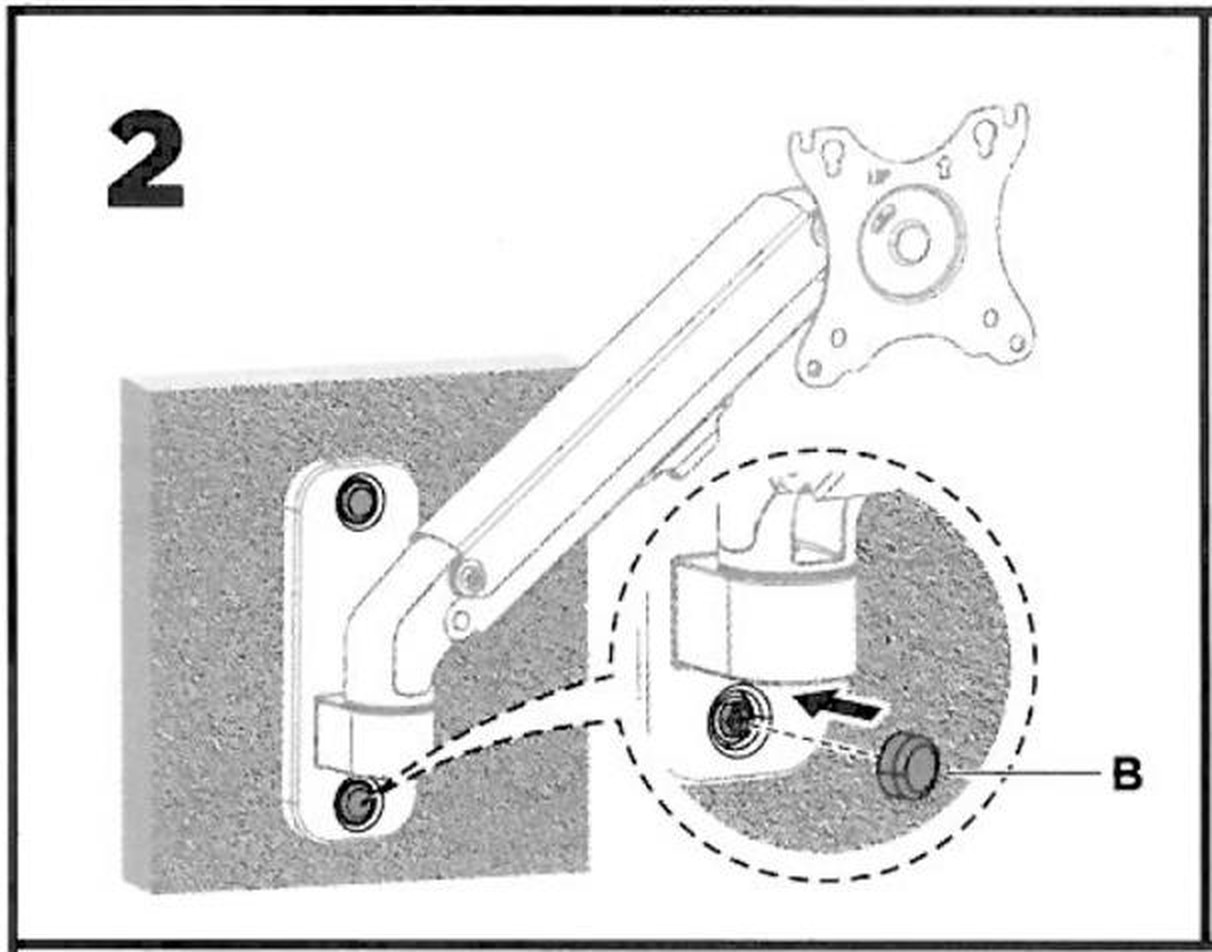
Step 2 — Fit the screw covers
Press the two covers (B) into the recesses over the screw heads on the wall plate.
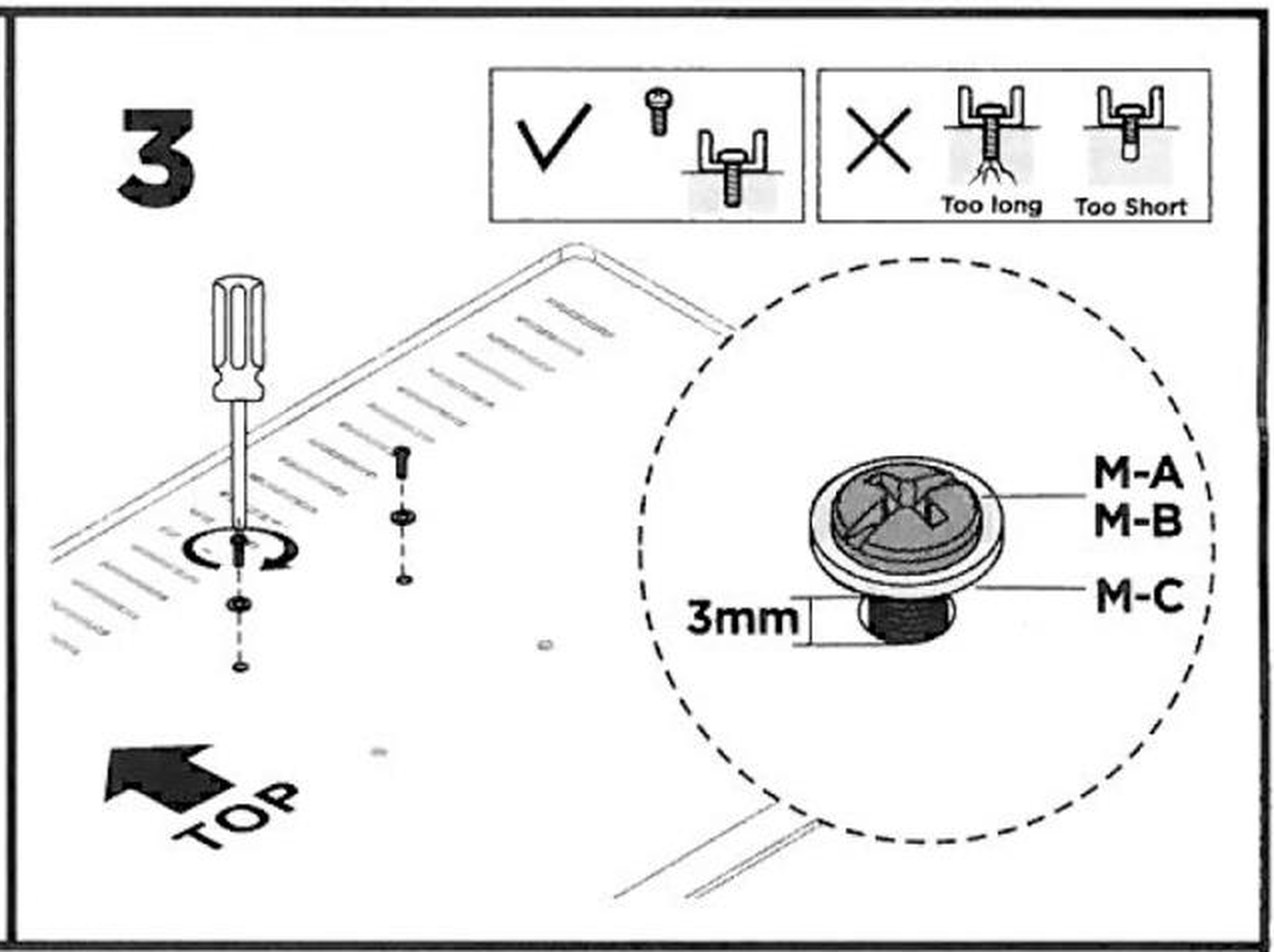
Step 3 — Fit the monitor screws
- Screw four screws with washers (M-C) into the VESA holes of the monitor: M4 × 12 (M-A) or M5 × 12 (M-B), whichever fits the thread. Choose the length that neither bottoms out nor is too short — the drawing shows the right and the wrong result.
- Leave each screw standing 3 mm proud of the monitor back — that is the gap the keyhole slots of the VESA head hook onto. The TOP mark on the head points up.
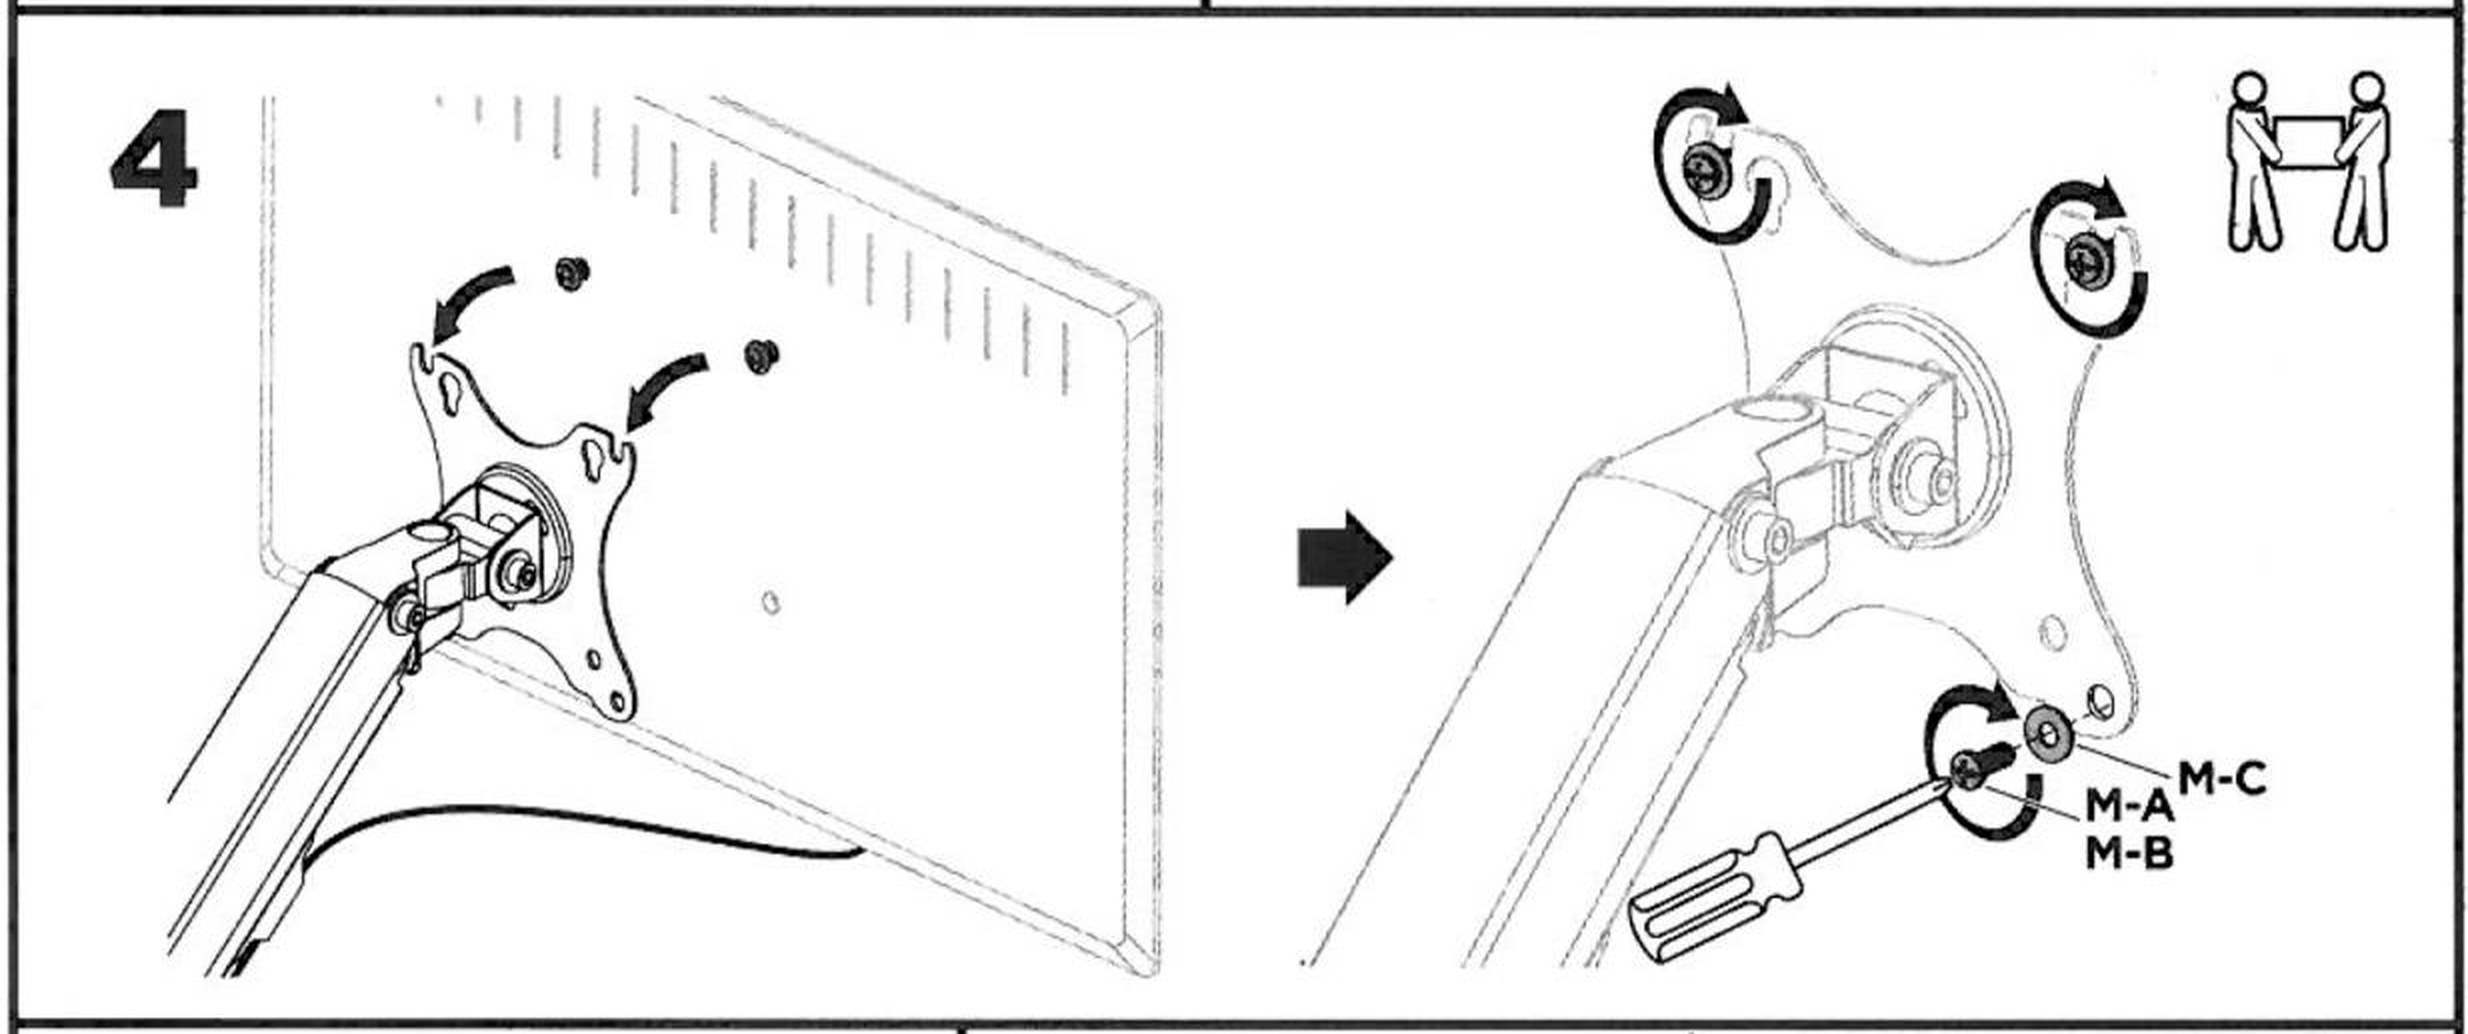
Step 4 — Hang the monitor
- With a second person holding the monitor, lower the four screw heads into the keyhole slots of the VESA head and let the monitor slide down until it seats.
- Tighten the four screws from behind with the screwdriver so the monitor cannot lift off the head.
Do not let go of the screen until all four screws have seated in the slots and are tightened.
Step 5 — Set the angle
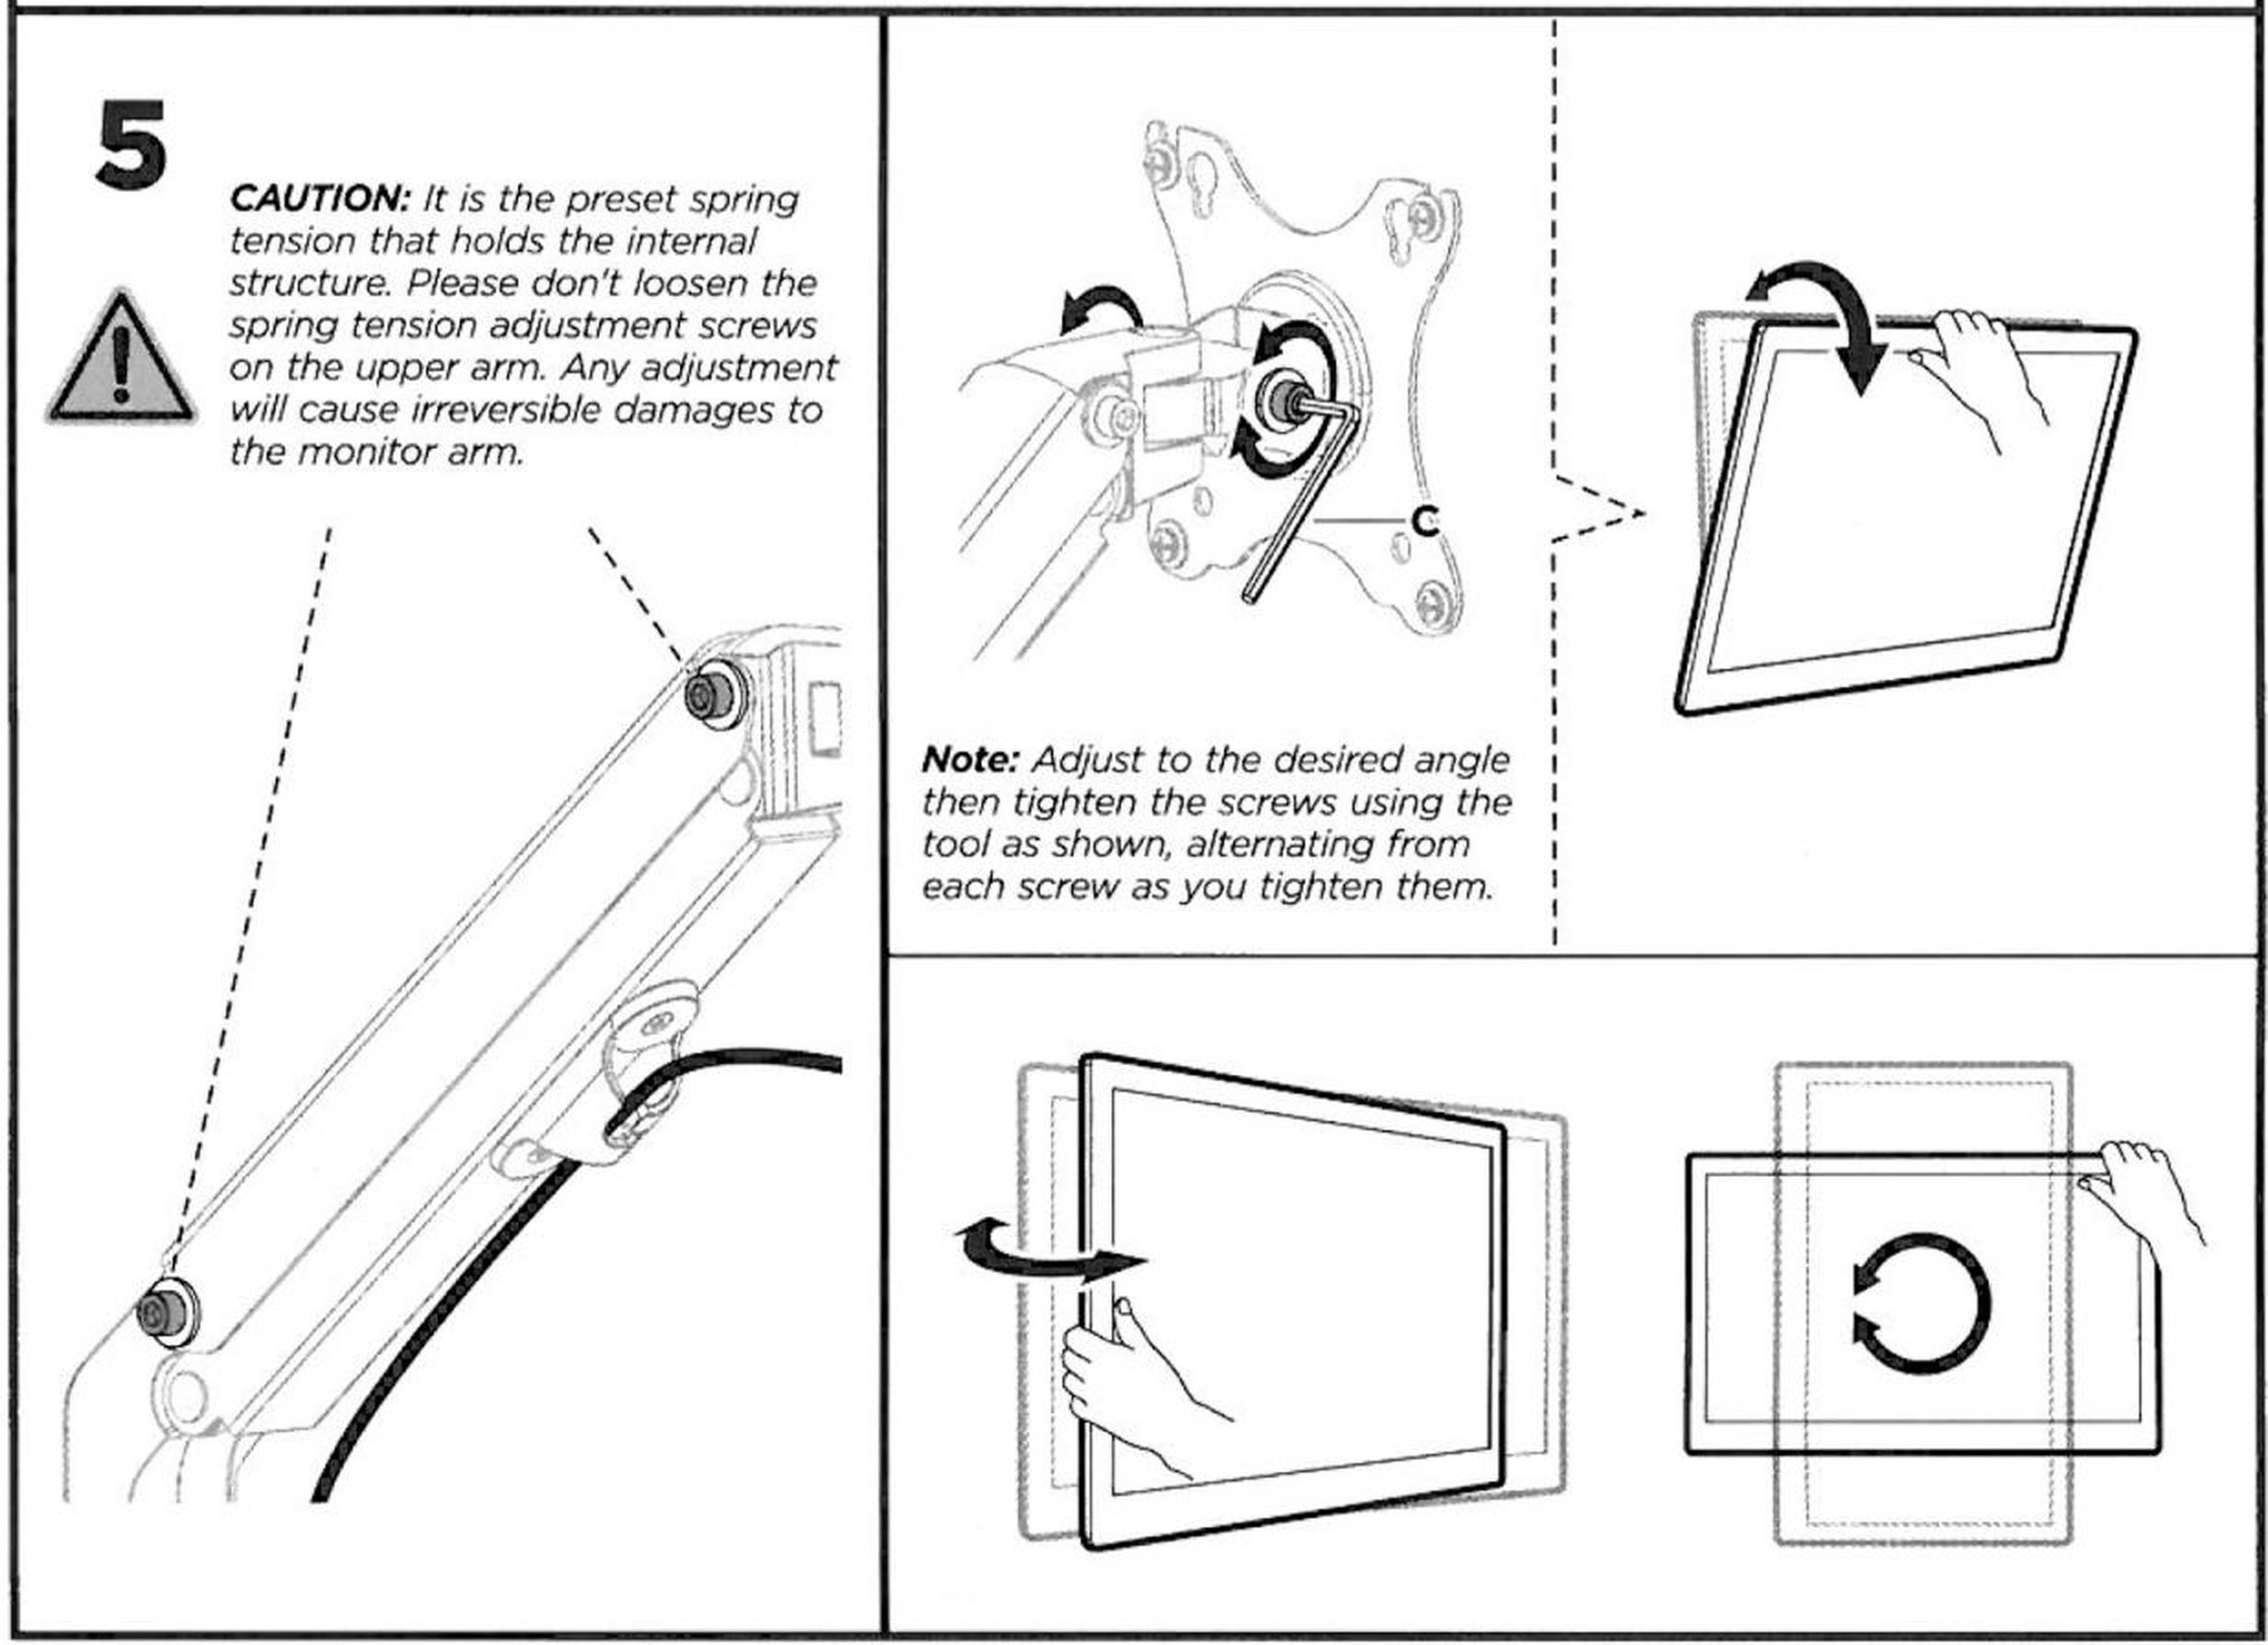
- Tilt the screen up or down by hand. If it does not stay at the angle you set, tighten the screws on the VESA head with the 5 mm Allen key (C) — a little at a time, alternating between them, as the drawing shows.
- Swivel the arm left or right and turn the screen to portrait by hand; both move without tools.
The spring tension is set at the factory and holds the whole mechanism. Never loosen the spring tension adjustment screws on the upper arm — any adjustment causes irreversible damage to the arm. Only the screws on the VESA head are meant to be adjusted.
Using the mount
Every adjustment is made by hand, without tools:
- Height — the spring holds the screen wherever you leave it
- Reach — up to 303 mm from the wall; the arm folds back against the wall when the screen is not needed
- Arm swivel — ±90°
- Screen tilt — +90° / −45°
- Screen rotation — ±180°, including 90° to portrait (pivot)
- Keep within the rating: a monitor of 2 to 7 kg
Safety instructions
Failure to read, understand and follow all instructions can result in serious personal injury or damage to equipment.
- Using the mount with a load above the rated capacity makes it unstable and can lead to injury.
- Follow the assembly instructions exactly. Incorrect installation can cause damage or serious personal injury.
- Make sure the wall will safely carry the combined weight of the mount, the monitor and all mounting hardware.
- Use the supplied mounting screws and do not overtighten them.
- The product contains small parts that can be a choking hazard if swallowed. Keep them away from children.
- The product is intended for indoor use only. Outdoor use can lead to failure of the product and to personal injury.
Frequently asked questions
Which monitors are compatible with SolidHand-AW01?
Can I rotate the monitor to portrait (vertical) orientation?
How difficult is the installation?
What kind of wall is needed?
Can I adjust the spring tension?
How far does the arm reach from the wall?
Downloads
The manufacturer’s manuals and datasheets in PDF, in case an offline copy is needed. Everything in them is on this page as well.