Gas-spring desk arm for one monitor, SolidHand-BG01BW
GTIN: 5907614668525 · SKU: SolidHand-BG01BW
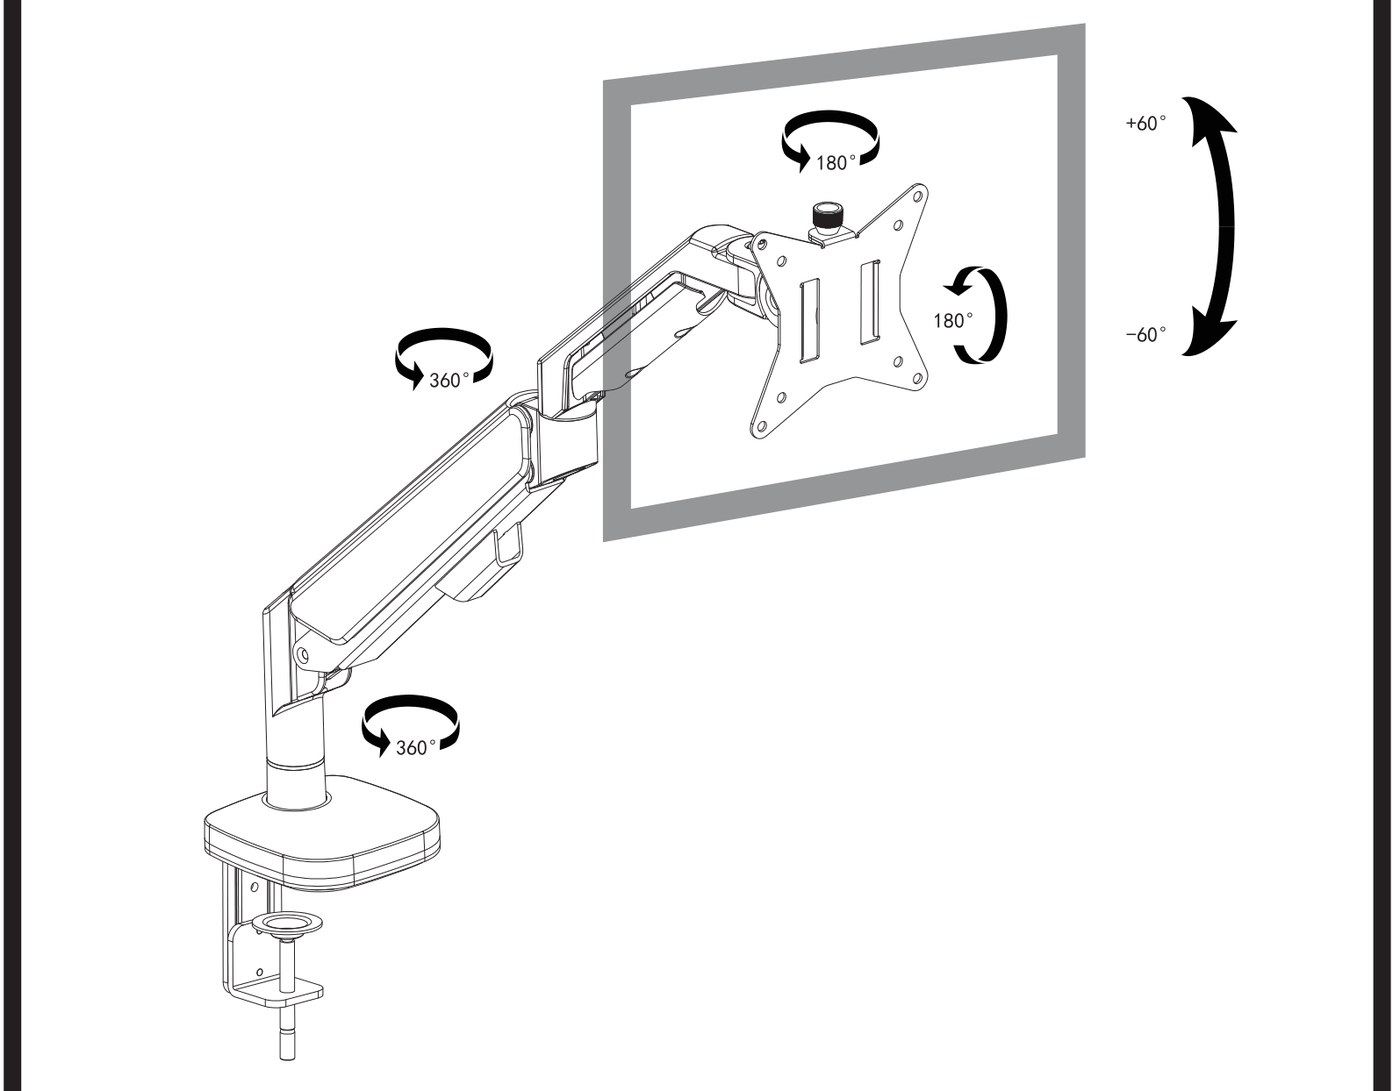
The SolidHand-BG01BW is a white aluminium desk arm for one monitor of 13 to 32 inches weighing 2 to 9 kg. A gas spring balances the weight of the screen, so it moves with a light push and stays wherever you leave it. The arm reaches up to 407 mm, the base and the joints turn 360°, the head tilts ±60° and rotates ±180°, so the screen can be turned to portrait. The base fixes to the desk with the clamp or through a hole in the desktop, and the cable runs under a cover on the arm.
Table of contents
Specifications
- Colour: white and black
- Material: aluminium
- Surface finish: powder coating
- Number of monitors: 1
- Monitor size: 13–32"
- Monitor weight: 2–9 kg
- VESA pattern: 75 × 75 mm, 100 × 100 mm
- Height adjustment: gas spring assisted
- Arm swivel: −90° to +90°
- Monitor rotation: −180° to +180°
- Monitor tilt: −60° to +60°
- Maximum arm reach: 407 mm
- Mounting: desk clamp or grommet
- Desktop thickness for the clamp: 10–80 mm
- Mount dimensions: height 16–40.7 cm, length 21.9–27.4 cm
- Package dimensions: 21 × 43 × 12 cm
- Weight of the arm: 2 kg
- Weight with packaging: 2.86 kg
Kit contents
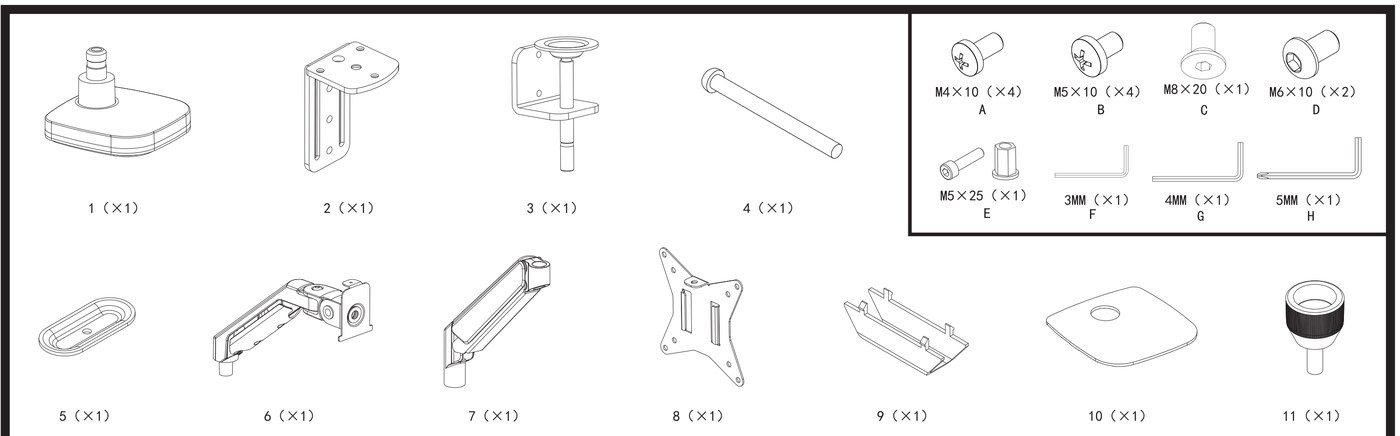
- 1 — base with column (× 1)
- 2 — clamp bracket (× 1), 3 — clamp with bolt (× 1)
- 4 — long grommet bolt (× 1), 5 — grommet plate (× 1)
- 6 — lower arm (× 1), 7 — upper arm with gas spring (× 1)
- 8 — VESA plate (× 1), 9 — cable cover (× 1)
- 10 — base cover plate (× 1), 11 — locking cap (× 1)
- A — M4 × 10 mm monitor bolt (× 4), B — M5 × 10 mm monitor bolt (× 4)
- C — M8 × 20 mm bolt (× 1), D — M6 × 10 mm bolt (× 2), E — M5 × 25 mm bolt (× 1)
- F — 3 mm Allen key, G — 4 mm Allen key, H — 5 mm Allen key (× 1 each)
Before you start
Assembly takes about twenty minutes. Prepare the following:
- Read the whole manual before you begin and follow the assembly instructions exactly
- Check that you have received every part from the list above; if anything is missing or faulty, contact us before assembling
- All three Allen keys are in the kit — no other tools are needed
- A second person to hold the monitor while it is hung on the arm
- A monitor of 13–32" with VESA 75 × 75 or 100 × 100 holes, weighing between 2 and 9 kg
Using the arm with a load heavier than the rated weight can make it unstable and cause injury.
Safety instructions
- Follow the assembly instructions exactly. Incorrect installation can damage the equipment or cause serious personal injury.
- Make sure the supporting surface will safely carry the combined weight of the equipment and all mounting hardware and components.
- Use the mounting bolts supplied and do not overtighten them.
- The product contains small parts that can be a choking hazard if swallowed. Keep them away from children.
- The product is intended for indoor use only. Using it outdoors can lead to product failure and injury.
Maintenance
At regular intervals — at least every three months — check that the arm is firmly fixed and safe to use.
Assembly
Step 1 — Fix the base to the desk
The base (1) can be fixed to the desk in two ways: with the clamp on the edge of the desktop (option A) or through a hole in the desktop with the long bolt and the grommet plate (option B).
Option A — desk clamp
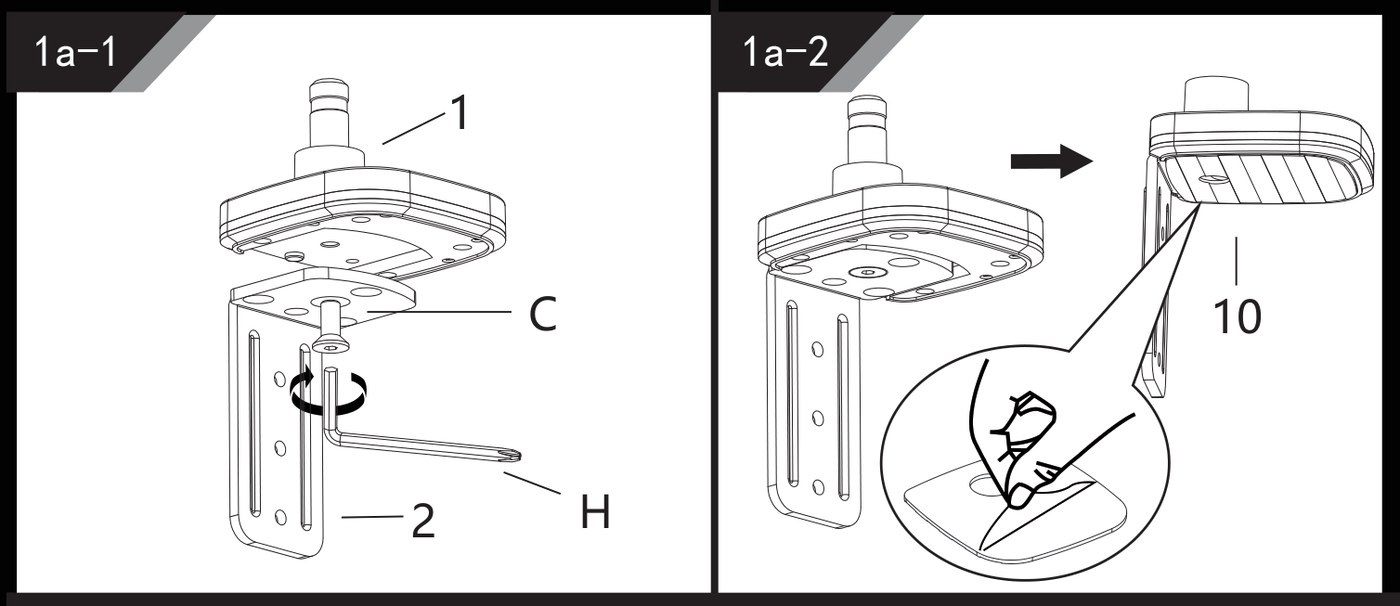
- Bolt the clamp bracket (2) to the underside of the base (1) with the M8 × 20 mm bolt (C) and tighten it with the 5 mm Allen key (H) (fig. 1a-1). Then snap the cover plate (10) onto the base so that it hides the bolt (fig. 1a-2).
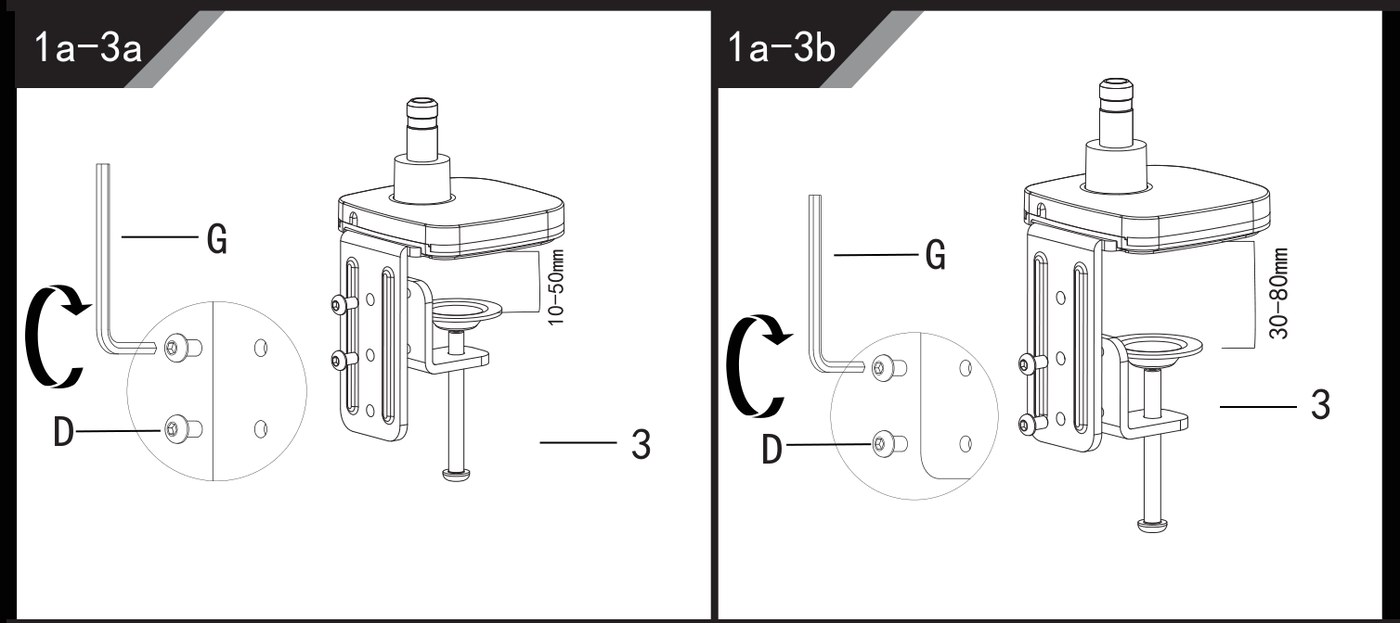
- Bolt the clamp (3) to the bracket (2) with the two M6 × 10 mm bolts (D), using the 4 mm Allen key (G). Choose the pair of holes to match the thickness of your desktop: the upper holes for a desktop of 10–50 mm (fig. 1a-3a), the lower holes for 30–80 mm (fig. 1a-3b).
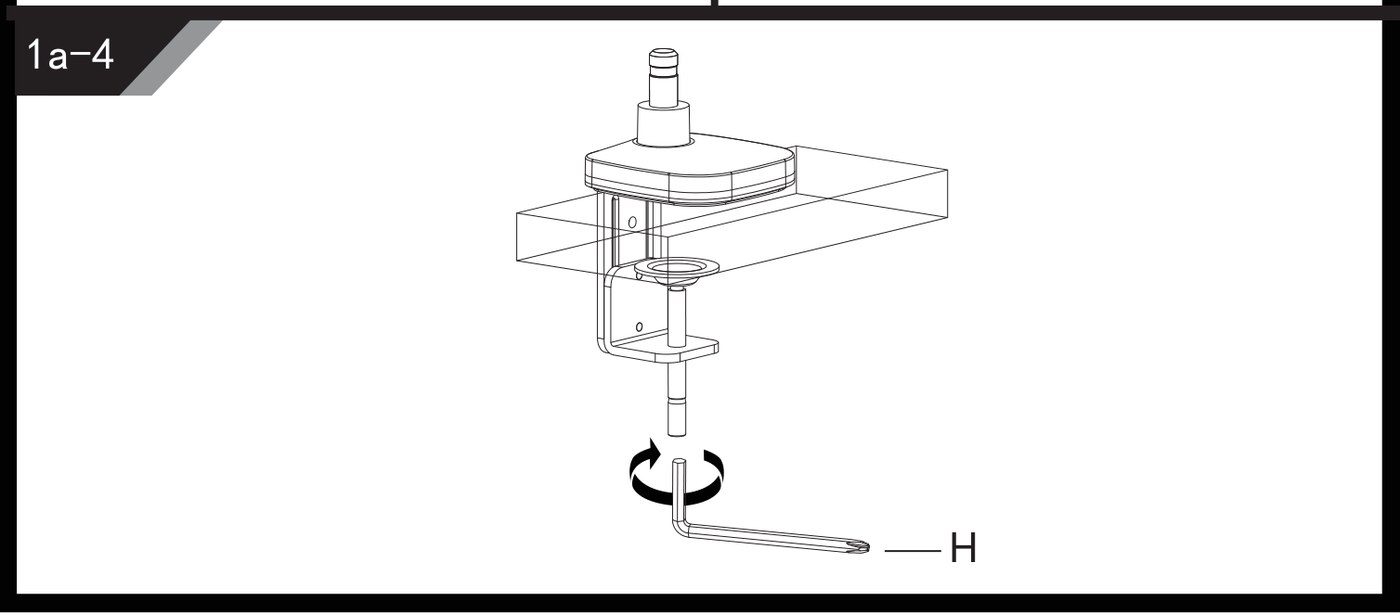
- Hook the clamp over the edge of the desk and tighten the clamp bolt from below with the 5 mm Allen key (H) until the base stands firm (fig. 1a-4).
Option B — through a hole in the desktop
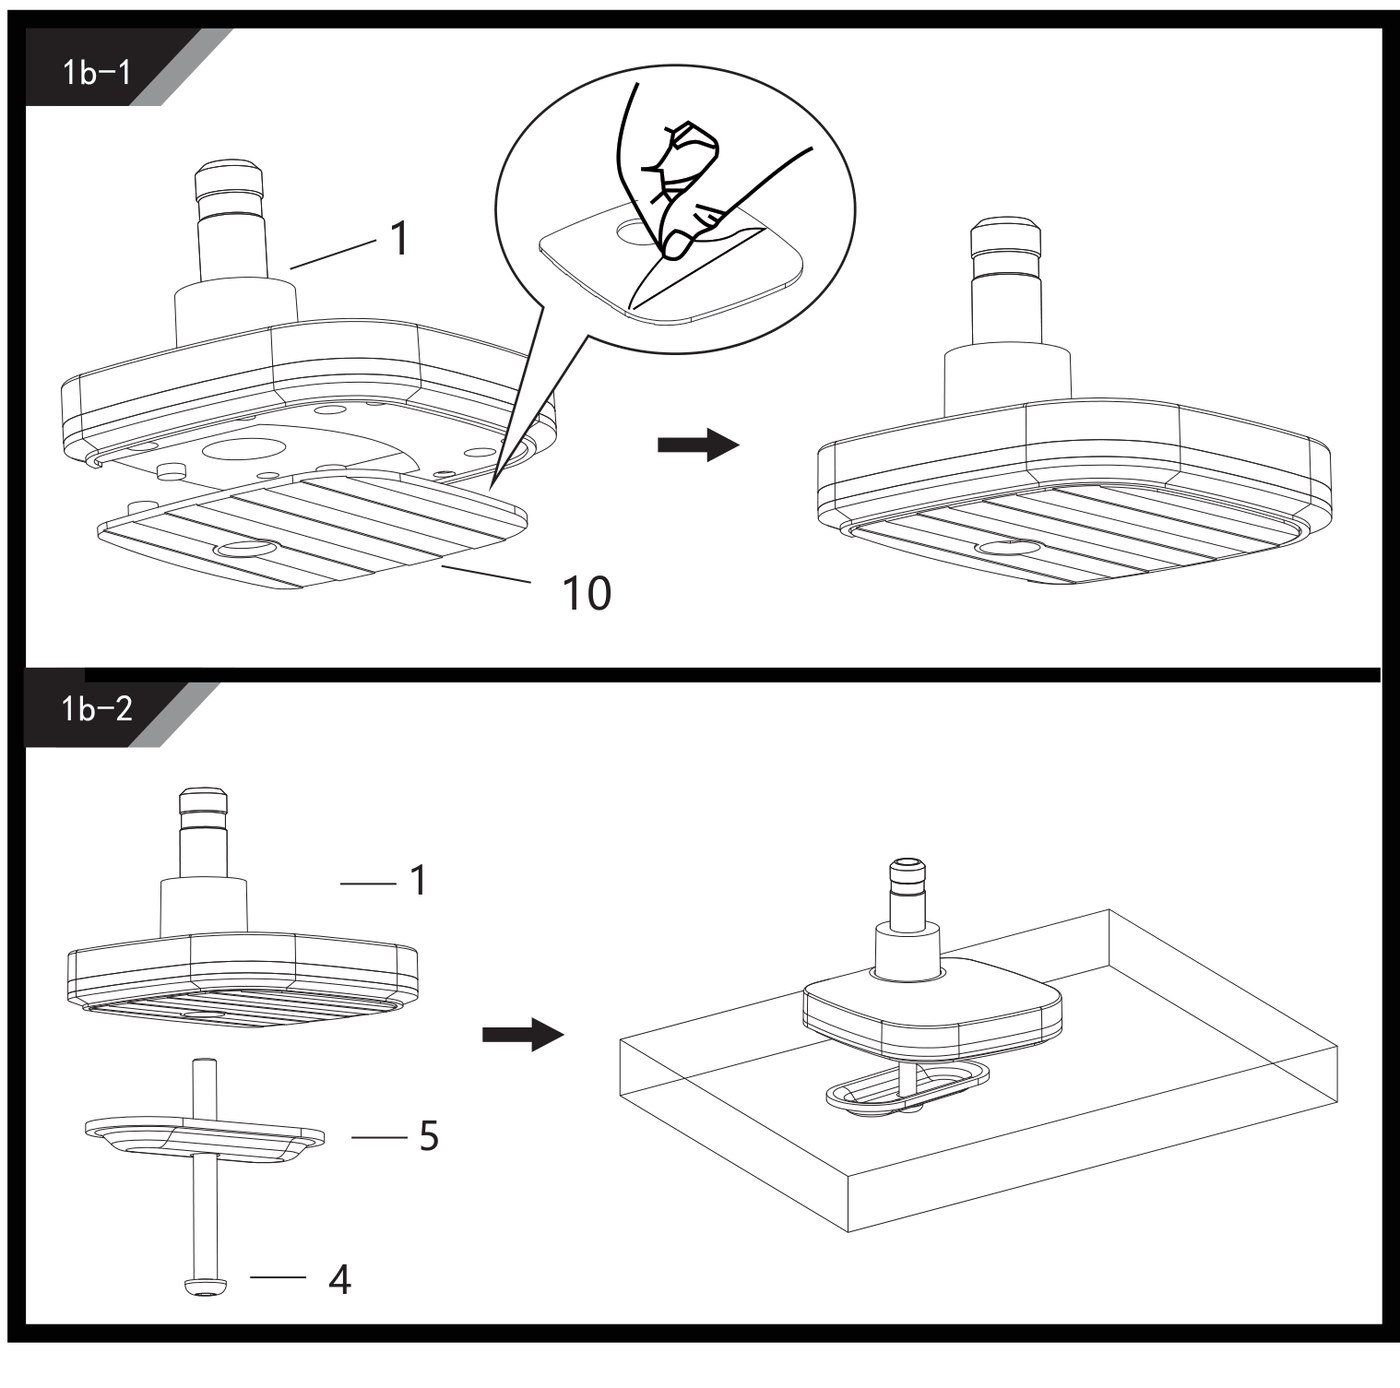
- Snap the cover plate (10) onto the base (1) (fig. 1b-1).
- Pass the long bolt (4) through the grommet plate (5) and up through the hole in the desktop, screw it into the base and tighten until the base stands firm on the desk (fig. 1b-2).
Step 2 — Fit the arms
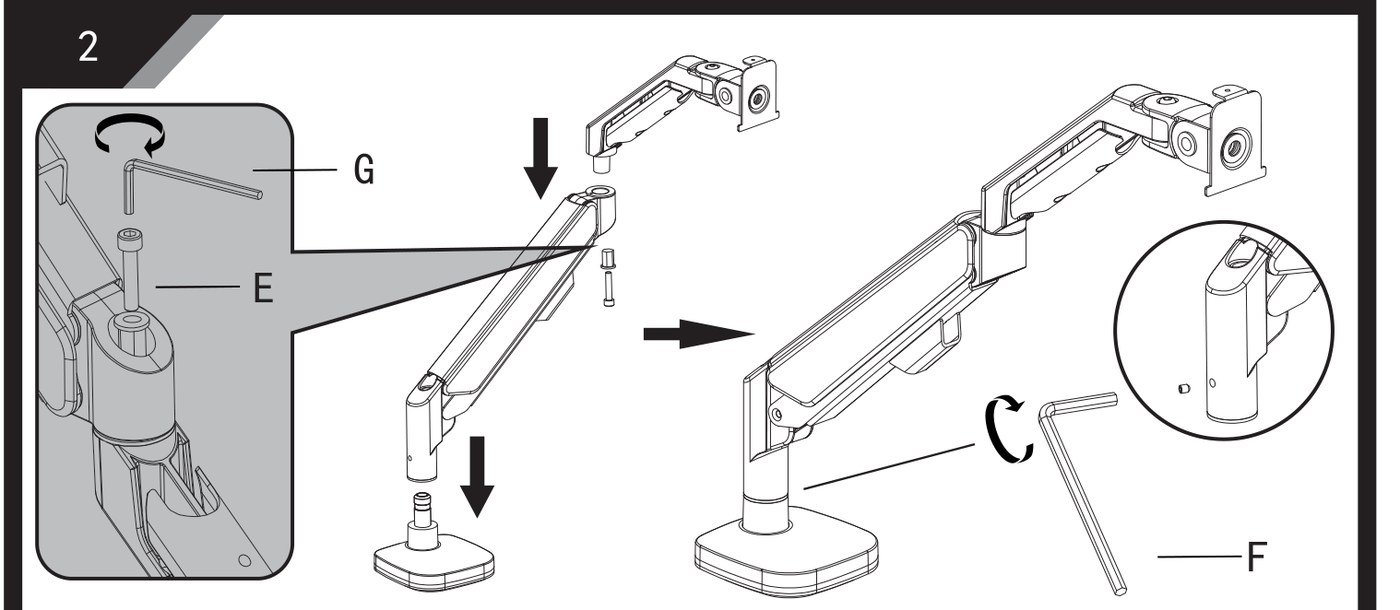
- Slide the lower arm (6) onto the column of the base and the upper arm (7) onto the pin of the lower arm.
- Lock the joint of the two arms with the M5 × 25 mm bolt (E), tightened with the 4 mm Allen key (G).
- Tighten the locking screw on the column with the 3 mm Allen key (F) so that the arm cannot lift off the base.
Step 3 — Fit the VESA plate to the monitor
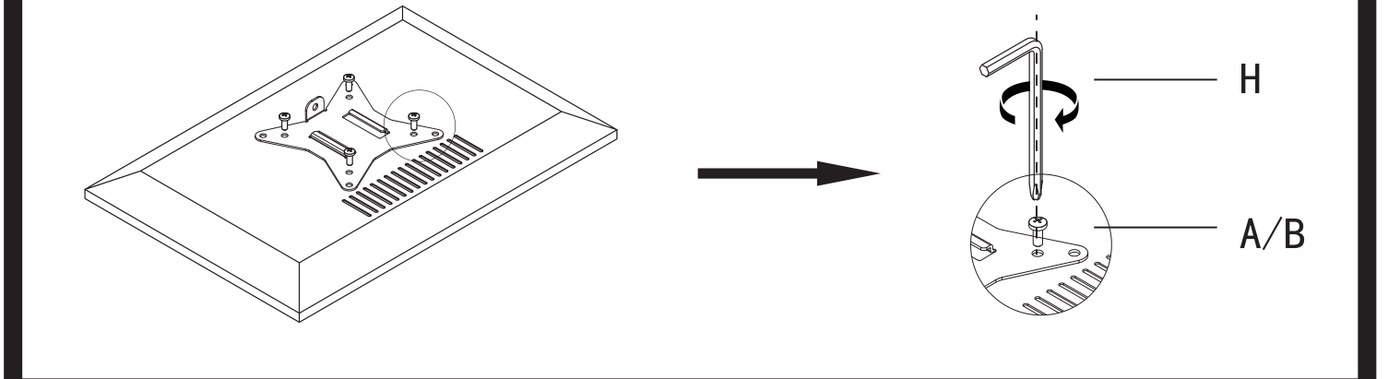
Screw the VESA plate (8) to the back of the monitor with four bolts — M4 × 10 mm (A) or M5 × 10 mm (B), whichever fit the threads of your monitor — using the 5 mm Allen key (H). Tighten them by hand with the key, not with a power tool: overtightening can damage the monitor.
Step 4 — Hang the monitor
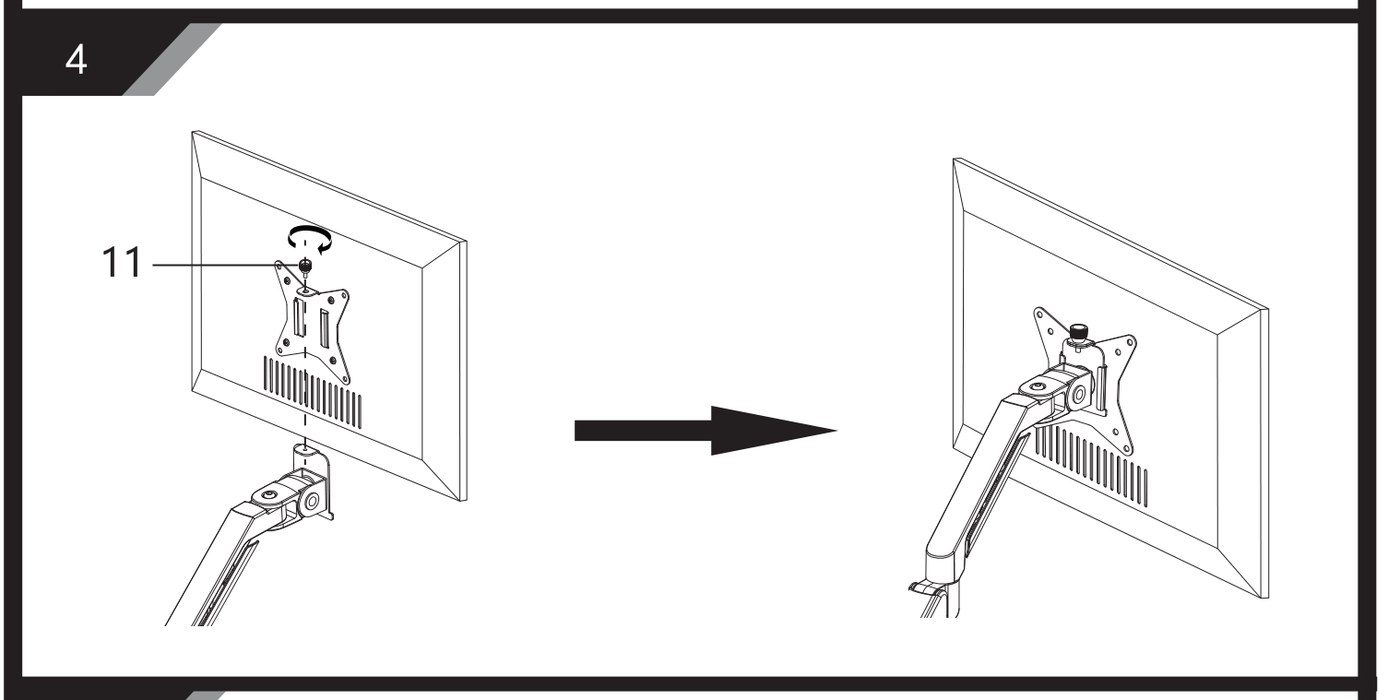
- With a second person holding the monitor, slide its VESA plate down onto the head of the upper arm as shown.
- Screw the locking cap (11) onto the pin at the top of the head so that the monitor cannot lift off.
Do not let go of the monitor until the locking cap (11) is screwed on.
Step 5 — Set the gas spring to the weight of the monitor
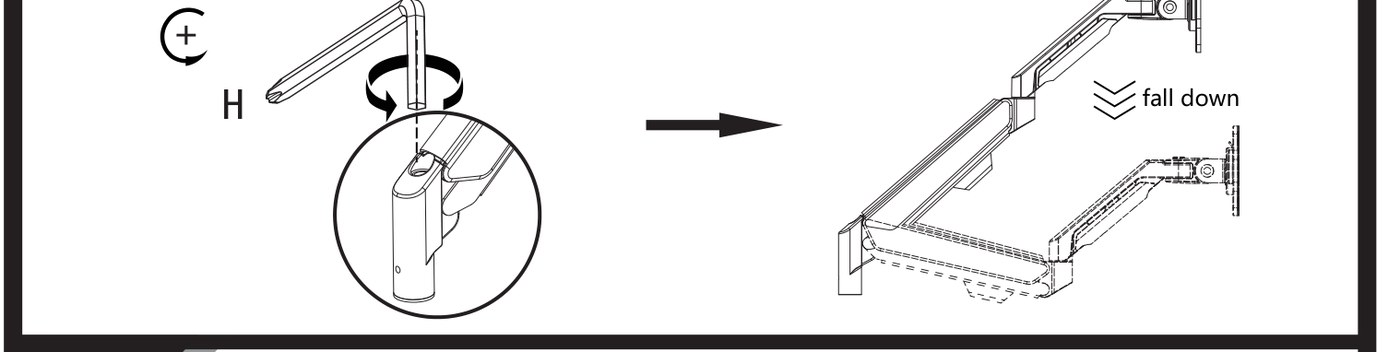
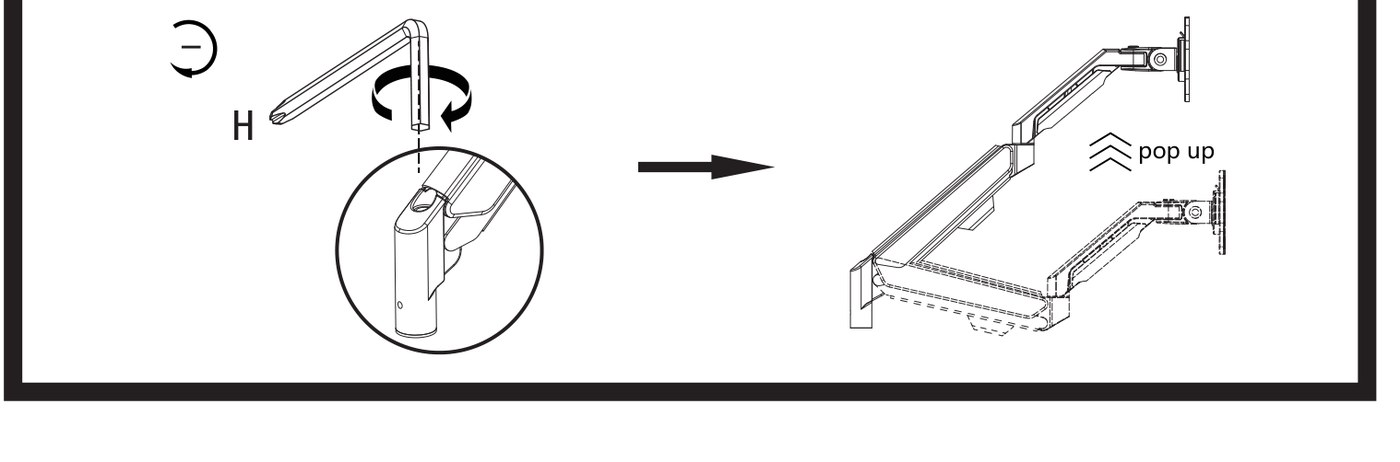
The tension screw sits in the upper arm, next to the joint with the head. Hold the arm horizontal with one hand and turn the screw with the 5 mm Allen key (H) — it may take many turns:
- The arm sinks under the monitor (fig. 5-1): turn the screw counter-clockwise (+) to increase the tension until the arm holds the weight.
- The arm rises on its own (fig. 5-2): turn the screw clockwise (−) to reduce the tension until the arm stays where you put it.
Step 6 — Set the tilt friction
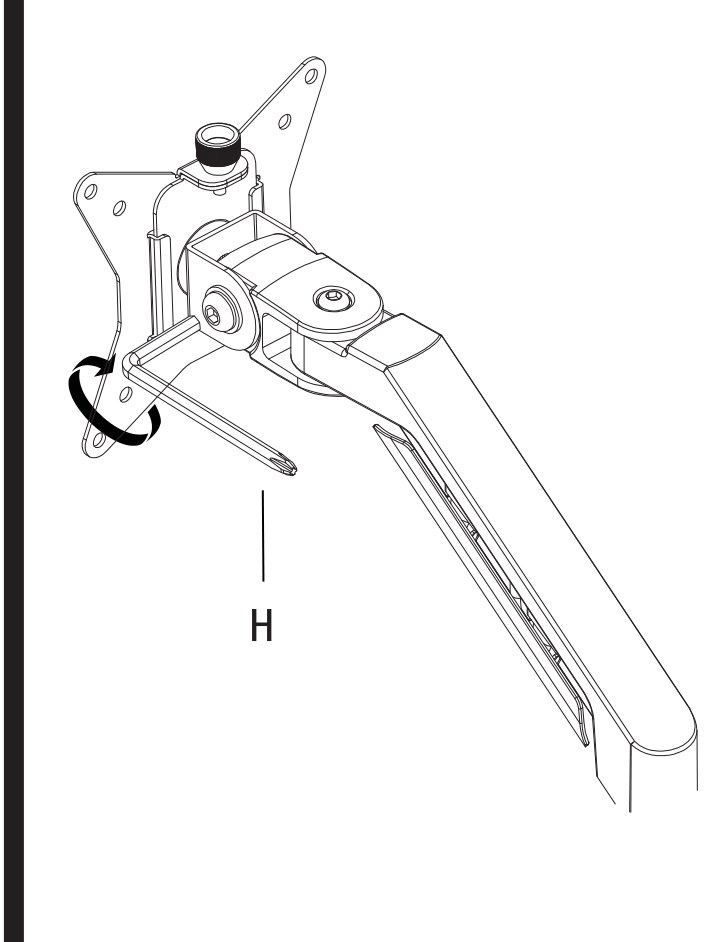
If the screen tilts too stiffly or too loosely, adjust the screw on the tilt joint of the head with the 5 mm Allen key (H): clockwise to tighten, counter-clockwise to loosen.
Step 7 — Route the cable
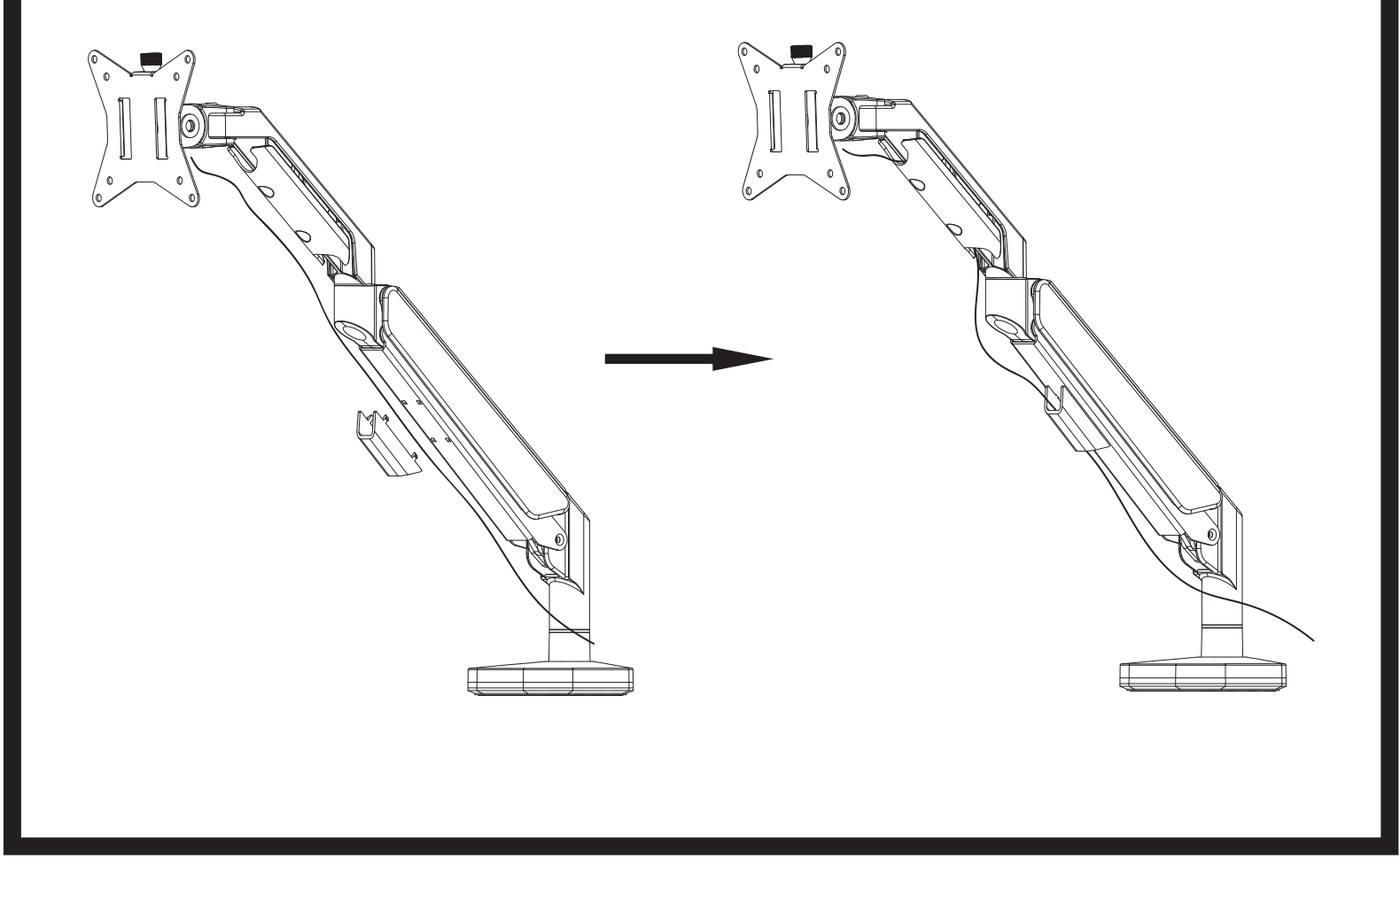
Lay the monitor cable along the arm and clip the cable cover (9) onto the lower arm over it. Leave enough slack at the joints for the full movement of the arm.
Step 8 — The arm is ready
The drawing shows the movement ranges: the base and the arm joint turn 360°, the head swivels 180° and pivots 180° to portrait, and the screen tilts from −60° to +60°.
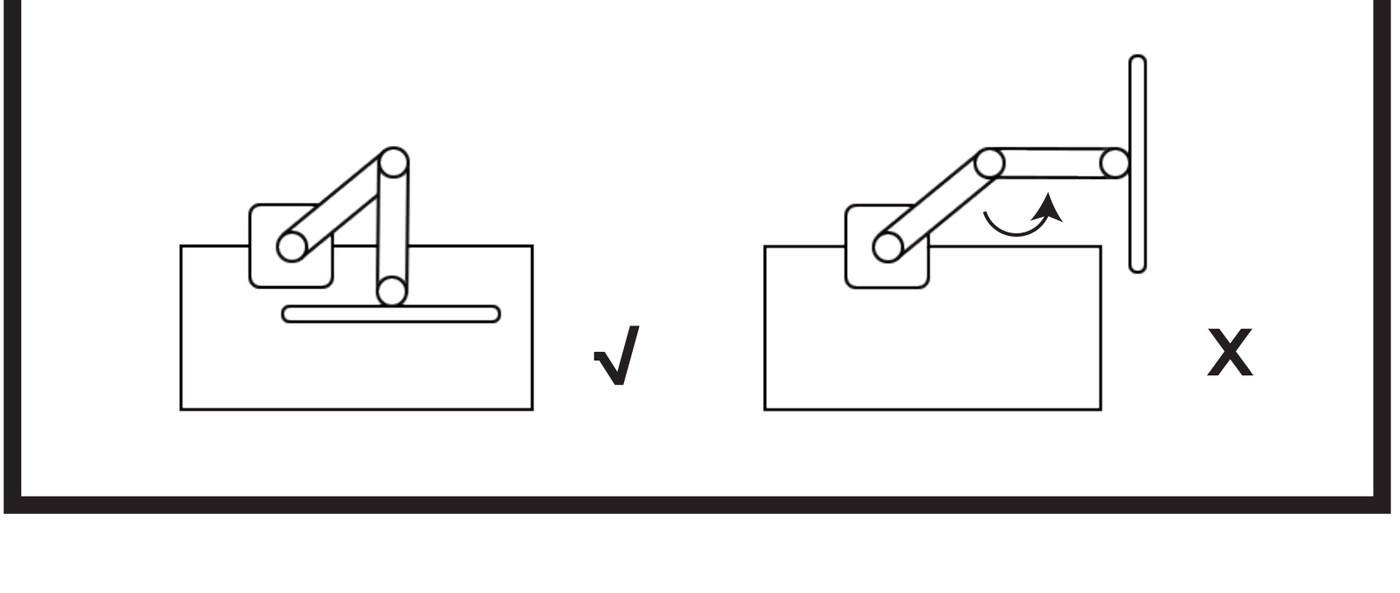
Do not swing the monitor out beyond the edge of the desk — the arm becomes unstable and can tip over or be damaged.
Using the arm
Once the tension is set, everything is moved by hand:
- Height and reach — take the screen and move it; the gas spring holds it in place (reach up to 407 mm)
- Swivel — 360° at the base and at the arm joint, ±90° at the head
- Tilt — from −60° to +60°
- Rotation — ±180°, so the screen can be turned to portrait
- Load — one monitor of 2 to 9 kg; readjust the tension screw when you change the monitor
- Keep the monitor above the desktop — never swing it out beyond the edge
Frequently asked questions
What monitor sizes and standards are supported?
What is the maximum load?
How can I mount the stand to my desk?
What range of motion does the arm provide?
Does the mount have USB ports?
The arm sinks or rises on its own — what should I do?
Downloads
The manuals and datasheets in PDF, in case an offline copy is needed. Everything in them is on this page as well.