Spring-assisted desk arm for one monitor, SolidHand-GS01
GTIN: 5906935201480 · SKU: SolidHand-GS01
The SolidHand-GS01 carries one monitor of 17 to 32 inches weighing between 2 and 9 kg. A mechanical spring inside the upper arm balances the screen, so once the tension is set to match its weight you move it up and down with one hand and it stays where you leave it. The arm reaches up to 450 mm from the base, the screen sits between 158 and 406 mm above the desk, and the base fixes to the desk with the clamp or through a hole in the desktop.
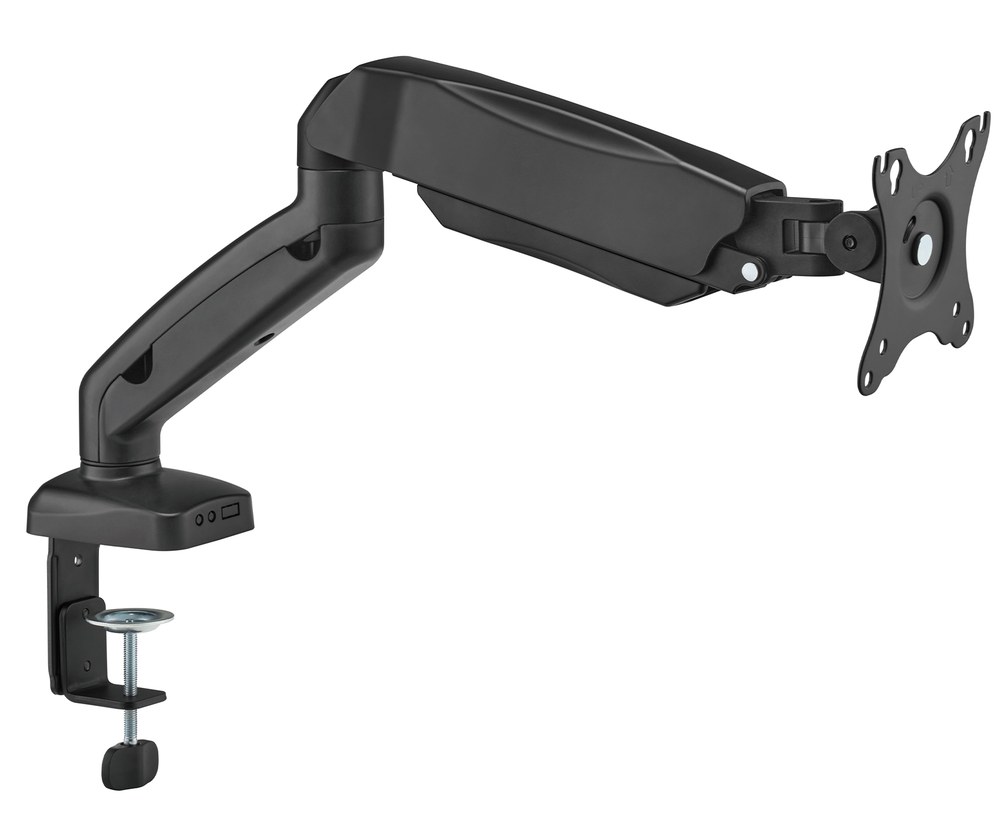
Table of contents
Specifications
- Colour: black
- Material: aluminium, steel, plastic
- Surface finish: powder coating
- Number of monitors: 1
- Monitor diagonal: 17–32 inches
- VESA standard: 75 × 75 mm, 100 × 100 mm
- Monitor weight: 2–9 kg
- Height adjustment: mechanical spring assisted
- Height above the desk: 158–406 mm
- Arm rotation range: +90° ~ −90°
- Monitor rotation range: +180° ~ −180°
- Monitor tilt range: +90° ~ −45°
- Maximum arm reach: 450 mm
- Mounting: desk clamp or grommet
- Desktop thickness: 10–80 mm with the clamp, 10–45 mm through a grommet hole
- Grommet hole: Ø 10–60 mm existing, or Ø 10 mm drilled
- Mount dimensions: 117 × 478 × 585 mm
- Package dimensions: 37 × 18 × 13 cm
- Mount weight: 2.2 kg
- Weight with packaging: 2.6 kg
Kit contents
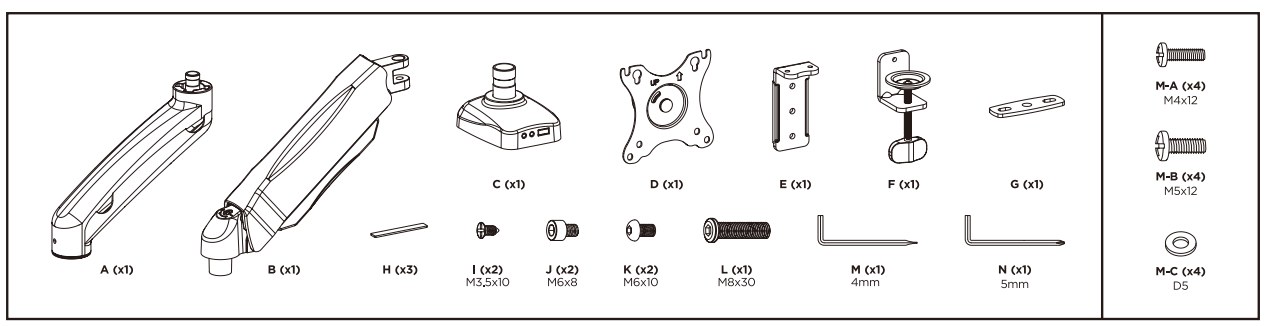
- A — lower arm (× 1)
- B — upper arm with the spring (× 1)
- C — base (× 1)
- D — VESA plate (× 1)
- E — clamp bracket (× 1)
- F — desk clamp (× 1)
- G — grommet plate (× 1)
- H — cover strip (× 3)
- I — M3.5 × 10 screw (× 2)
- J — M6 × 8 screw (× 2)
- K — M6 × 10 screw (× 2)
- L — M8 × 30 screw (× 1)
- M — 4 mm Allen key (× 1)
- N — 5 mm Allen key (× 1)
Monitor screws:
- M-A — M4 × 12 (× 4)
- M-B — M5 × 12 (× 4)
- M-C — D5 washer (× 4)
Before you start
Allow about half an hour. Have ready:
- A second person for hanging the monitor and for the spring adjustment — the manual asks for help at both stages
- Both Allen keys (M, N) from the kit and a screwdriver for the monitor screws
- For the clamp: a free desk edge with a desktop 10 to 80 mm thick
- For the grommet: an existing hole of Ø 10–60 mm in a desktop 10 to 45 mm thick, or a drill with a Ø 10 mm bit
- A check that the monitor weighs between 2 and 9 kg and has 75 × 75 or 100 × 100 VESA holes
The spring is matched to a load of 2 to 9 kg. A screen lighter than 2 kg will be pushed up by the spring even at the lowest tension, and one heavier than 9 kg will sink — neither can be corrected with the adjustment screw.
Assembly
Step 1 — Fix the base to the desk
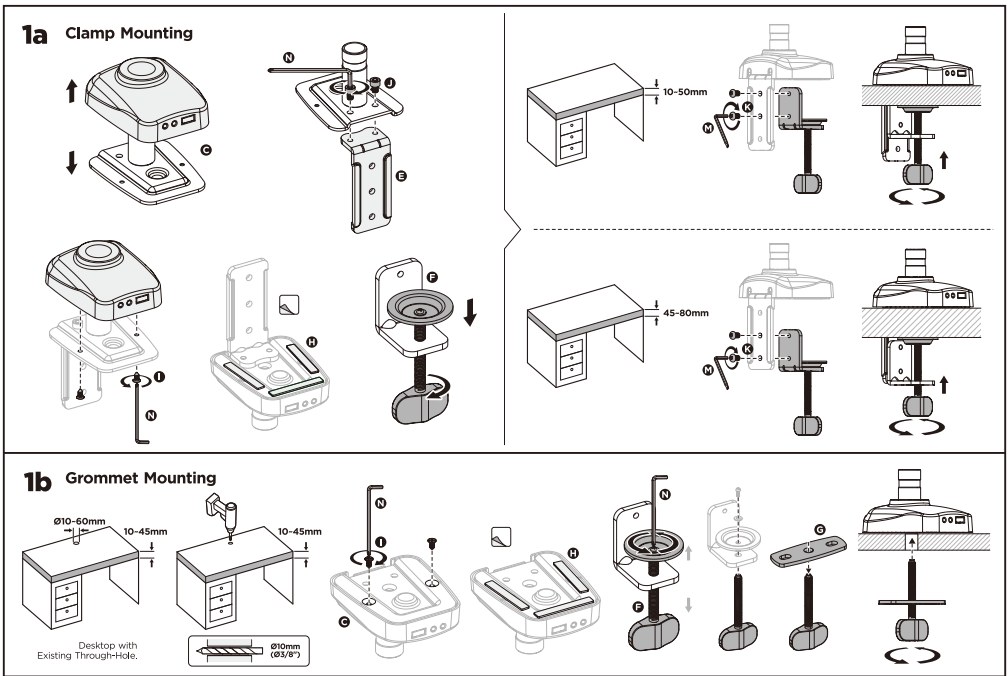
The base mounts in one of two ways. Choose one before you start.
Option 1a — desk clamp (desktop 10–80 mm)
- Fasten the clamp bracket (E) to the base (C) with the screws (K), using the 4 mm Allen key (M). The bracket has two pairs of holes: use the upper pair for a desktop of 10–50 mm and the lower pair for 45–80 mm.
- Fit the clamp (F) into the bracket and place the assembly on the edge of the desk.
- Turn the clamp screw until its pad presses firmly against the underside of the desktop.
Option 1b — grommet (desktop 10–45 mm)
- Use an existing cable hole of Ø 10–60 mm, or drill a Ø 10 mm hole where the base is to stand.
- Fasten the grommet fitting to the base (C) with the screws (I), using the 5 mm Allen key (N), and stick the pads (H) to the underside of the base.
- Pass the bolt through the hole, fit the plate (G) from underneath and tighten it against the desktop.
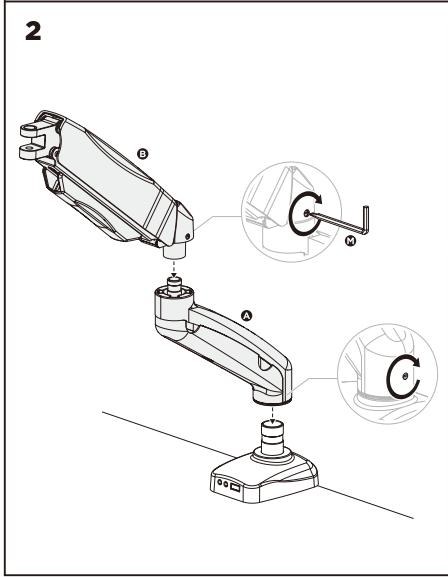
Step 2 — Fit the arm to the base
- Slide the lower arm (A) onto the post of the base (C) from above.
- Push it down until it seats fully, then secure it as shown with the screw supplied for the joint.
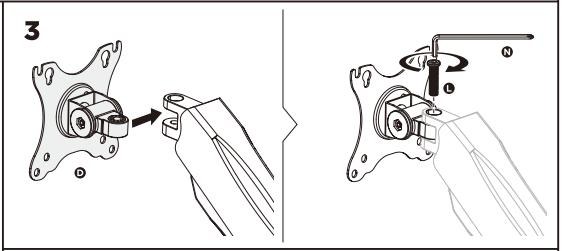
Step 3 — Attach the VESA plate to the arm
- Fit the VESA plate (D) onto the head at the end of the upper arm (B).
- Secure it with the screw (J) and tighten it with the 4 mm Allen key (M).
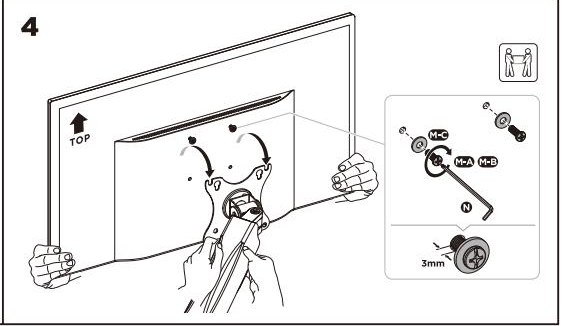
Step 4 — Screw the plate to the monitor
Lay the monitor face down on a soft, clean surface, with the UP mark on the plate pointing towards the top of the screen.
- Match the plate to the VESA holes — 75 × 75 mm or 100 × 100 mm.
- Fasten it with four M4 × 12 (M-A) or M5 × 12 (M-B) screws and the washers (M-C), whichever thread fits.
- Tighten the four screws evenly and do not overtighten them — the thread is in the monitor housing.
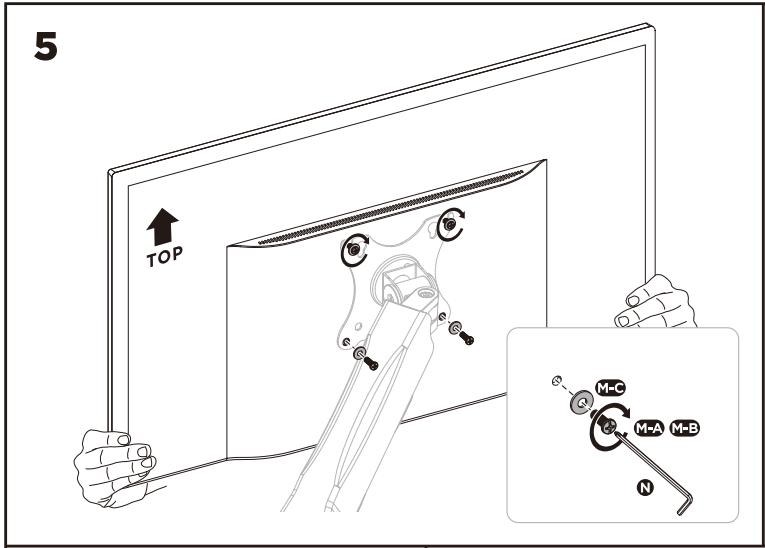
Step 5 — Hang the monitor on the arm
- With the second person holding the monitor, engage the plate on the arm head.
- Secure it with the screws and tighten them with the 5 mm Allen key (N).
- Do not release the screen until it is held.
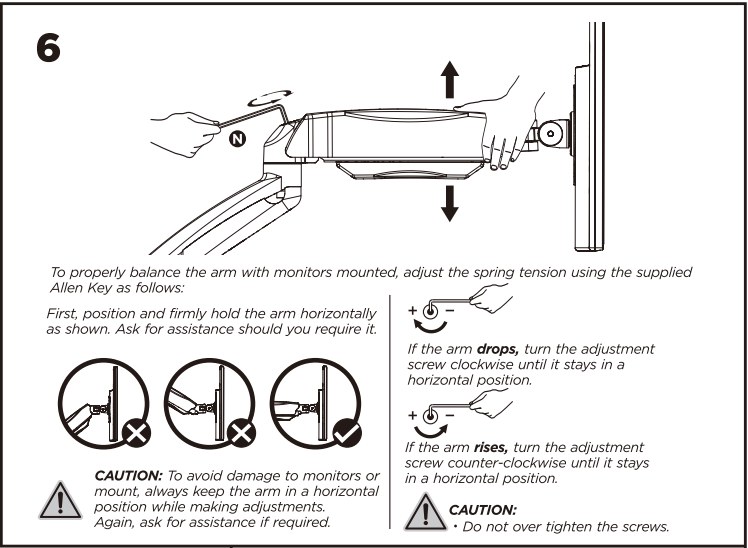
Step 6 — Set the spring tension
This is the step that decides whether the arm holds your screen. Do it with the monitor already mounted.
- Hold the arm firmly in a horizontal position — ask the second person for help if you need it.
- Turn the adjustment screw with the supplied Allen key:
- if the arm drops, turn the screw clockwise until it stays horizontal
- if the arm rises, turn the screw counter-clockwise until it stays horizontal
- Do not overtighten the screw.
Always keep the arm horizontal while adjusting. Adjusting it in any other position can damage the monitor or the mount.
Step 7 — Route the cable
Lay the monitor cable in the channel along the arm and close the covers, then run it down past the base to the desk.
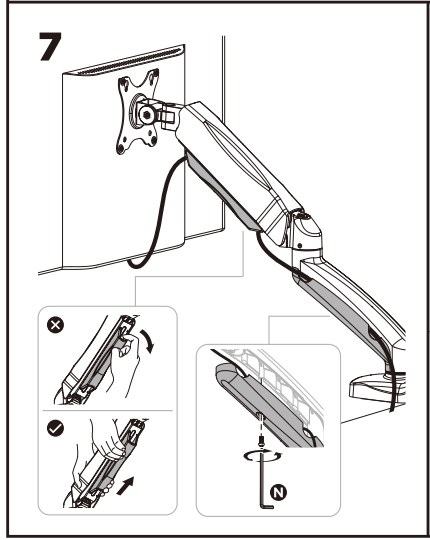
Step 8 — Set the screen position
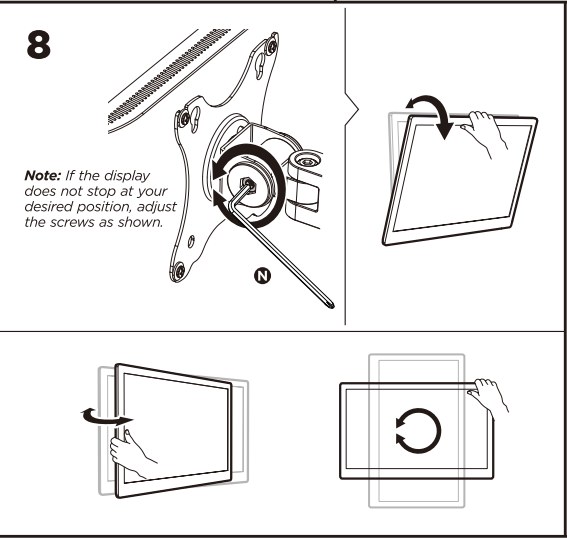
Turn the screen to the angle you want. If it does not stay where you put it, tighten the screws on the head as shown.
Dimensions and movement ranges
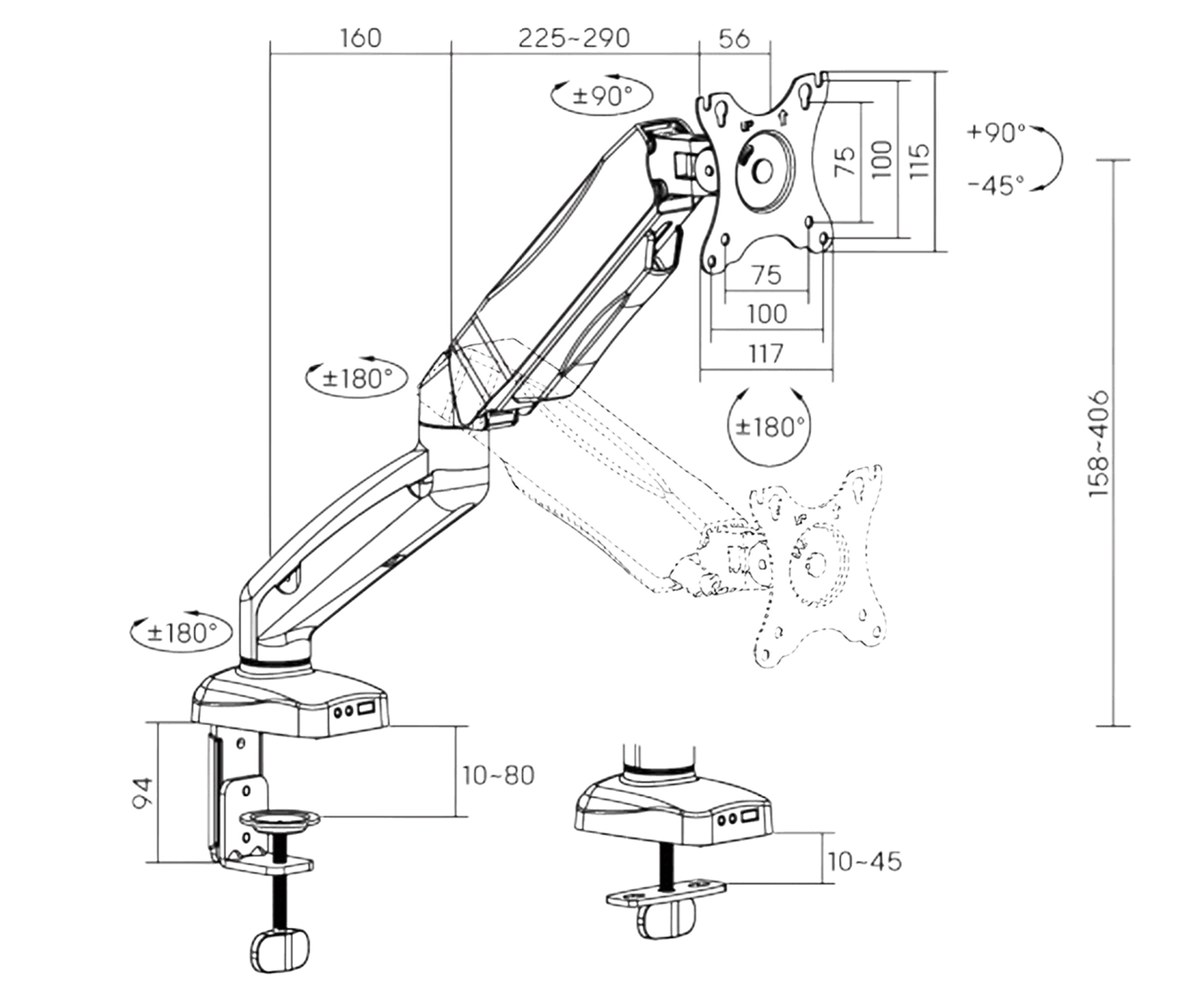
- Height above the desk — 158 to 406 mm
- Reach — up to 450 mm from the base, with arm sections of 160 mm and 225–290 mm
- Arm joints — ±180° at the base, ±180° at the elbow and ±90° at the head
- Screen — rotates ±180° and tilts from −45° to +90°
- Desktop — 10 to 80 mm with the clamp, 10 to 45 mm through a grommet hole
Using the mount
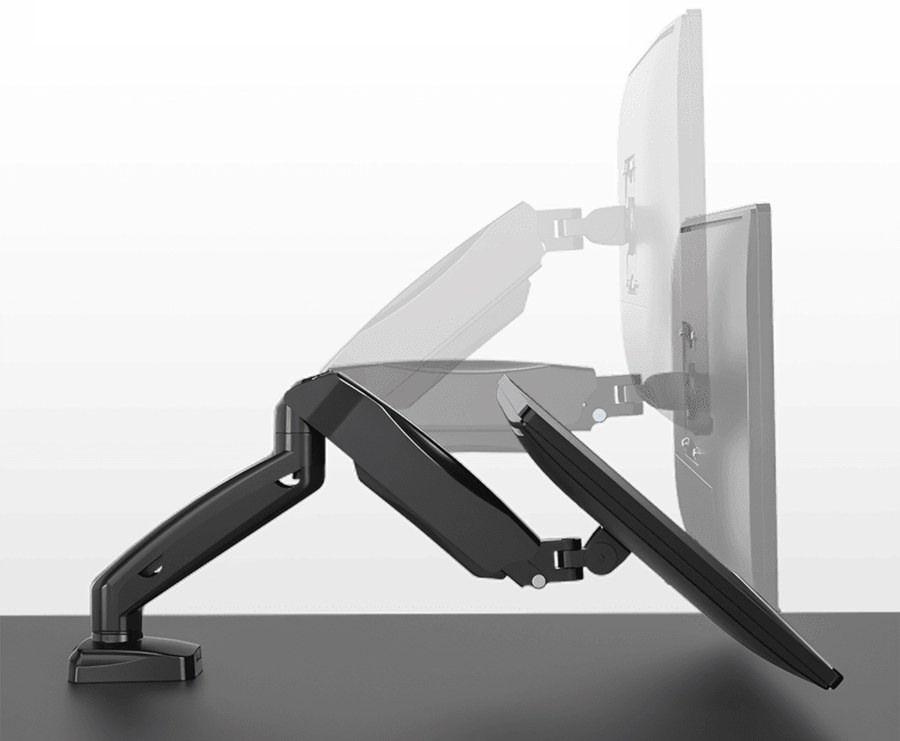
Once the spring tension matches the weight of your screen, you move it by hand:
- Height — lift or lower the screen with one hand; the spring holds it where you leave it
- Reach — pull the screen towards you or push it back, up to 450 mm from the base
- Rotation — ±180° at the base and at the elbow, so the arm folds back against the desk when you need the space
- Screen — ±180° of rotation for portrait mode, and tilt from −45° to +90°
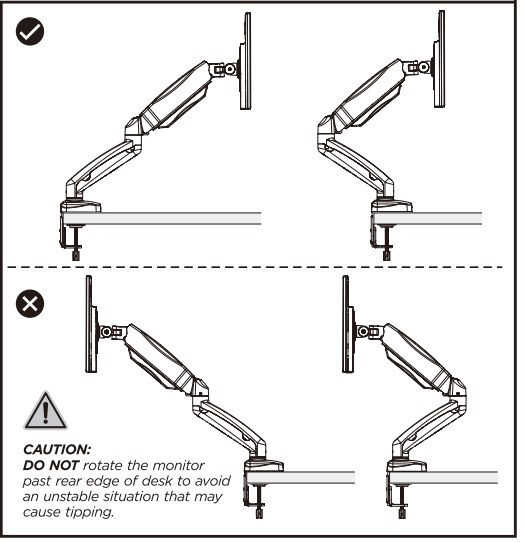
Do not rotate the monitor past the rear edge of the desk. The arm reaches far enough to take the screen beyond the desktop, which shifts the load outside the clamp and can tip the whole desk.
Safety instructions
- Make sure the mounting surface is strong enough to carry the product and the equipment on it.
- Do not exceed the maximum permitted load.
- Always use a second person or a mechanical lifting device to raise and position heavy equipment safely.
- Tighten screws firmly but not excessively. Overtightening can damage the product and significantly reduce its load capacity.
- Keep a safe distance from moving parts while using the product.
- Use the product only as intended. Do not sit, stand or climb on it.
- The product is intended for indoor use only.
- Modifying the construction in any way is not permitted.
- The product may contain small parts that pose a choking hazard if swallowed. Keep them away from children.
- Before use, make sure all parts are securely fastened and that the instructions have been read and understood in full.
- Check regularly that the product is safe and ready for use.
Frequently asked questions
Which monitors fit the SolidHand-GS01?
The arm drifts up or down on its own. What do I do?
How thick can my desktop be?
Do I have to drill a hole in my desk?
Can I turn the monitor to portrait?
Downloads
Manufacturer manuals and datasheets in PDF, in case an offline copy is needed. Everything in them is also on this page.