Single-arm desk mount for a monitor or a laptop, SolidHand-L01
GTIN: 5907614664879 · SKU: SolidHand-L01
The SolidHand-L01 is a steel pole clamped to the desk with one swivel arm on it. The arm carries either a monitor of 13 to 32 inches on its VESA plate or a laptop on the supplied tray — one device at a time, up to 10 kg. The arm turns a full 360° around the pole, the head tilts ±90° and rotates 360°, so the screen can also be set upright in portrait.
Table of contents
Specifications
- Colour: black
- Material: steel
- Number of monitors: 1
- Screen size: 13–32"
- Load capacity: up to 10 kg
- VESA pattern: 75 × 75 mm, 100 × 100 mm
- Tilt: ±90°
- Arm swivel: 360°
- Rotation: 360°
- Mounting: desk clamp; grommet plate also supplied
- Weight: 4.3 kg
Kit contents
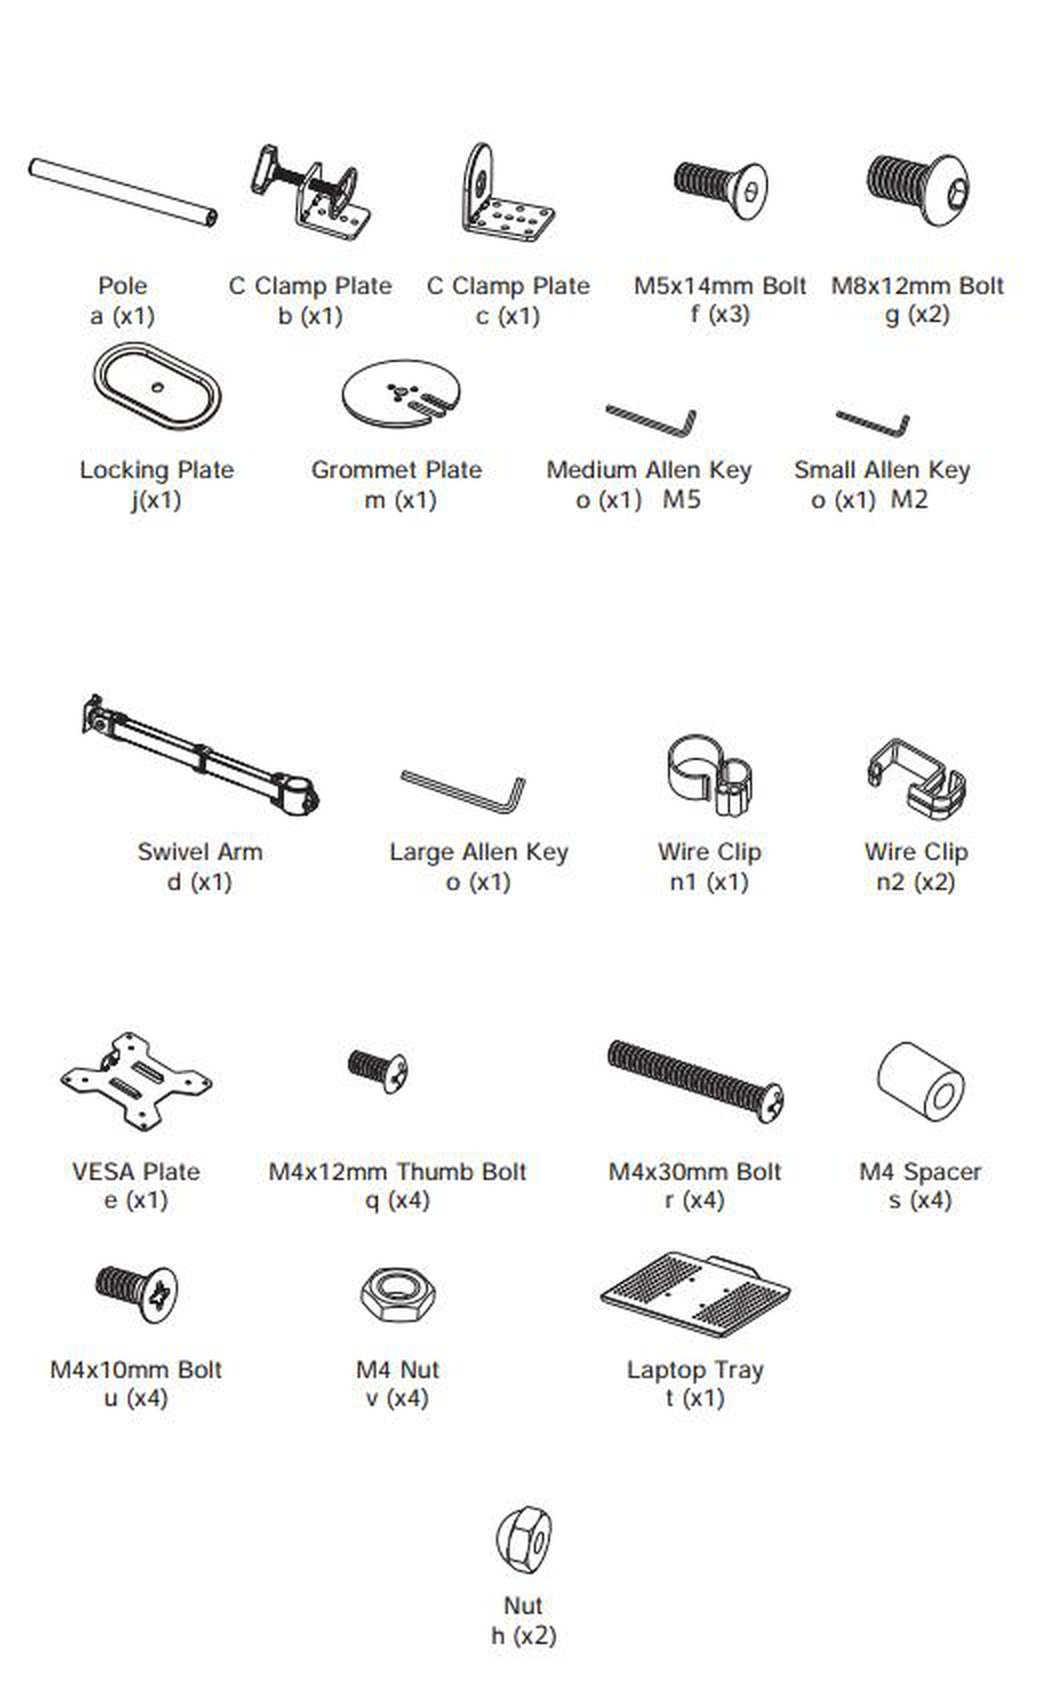
- a — pole (× 1)
- b, c — C clamp plates (× 1 each)
- d — swivel arm (× 1)
- e — VESA plate (× 1)
- t — laptop tray (× 1)
- j — locking plate (× 1)
- m — grommet plate (× 1)
- n1 — wire clip (× 1), n2 — wire clips (× 2)
- f — M5 × 14 mm bolt (× 3), g — M8 × 12 mm bolt (× 2), h — nut (× 2)
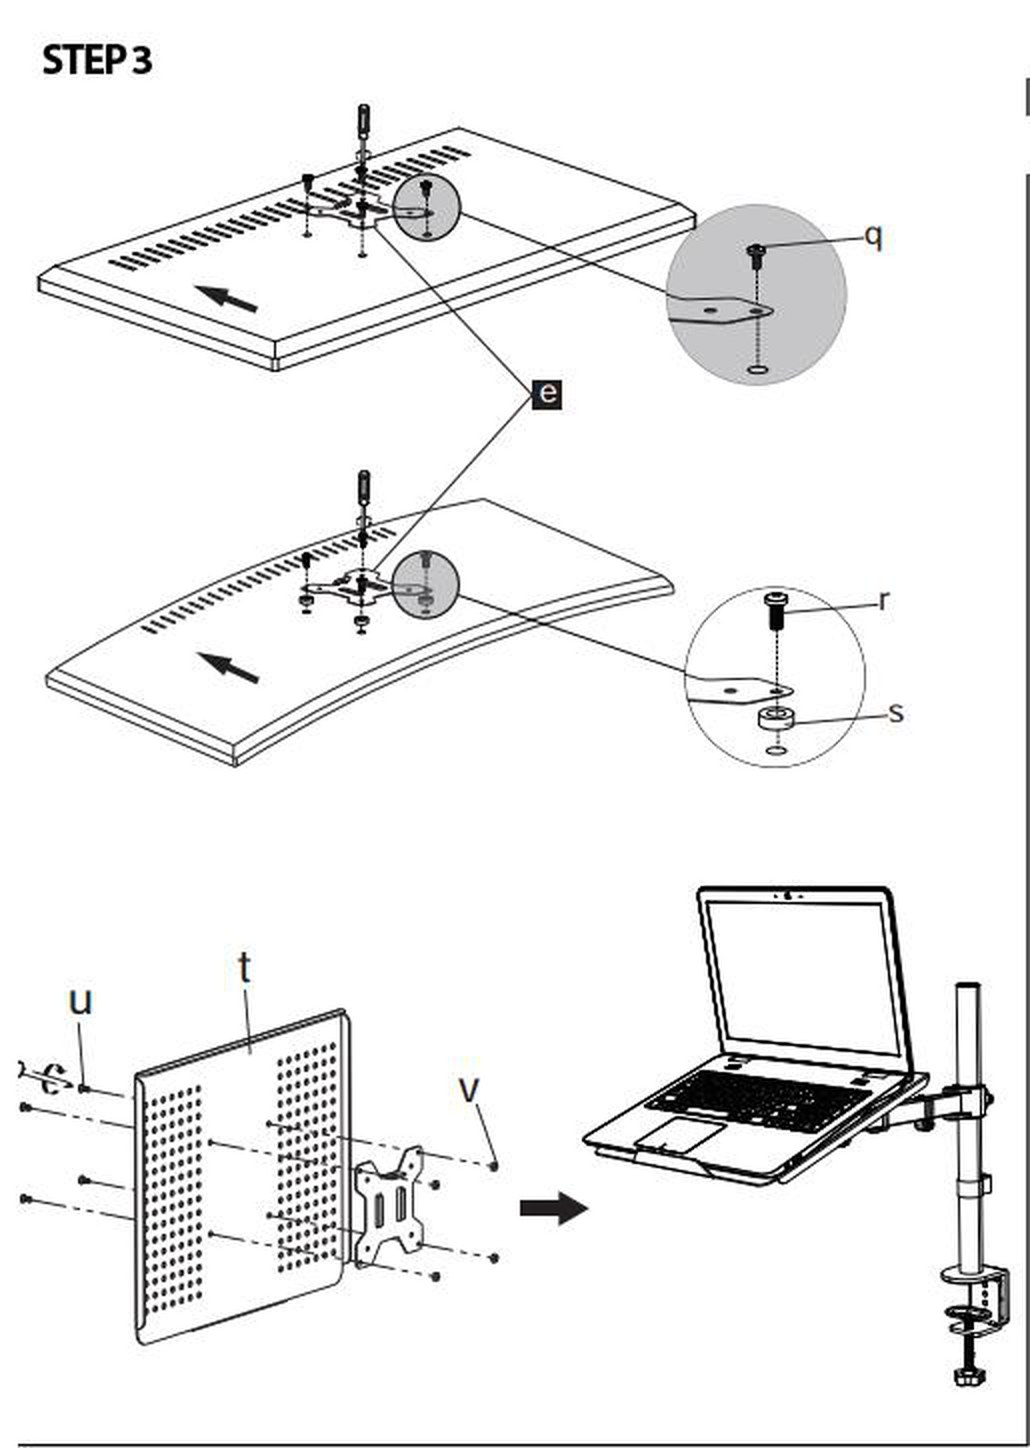
- q — M4 × 12 mm thumb bolt (× 4), r — M4 × 30 mm bolt (× 4), s — M4 spacer (× 4)
- u — M4 × 10 mm bolt (× 4), v — M4 nut (× 4)
- o — Allen keys: large, medium (M5) and small (M2)
Before you start
Assembly takes about twenty minutes. Prepare the following:
- A second person — hanging the monitor on the arm is a two-person job
- A Phillips screwdriver for the tray bolts; all three Allen keys are in the kit
- A check that the monitor is 13–32" with VESA 75 × 75 or 100 × 100 holes, and that the device weighs no more than 10 kg
- A free desk edge for the clamp, and a desktop solid enough to carry the pole with the screen
Check that you have received all the parts listed above before you start. If anything is missing or damaged, contact us before assembling the mount.
Assembly
Step 1 — Fix the pole to the desk
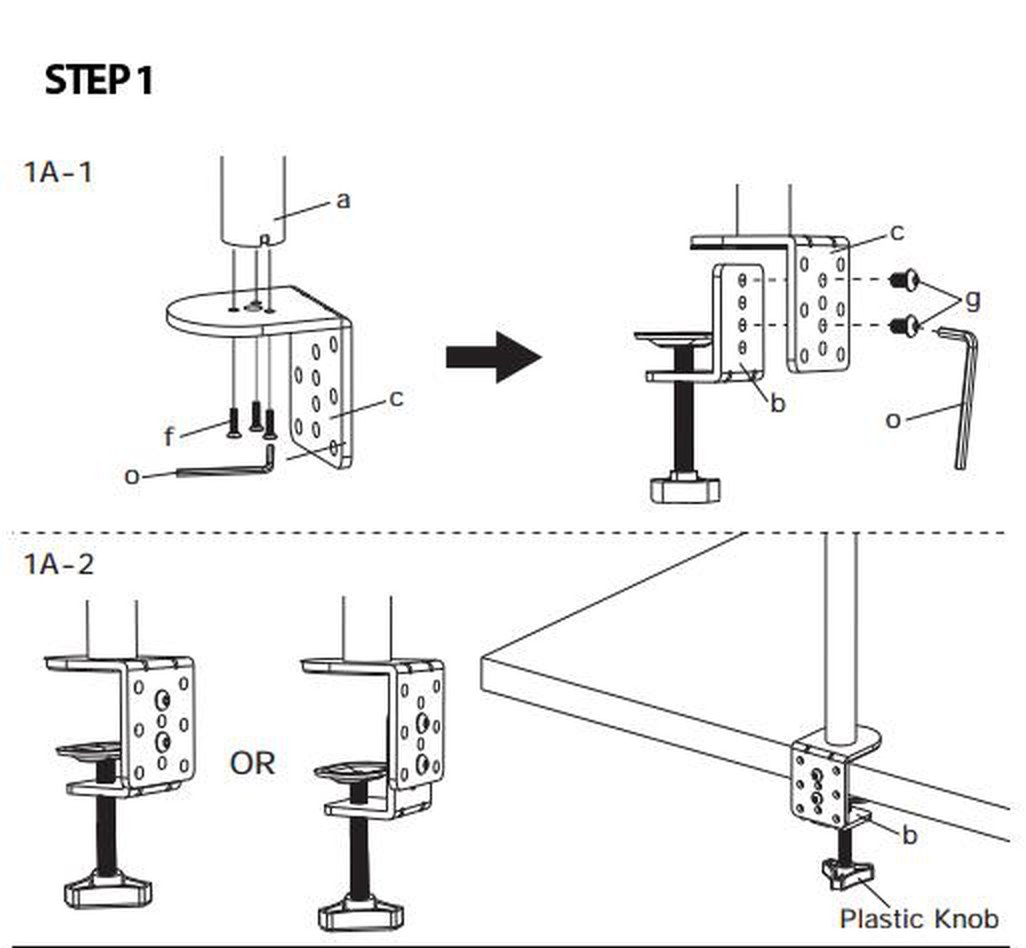
The pole is fixed to the desk in one of two ways, and the parts for both are in the kit. The clamp grips a free edge of the desk and leaves no trace; the grommet fitting goes through a hole in the desktop and keeps the base flush with it.
Variant A — clamp mounting
- Stand the pole (a) on the round plate of clamp plate c and fix the two together with the three M5 × 14 mm bolts (f), using the medium Allen key (o).
- Put clamp plate b against c and join them with the two M8 × 12 mm bolts (g). The two plates can be bolted in either of the two positions shown, which is how the clamp is matched to the thickness of your desktop.
- Hook the assembly over the edge of the desk and tighten the plastic knob underneath until the pole stands firm and vertical.
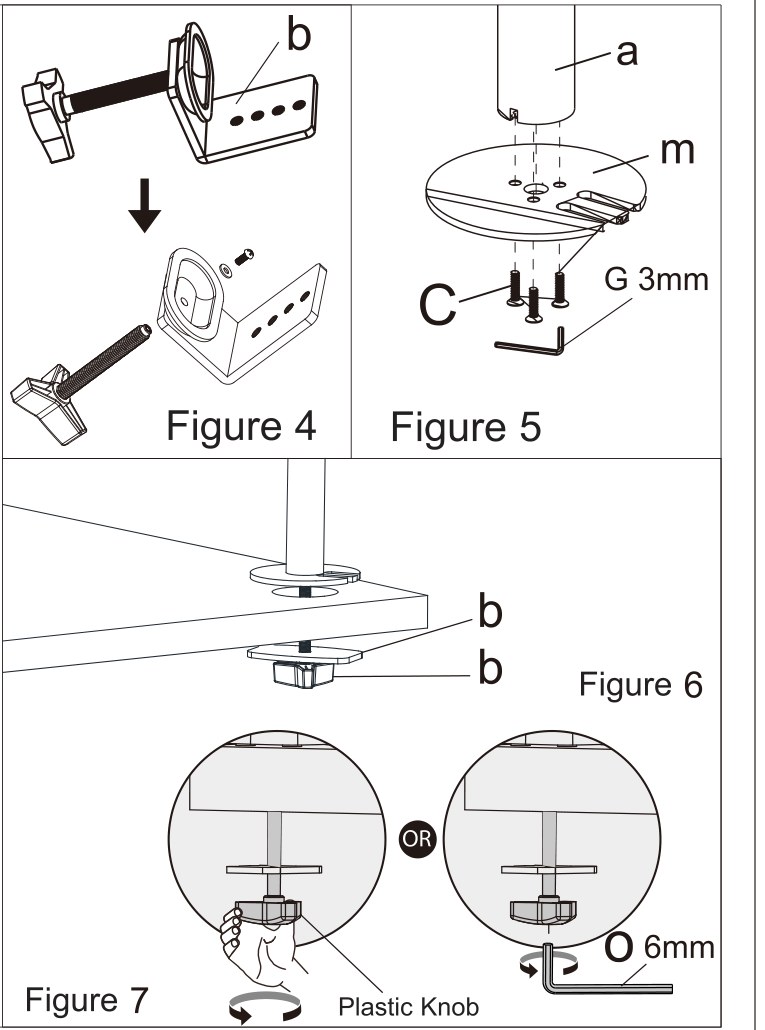
Variant B — grommet mounting
- If the hole in the desktop has a plastic grommet in it, take it out — the base needs a flat surface.
- Loosen the screws and separate clamp plate b into its two parts.
- Screw the grommet plate (m) to the pole (a) with the three M5 × 14 mm bolts (f), tightening with the 3 mm Allen key (o).
- Pass the bolt of the separated clamp down through the hole in the desktop, fit the support plate underneath and tighten it with the plastic knob or the 6 mm Allen key (o).
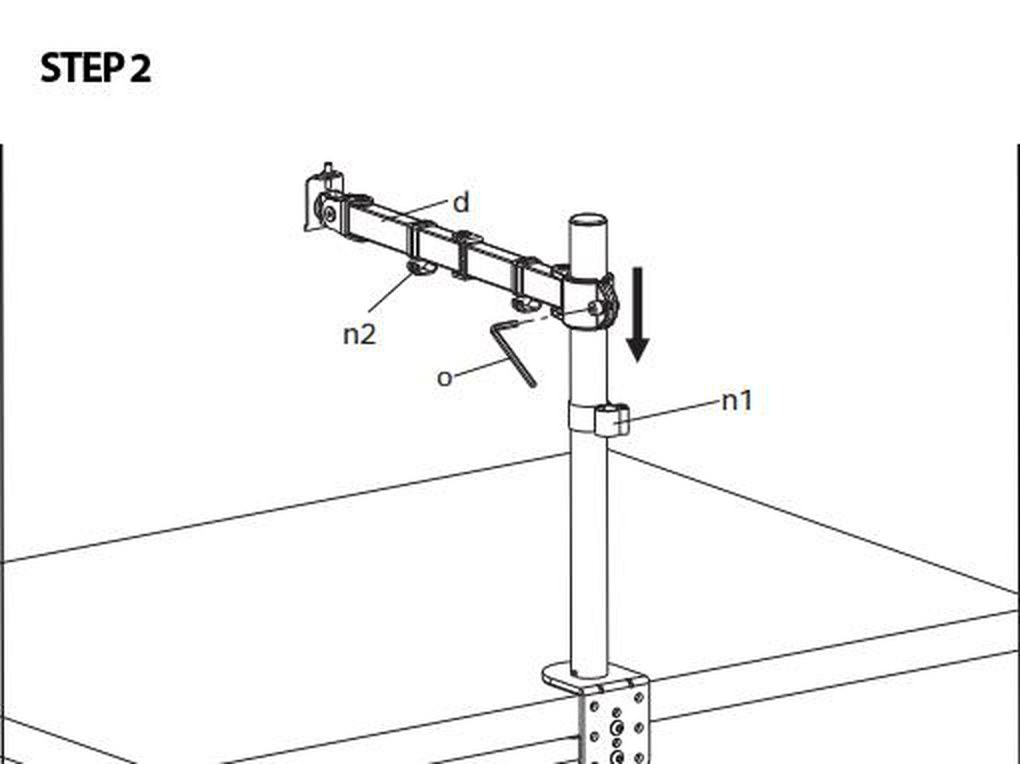
Step 2 — Fit the swivel arm
- Slide the wire clip (n1) onto the pole and set it at the height you want the arm to sit; it works as the stop the arm rests on.
- Slide the swivel arm (d) down over the pole onto the clip and tighten the arm with the Allen key (o).
- Clip the two wire clips (n2) onto the arm — the cables go into them later.
Step 3 — Fit the VESA plate or the laptop tray
- For a flat monitor, screw the VESA plate (e) to the back of the screen with the four M4 × 12 mm thumb bolts (q).
- For a curved monitor, use the four M4 × 30 mm bolts (r) with the M4 spacers (s), so the plate clears the curve of the back panel.
- To carry a laptop instead, bolt the tray (t) to the VESA plate with the four M4 × 10 mm bolts (u) and the M4 nuts (v), and put the laptop on the tray.
Step 4 — Hang the screen on the arm
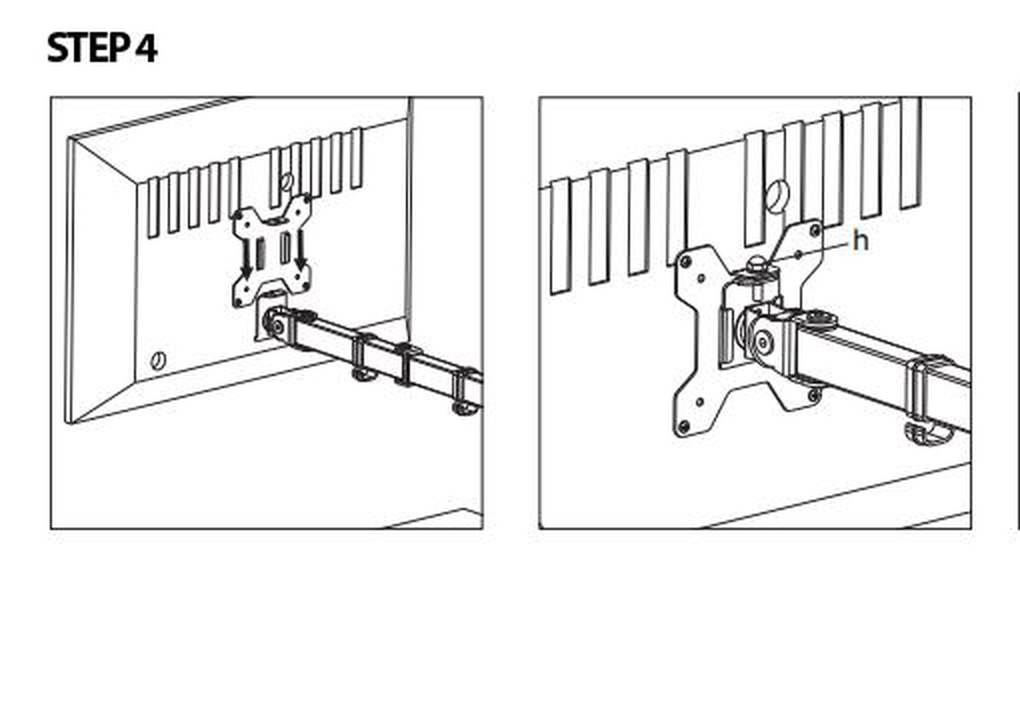
- With a second person holding the screen, bring the VESA plate up to the head at the end of the arm and seat it on the pin.
- Secure it with the nut (h) so the screen cannot lift off the head.
Do not let go of the screen until the nut is on and tightened. Keep to the rated load — the arm carries up to 10 kg.
Step 5 — Set the angle
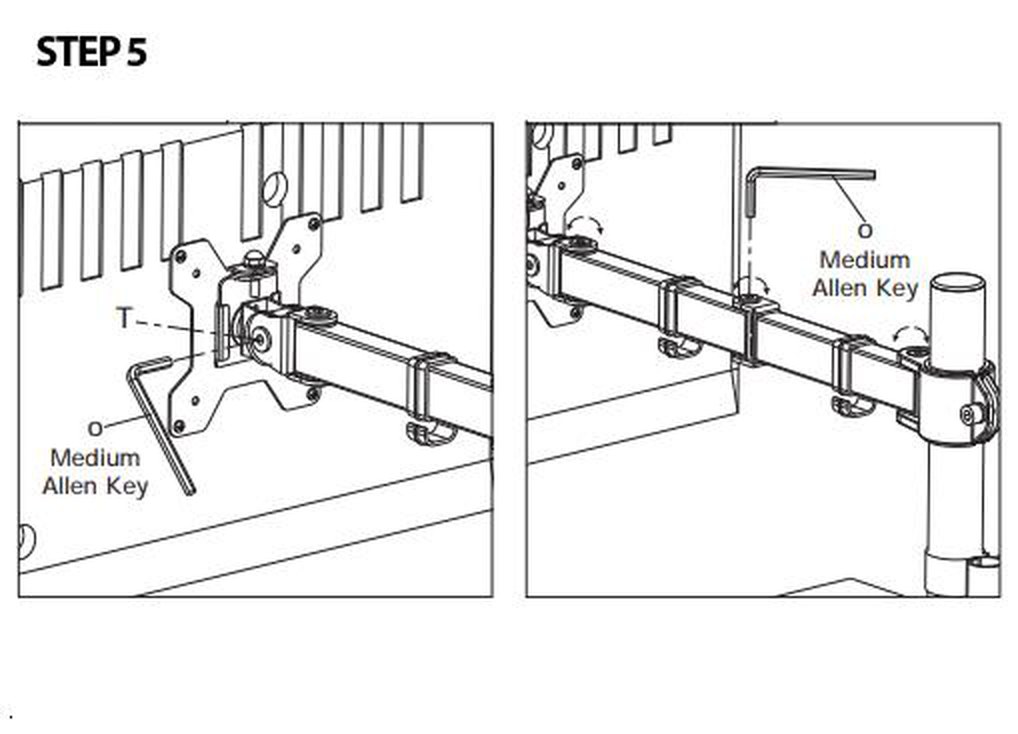
- Tilt the screen up or down by hand — the head moves ±90°. If it does not hold the angle you set, tighten the screw T on the head with the Allen key (o).
- Swing the arm around the pole and turn the screen to portrait by hand; the arm turns a full 360° and so does the head.
Step 6 — Route the cables
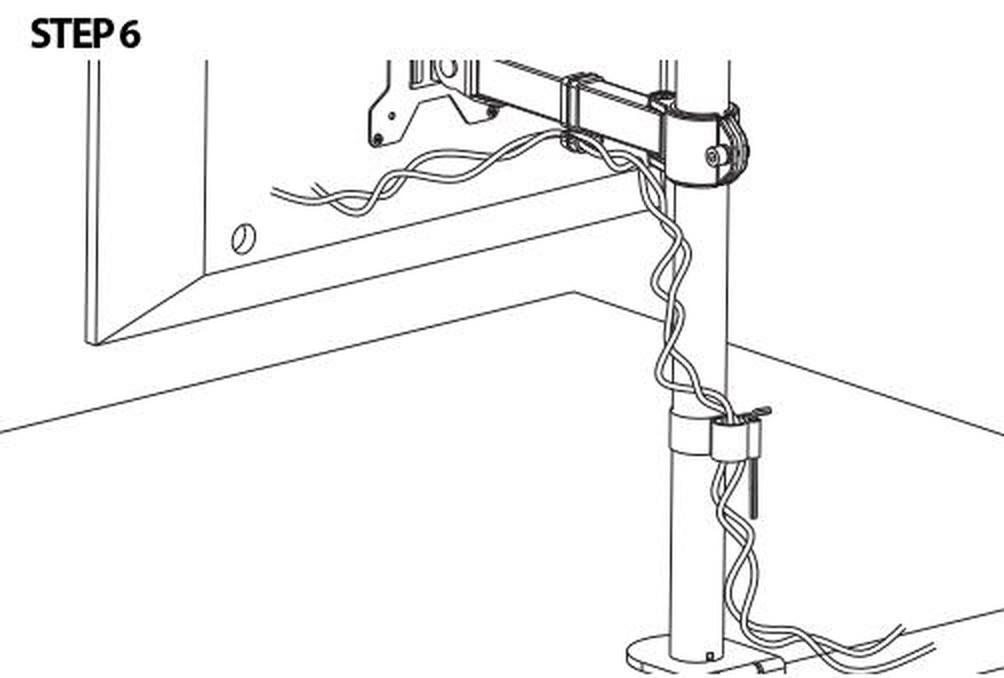
Lay the monitor cable along the arm, press it into the two clips (n2), then take it down the pole and through the clip (n1). Leave enough slack for the full swing of the arm — a taut cable pulls on the ports every time the screen is moved.
Using the mount
Everything is set by hand, except the tilt screw:
- Height — the arm rests on the stop clip; move the clip to change it
- Arm swing — 360° around the pole
- Screen rotation — 360°, including 90° to portrait
- Screen tilt — ±90°
- One device at a time: a monitor of 13 to 32 inches on the VESA plate, or a laptop on the tray, up to 10 kg
Frequently asked questions
Can the SolidHand-L01 hold both a laptop and a monitor?
What VESA patterns does the SolidHand-L01 support?
What is the pivot function and what is it useful for?
How do I choose between clamp and grommet mounting?
Can I put a curved monitor on it?
What is the maximum load?
Downloads
The manufacturer’s manuals and datasheets in PDF, in case an offline copy is needed. Everything in them is on this page as well.