Desk mount for a monitor and a laptop, SolidHand-LM01
GTIN: 5907614661946 · SKU: SolidHand-LM01
The SolidHand-LM01 is a steel pole fixed to the desk with two swivel arms on it: the upper one carries a monitor of 13 to 27 inches on a VESA 75 × 75 / 100 × 100 plate, the lower one a laptop on a ventilated tray. Both arms turn 360° around the pole and can be set at any height between 100 and 400 mm; the monitor head tilts and rotates ±90°, so the screen can also be turned to portrait. The pole mounts either with the desk clamp or through an existing cable hole using the grommet plate. Total load up to 10 kg.
Table of contents
Specifications
- Colour: black
- Number of monitors: 1
- Number of laptops: 1
- Monitor size: 13–27"
- Maximum load: 10 kg
- VESA pattern: 75 × 75 mm, 100 × 100 mm
- Height adjustment: manual, with tools
- Arm swivel: 360°
- Monitor rotation: −90° to +90°
- Monitor tilt: −90° to +90°
- Arm height range: 100–400 mm
- Laptop tray: 300 × 350 mm
- Desktop thickness for the clamp: up to 100 mm
- Package dimensions: 440 × 310 × 100 mm
- Weight of the mount: 2.8 kg
- Weight with packaging: 4.64 kg
Kit contents
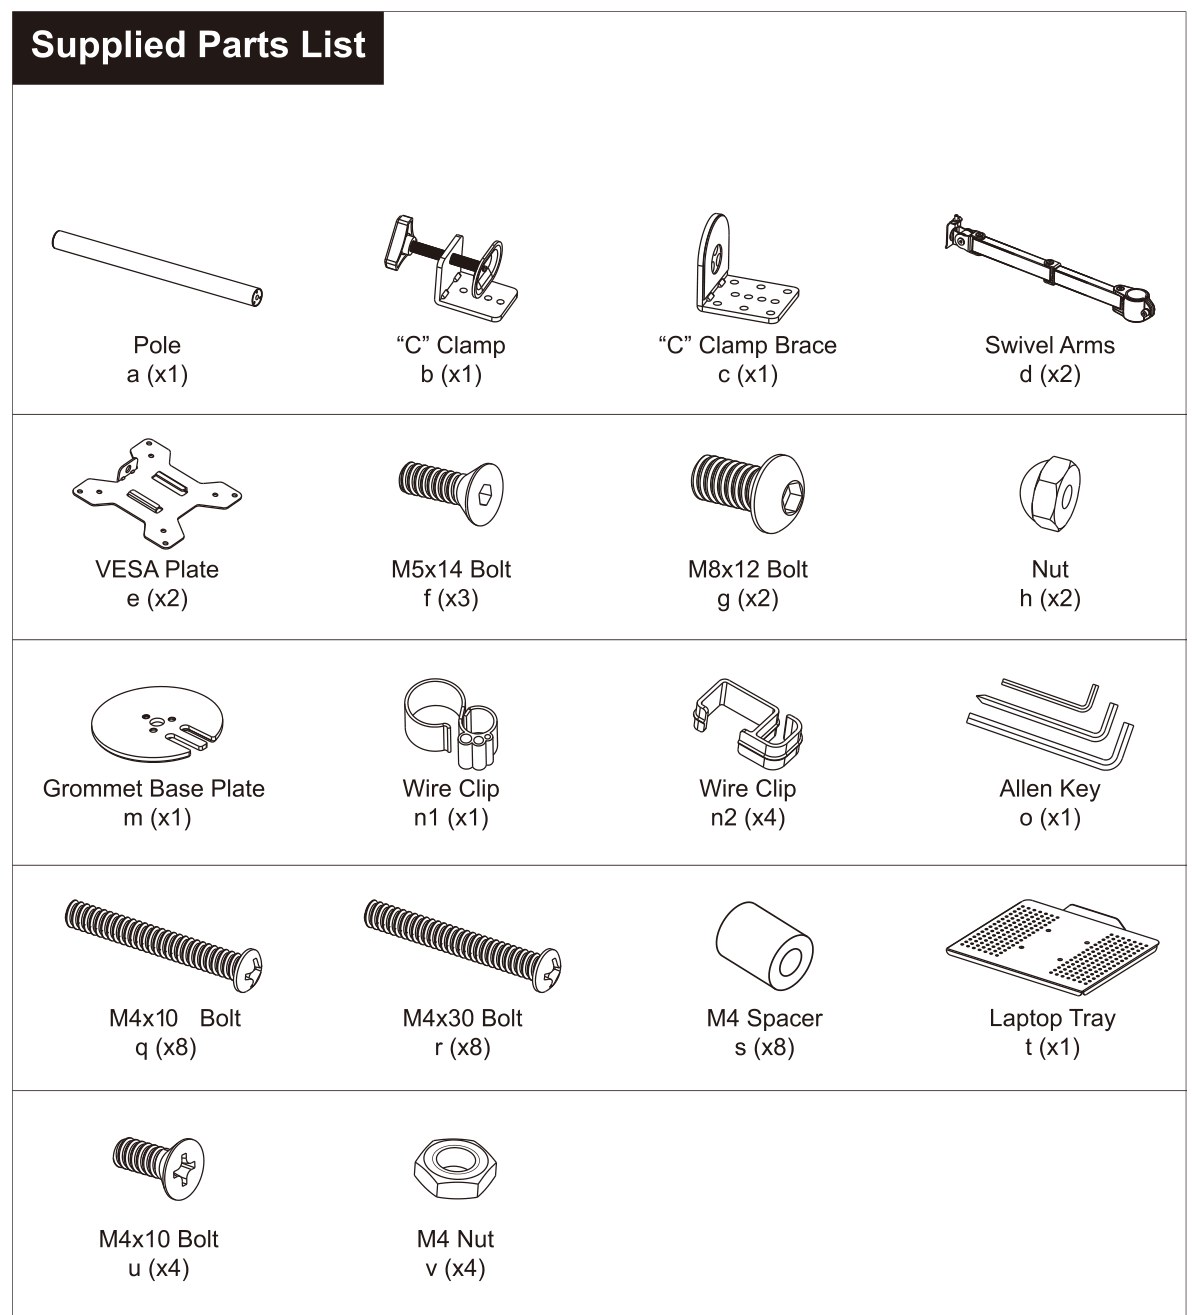
- a — pole (× 1)
- b — C clamp (× 1), c — C clamp brace (× 1)
- d — swivel arm (× 2)
- e — VESA plate (× 2)
- t — laptop tray (× 1)
- m — grommet base plate (× 1)
- n1 — wire clip with a holder for the Allen keys (× 1), n2 — wire clip (× 4)
- f — M5 × 14 mm bolt (× 3), g — M8 × 12 mm bolt (× 2), h — nut (× 2)
- q — M4 × 10 mm bolt (× 8), r — M4 × 30 mm bolt (× 8), s — M4 spacer (× 8)
- u — M4 × 10 mm countersunk bolt (× 4), v — M4 nut (× 4)
- o — set of Allen keys, including 3 mm and 6 mm (× 1)
A Phillips screwdriver is needed for the M4 bolts (q, r, u) — it is not included in the kit.
Before you start
Assembly takes about half an hour. Unpack and prepare as follows:
- Open the carton carefully, take out the contents and lay them on the box or another protective surface so that nothing gets scratched
- Check the contents against the parts list above and make sure every part arrived undamaged — do not use damaged or defective parts
- Read the whole manual before you begin the installation
- Have the Allen keys from the kit and your own Phillips screwdriver at hand, and ask a second person to help when the monitor is hung on the arm
If anything is missing or damaged, contact us before assembling the mount.
Safety instructions
- Install and use the mount with care. Read the manual before installation and follow it exactly; use suitable protective equipment while installing.
- If any instruction is unclear or you have doubts about the safety of the installation, contact us for help before continuing.
- Do not use the product for any purpose or in any configuration not described in this manual. The manufacturer is not liable for injury or damage resulting from incorrect assembly or misuse of the product.
Assembly
Step 1 — Fix the pole to the desktop
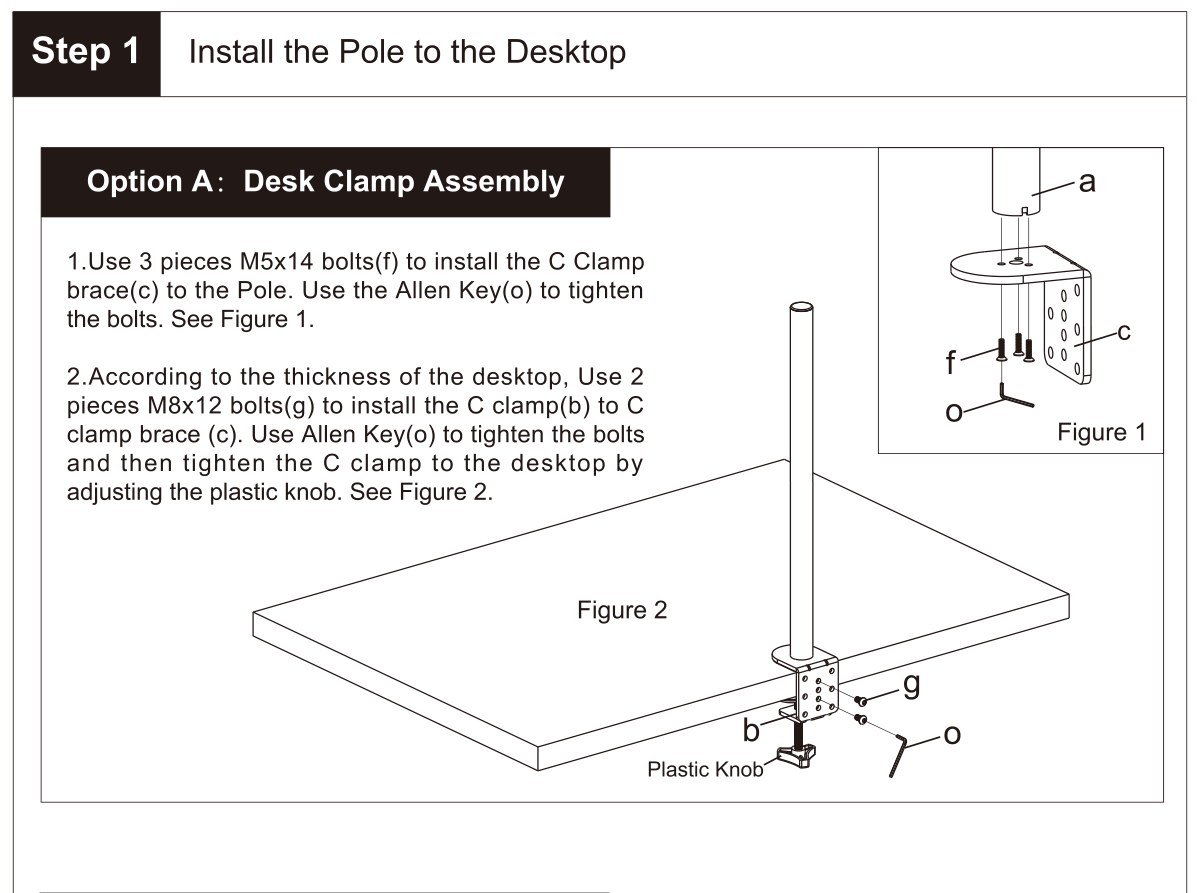
The pole (a) can be fixed to the desk in two ways: with the clamp on the edge of the desktop (option A) or through an existing cable hole using the grommet plate (option B).
Option A — desk clamp
- Fix the C clamp brace (c) to the pole (a) with the three M5 × 14 mm bolts (f) and tighten them with the Allen key (o) (fig. 1).
- Depending on the thickness of the desktop, fix the C clamp (b) to the brace (c) with the two M8 × 12 mm bolts (g) and tighten them with the Allen key (fig. 2).
- Hook the clamp over the edge of the desk and tighten the plastic knob until the pole stands firm and vertical.
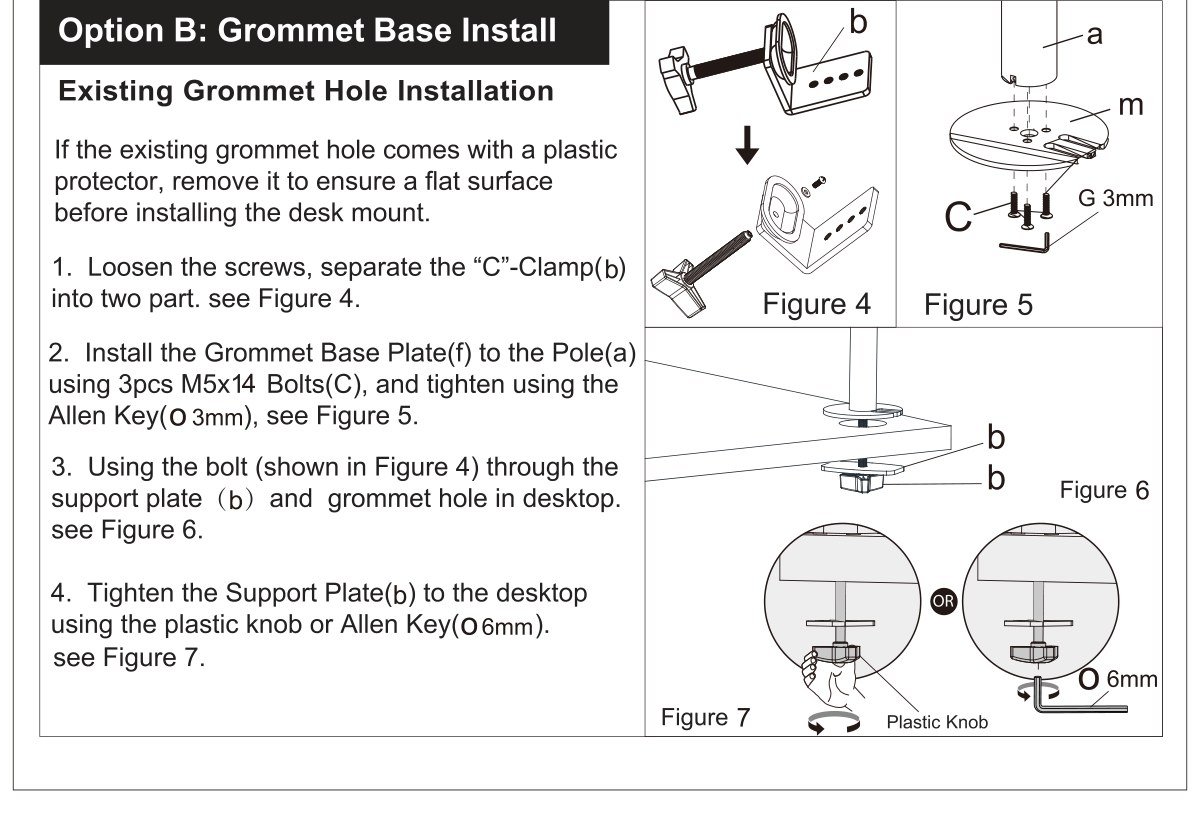
Option B — grommet plate in an existing hole
If the cable hole in the desktop has a plastic grommet, remove it first so that the mount sits on a flat surface.
- Loosen the knob bolt and separate the C clamp (b) into its two parts (fig. 4).
- Fix the grommet base plate (m) to the pole (a) with the three M5 × 14 mm bolts (f) and tighten them with the 3 mm Allen key (o) (fig. 5).
- Pass the knob bolt through the support plate (b) and the hole in the desktop (fig. 6).
- Tighten the support plate (b) against the underside of the desktop with the plastic knob or the 6 mm Allen key (o) (fig. 7).
Step 2 — Fit the swivel arms
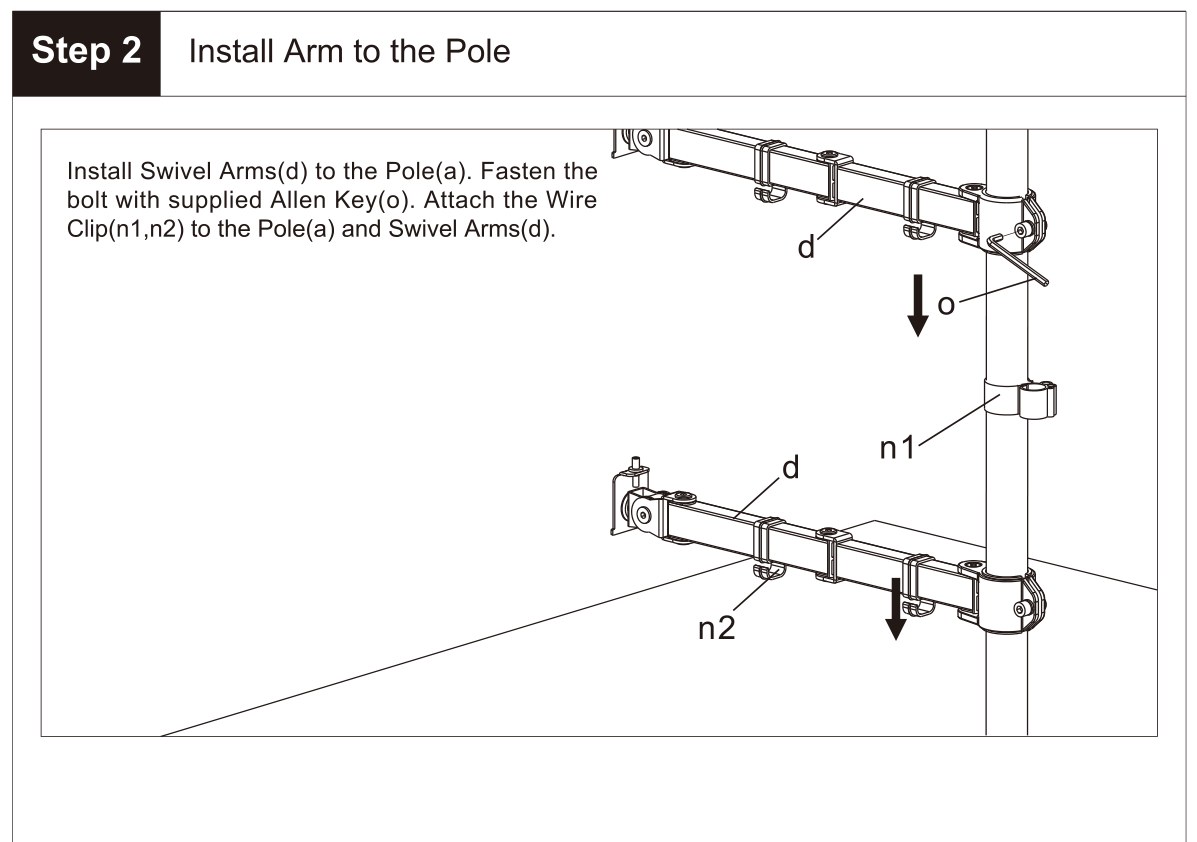
- Slide the two swivel arms (d) onto the pole (a) — the upper one for the monitor, the lower one for the laptop tray — and set each at the height you want.
- Tighten the bolt of each arm collar with the Allen key (o) so that the arm cannot slide down.
- Clip the wire clips (n1, n2) onto the pole and the arms — the cables go into them later.
Step 3 — Fit the VESA plates to the laptop tray and the monitor
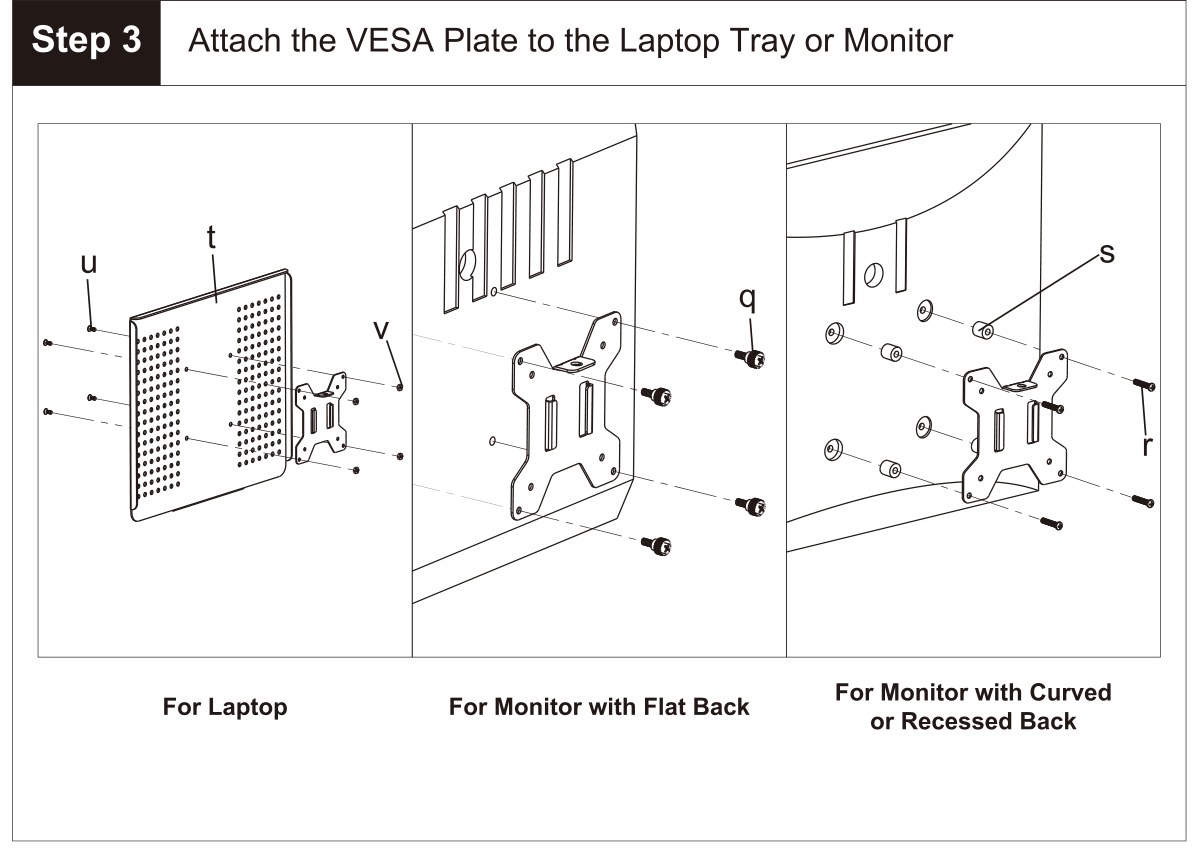
The kit has two VESA plates (e): one goes on the laptop tray, the other on the back of the monitor.
- Laptop tray: bolt one VESA plate to the underside of the tray (t) with the four M4 × 10 mm countersunk bolts (u) and the M4 nuts (v).
- Monitor with a flat back: screw the other VESA plate to the back of the monitor with four M4 × 10 mm bolts (q).
- Monitor with a curved or convex back: use four M4 × 30 mm bolts (r) with the M4 spacers (s), so that the plate clears the back panel and sits flat.
Step 4 — Hang the monitor on the arm
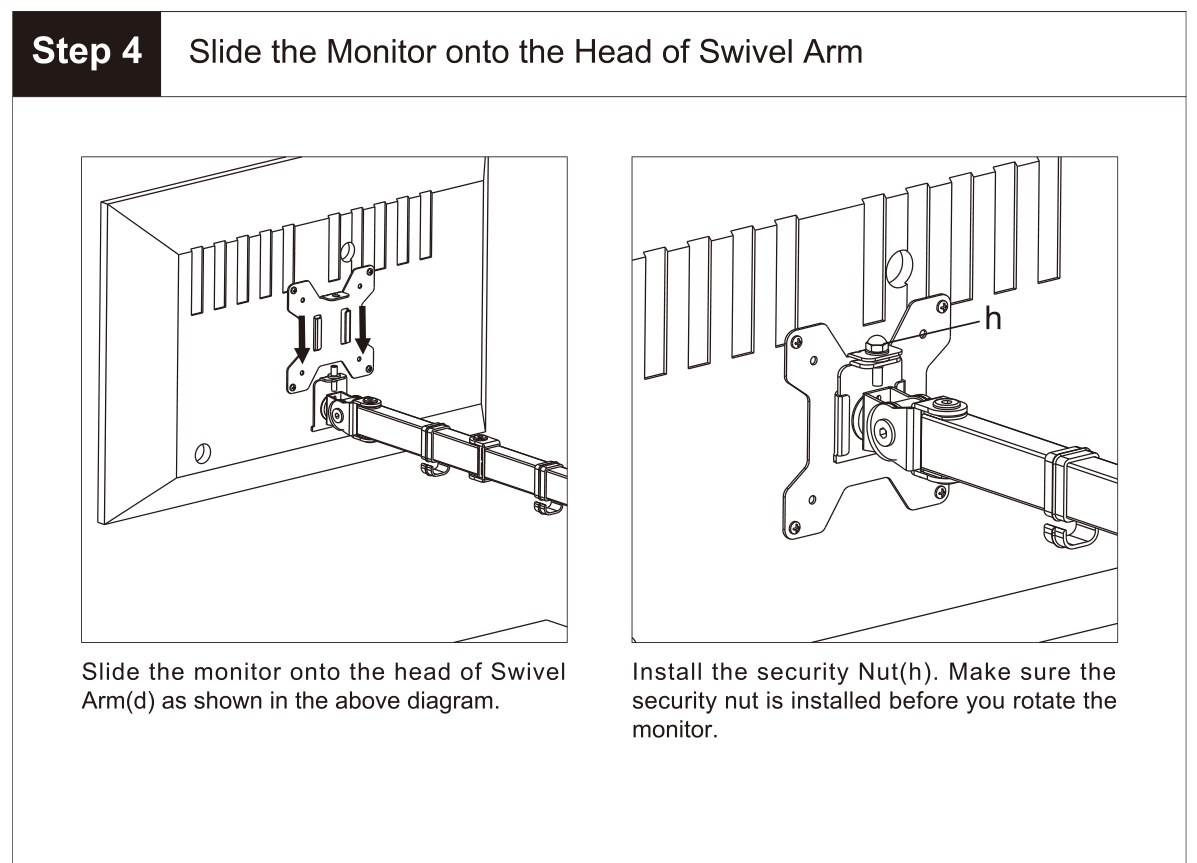
- With a second person holding the monitor, slide its VESA plate down onto the head of the upper swivel arm (d) as shown in the drawing.
- Fit the locking nut (h) onto the head. Make sure the nut is on before you rotate the monitor.
- Hang the laptop tray on the lower arm in the same way and secure it with the second nut (h).
Do not let go of the monitor until the nut (h) is tightened. Keep to the rated load — the mount carries up to 10 kg in total.
Step 5 — Make the final adjustments
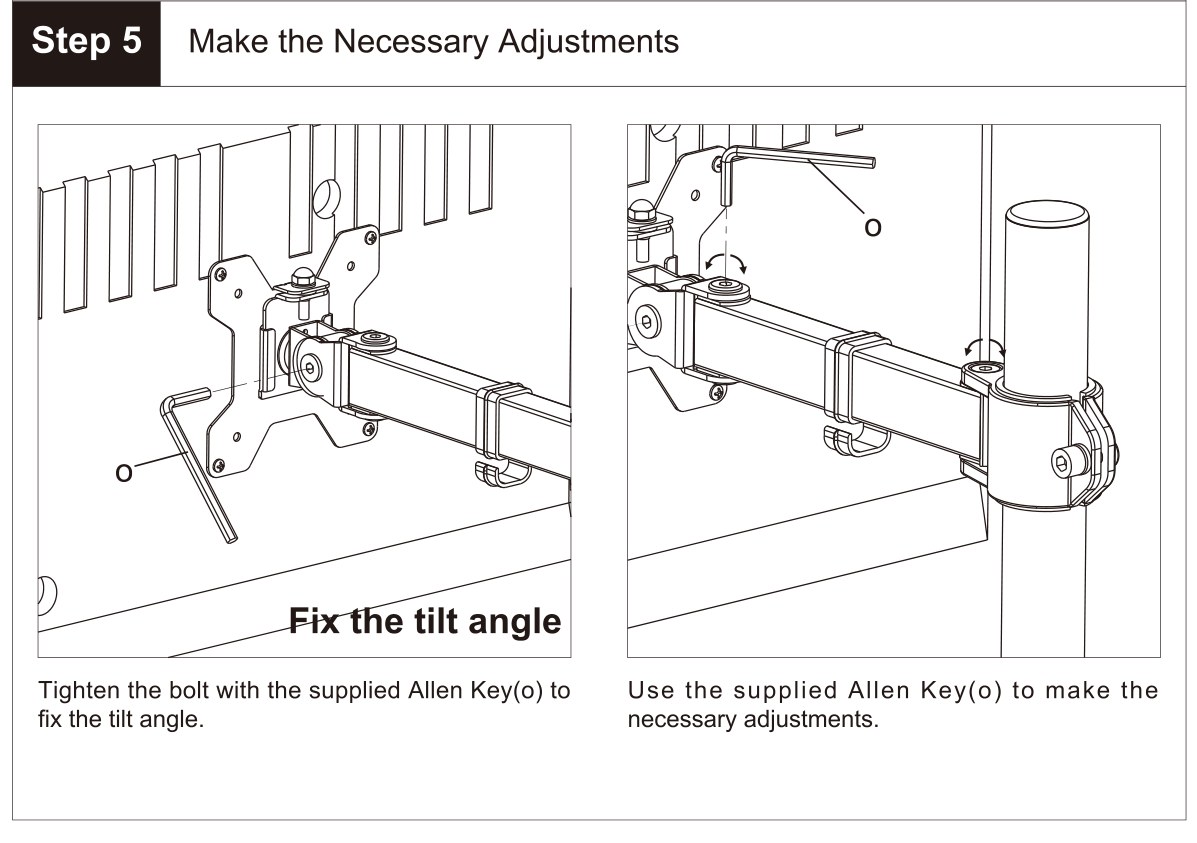
- Set the tilt of the monitor and tighten the bolt on the head with the Allen key (o) so that the screen holds the angle.
- Tighten the bolts in the arm joints with the same key so that the arms do not swing open on their own.
Step 6 — Route the cables and stow the Allen keys
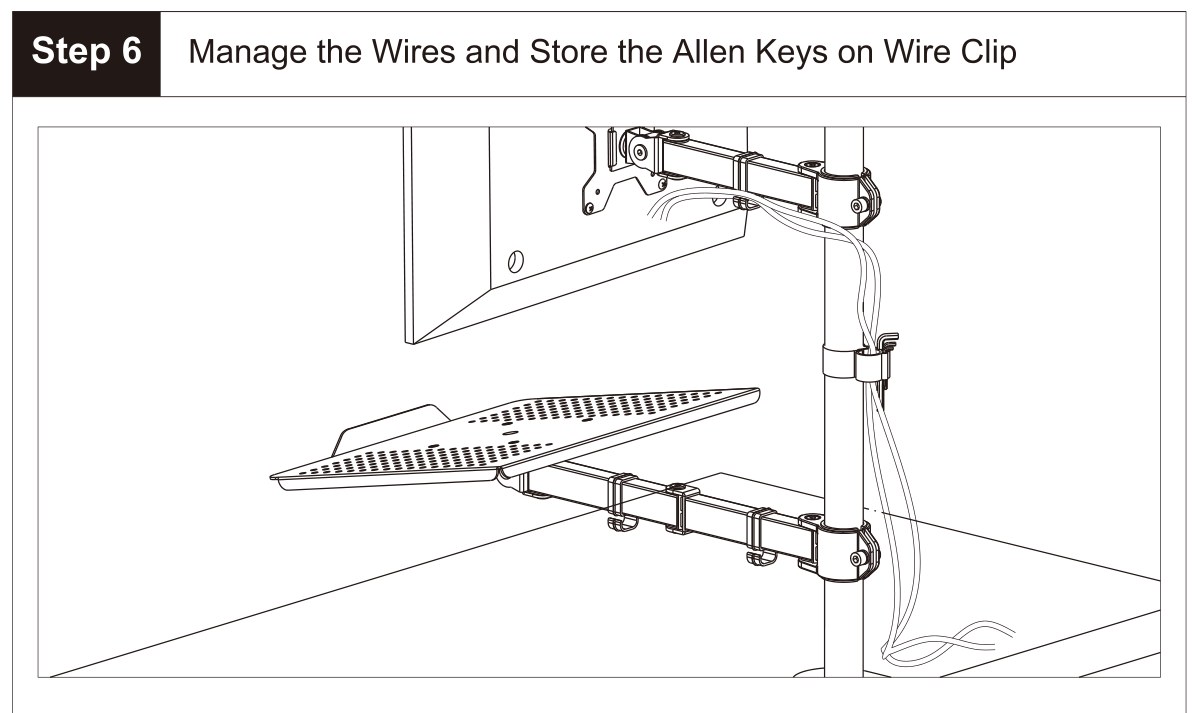
Lay the monitor and laptop cables along the arms and down the pole, pressing them into the wire clips (n2) and the clip (n1). Leave enough slack for the full swing of the arms — a taut cable pulls on the ports every time a device is moved. The clip n1 also holds the Allen keys, so keep them there for later adjustments.
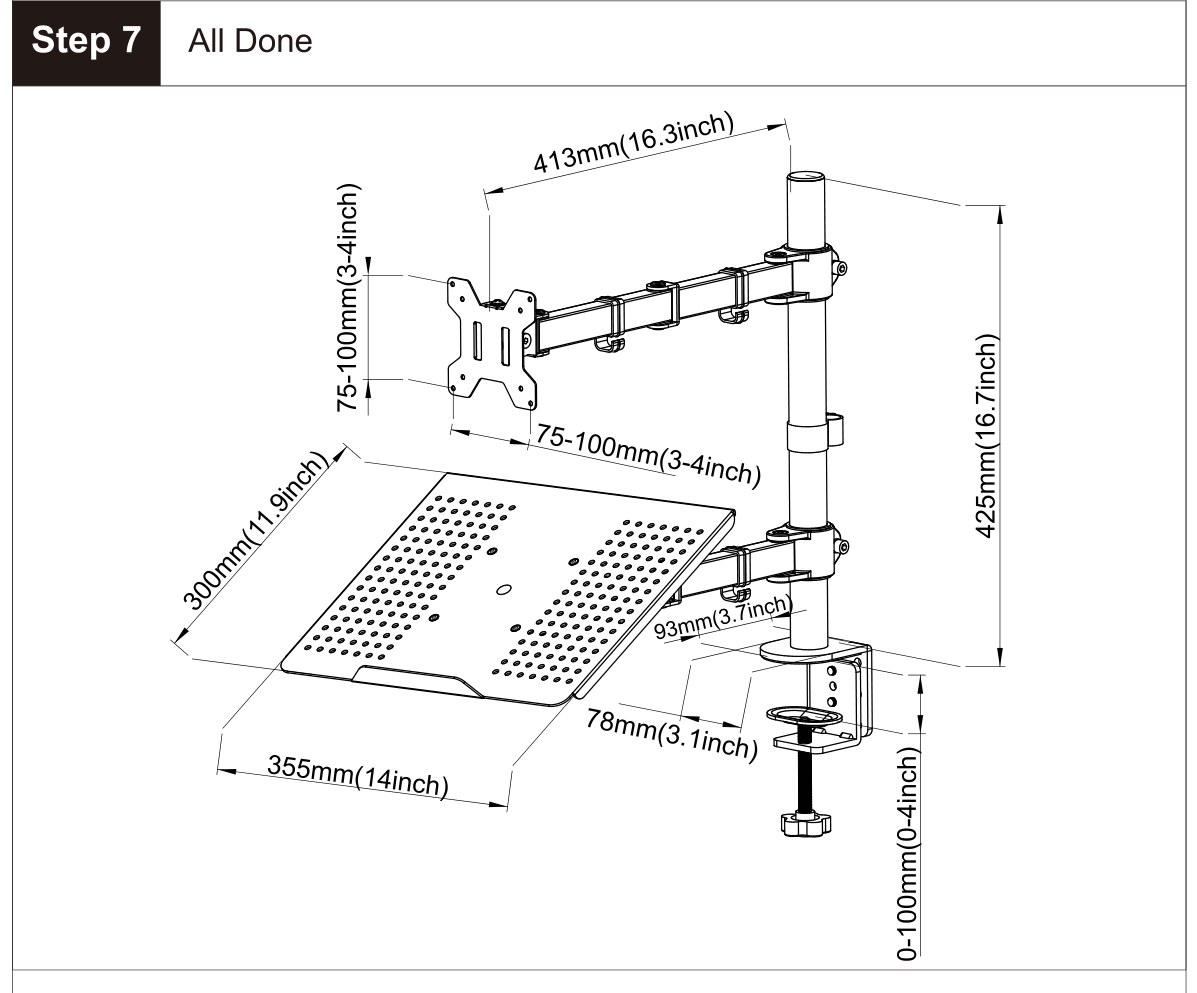
Step 7 — The mount is ready
The drawing gives the main dimensions of the assembled mount: arm reach 413 mm, pole height 425 mm, VESA hole spacing 75–100 mm and the clamp opening for desktops up to 100 mm thick.
Using the mount
The height is set with the Allen key; everything else is set by hand:
- Height — loosen the arm collar, move the arm on the pole (100–400 mm) and tighten it again
- Arm swing — 360° around the pole, each arm independently
- Monitor tilt — −90° to +90°
- Monitor rotation — −90° to +90°, so the screen can be turned to portrait; make sure the nut (h) is on first
- Load — up to 10 kg for the monitor and the laptop together
Frequently asked questions
What monitor sizes and standards are supported?
What is the maximum load capacity?
How can I mount the stand to my desk?
What range of motion do the arms provide?
Can I use the monitor and the laptop at the same time?
Can I put a curved monitor on it?
Downloads
The manuals and datasheets in PDF, in case an offline copy is needed. Everything in them is on this page as well.