Triple monitor desk arm with gas springs, SolidHand-SG03
GTIN: 5907614664862 · SKU: SolidHand-SG03
The SolidHand-SG03 holds three monitors of 13 to 27 inches, each up to 8 kg, on one steel pole fixed to the desk. Each of the three arms has its own gas spring, so every screen moves with a light push and stays wherever you leave it, tilts ±45°, swivels ±90° and rotates ±90° to portrait. The pole mounts with the clamp on the edge of the desk or through a hole in the desktop.
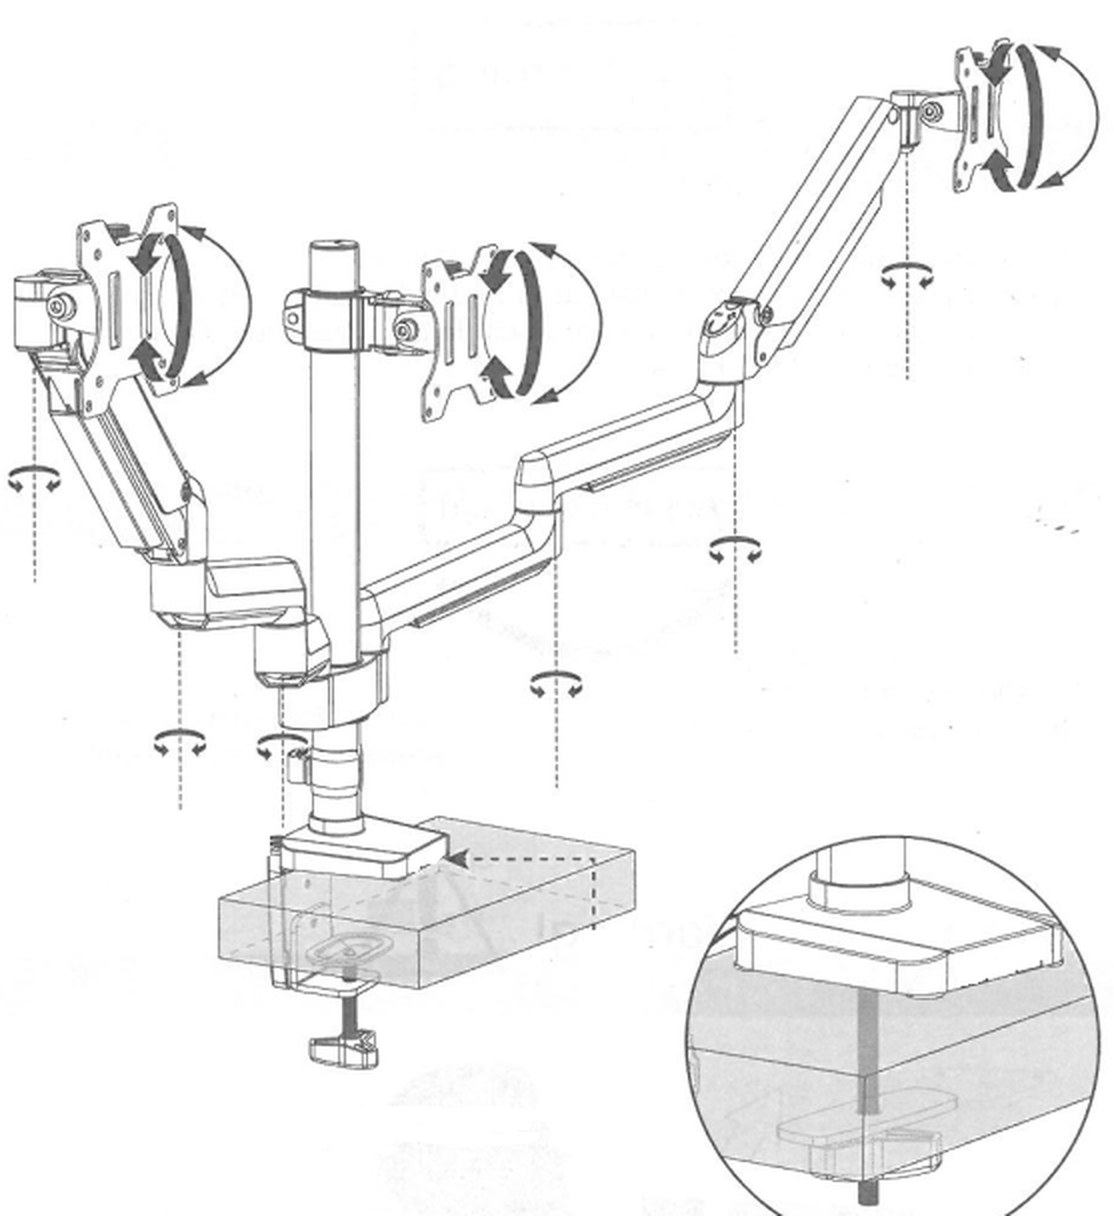
Table of contents
Specifications
- Colour: black
- Material: steel
- Number of monitors: 3
- Monitor size: 13–27"
- Load: 2–8 kg per arm
- VESA pattern: 75 × 75 mm, 100 × 100 mm
- Height adjustment: gas spring assisted
- Arm swivel: 360°
- Monitor swivel: ±90°
- Monitor tilt: ±45°
- Mounting: desk clamp or grommet
- Desktop thickness: 10–80 mm with the clamp, up to 75 mm with the grommet
- Dimensions: 17 × 40.5 × 16 cm
Kit contents
- 01 — base (× 1), 02 — pole (× 1), 10 — self-adhesive foot pads (× 1)
- 03 — clamp brace (× 1), 09 — clamp (× 1), 08 — knob (× 1), 04 — cable cover (× 1)
- 05 — grommet bolt (× 1), 06 — grommet plate (× 1), 07 — locking plate (× 1)
- 12 — arm assembly (× 1), 11 — cable clip (× 1), 13 — centre monitor head (× 1)
- 14 — monitor plate (× 3), 15 — M6 × 12 mm thumb screw (× 3)
- A — M6 × 10 mm bolt (× 2), B — M6 × 12 mm bolt (× 3), C — M6 × 20 mm bolt (× 3)
- M-A — M4 × 12 mm monitor bolt (× 12), M-B — M4 × 30 mm monitor bolt (× 12), M-C — M4 washer (× 12), M-D — spacer (× 12)
- D — 4 mm Allen key, E — 6 mm Allen key, F — 5 mm Allen key (× 1 each)
Not every part in the kit is used — the clamp and the grommet set are alternatives.

Before you start
Assembly takes about forty minutes. Prepare the following:
- Read the whole manual before you begin; if anything is unclear, contact us
- Check that every part from the list above is in the box and undamaged — do not use damaged or defective parts, contact us for a replacement
- A Phillips screwdriver for the monitor bolts; the three Allen keys are in the kit. For grommet mounting without an existing hole you also need a drill with an 11–22 mm bit
- A second person to hold the monitors while they are hung
- Three monitors of 13–27" with VESA 75 × 75 or 100 × 100 holes, each weighing 2–8 kg
Never exceed the rated load. A monitor heavier than 8 kg can make the arm fail and cause damage or injury. The desk must carry three times the total weight of the mount, the monitors and all accessories — do not mount the arm on a chipboard desktop.
Safety instructions
- Do not use the product for any purpose other than the one described in this manual.
- The manufacturer is not liable for damage or injury caused by improper assembly, incorrect mounting or misuse.
- The arms contain high-pressure gas springs: keep them away from fire, do not hit them and do not take them apart yourself.
- Check the VESA pattern before you start: the mount fits 75 × 75 mm and 100 × 100 mm only — a monitor with a larger or smaller pattern is not compatible.
- The product contains small parts that can be a choking hazard if swallowed. Keep them away from children.
Assembly
Step 1 — Assemble the pole
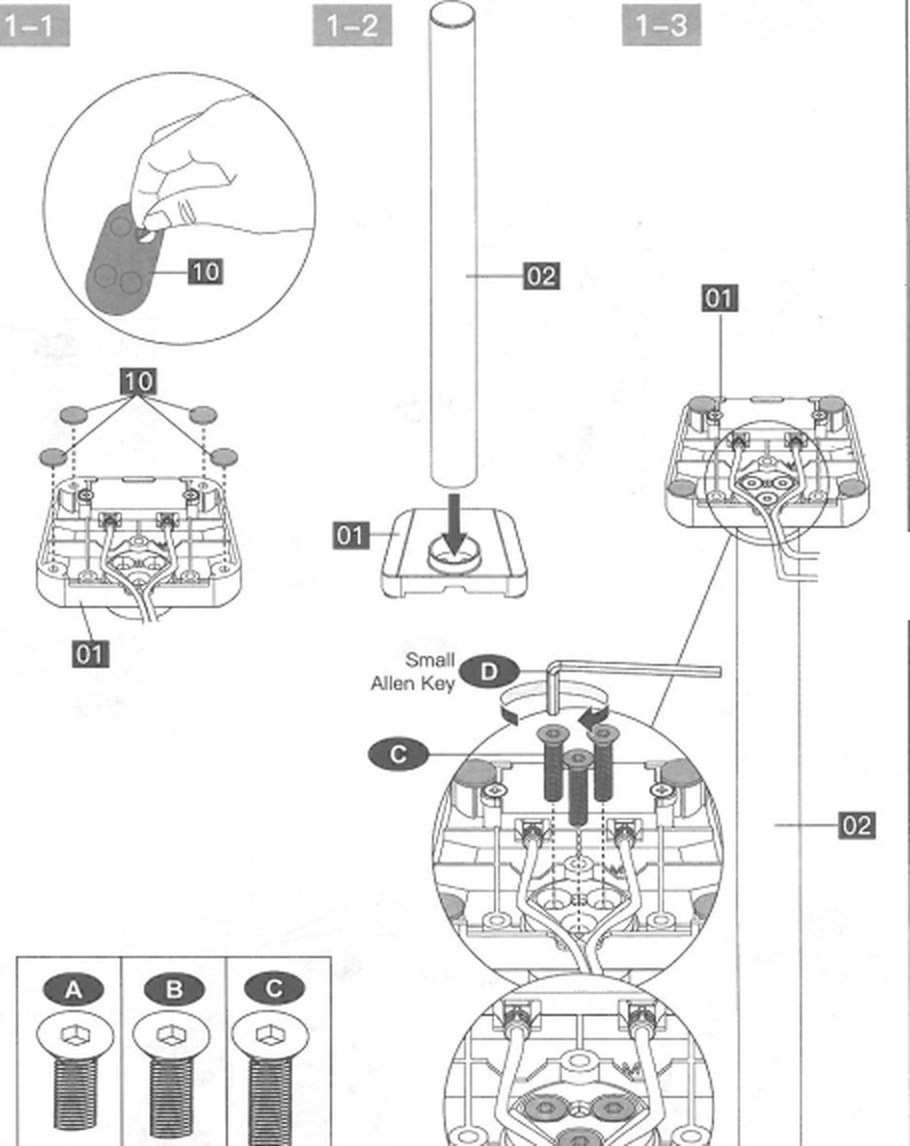
- Stick the foot pads (10) onto the underside of the base (01) (fig. 1-1).
- Put the pole (02) into the socket of the base (fig. 1-2).
- Turn the base over and fix the pole from below with the three M6 × 20 mm bolts (C), tightened with the 4 mm Allen key (D) (fig. 1-3).
Step 2 — Fix the base to the desk
The base can be fixed to the desk in two ways: with the clamp on the edge of the desktop (option A) or through a hole in the desktop with the grommet set (option B).
Option A — desk clamp
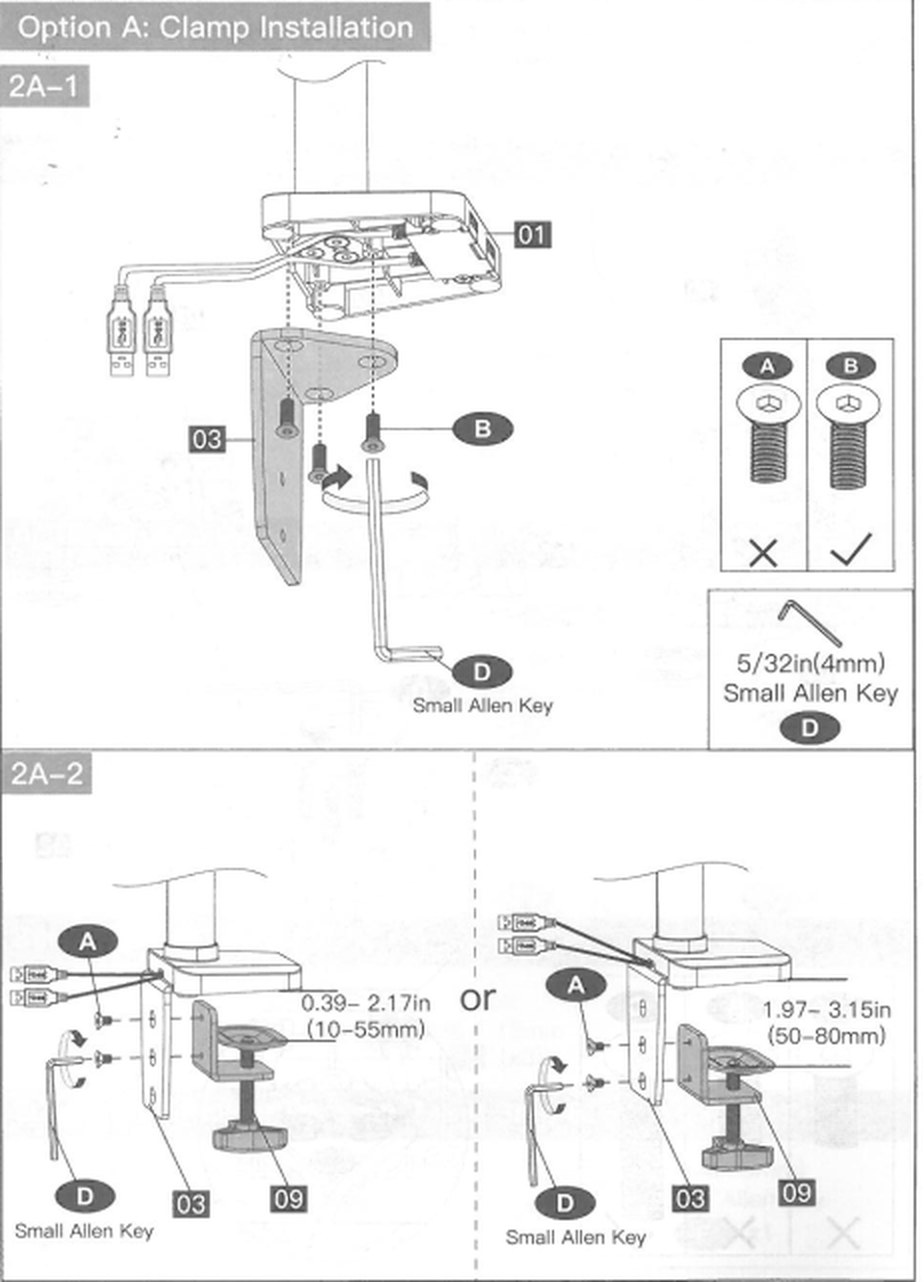
- Bolt the clamp brace (03) to the underside of the base (01) with the three M6 × 12 mm bolts (B), using the 4 mm Allen key (D) — not the shorter bolts A (fig. 2A-1).
- Bolt the clamp (09) to the brace with the two M6 × 10 mm bolts (A). Choose the holes to match the desktop: the upper holes for 10–55 mm, the lower holes for 50–80 mm (fig. 2A-2).
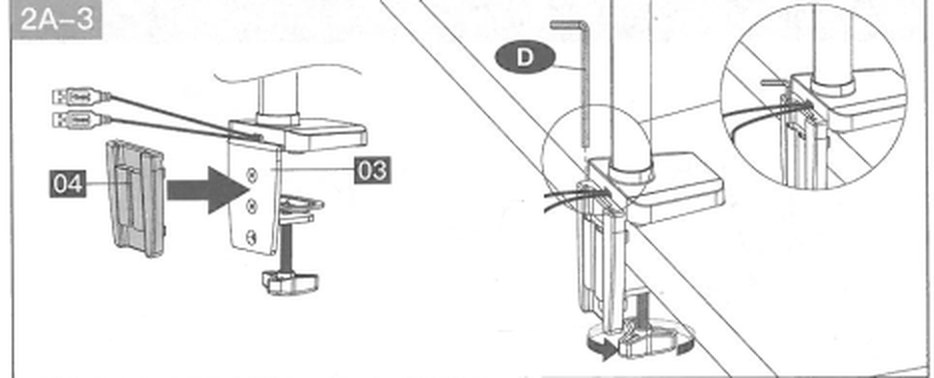
- Clip the cable cover (04) onto the brace, hook the clamp over the edge of the desk and tighten the knob underneath until the base stands firm (fig. 2A-3).
Option B — through a hole in the desktop
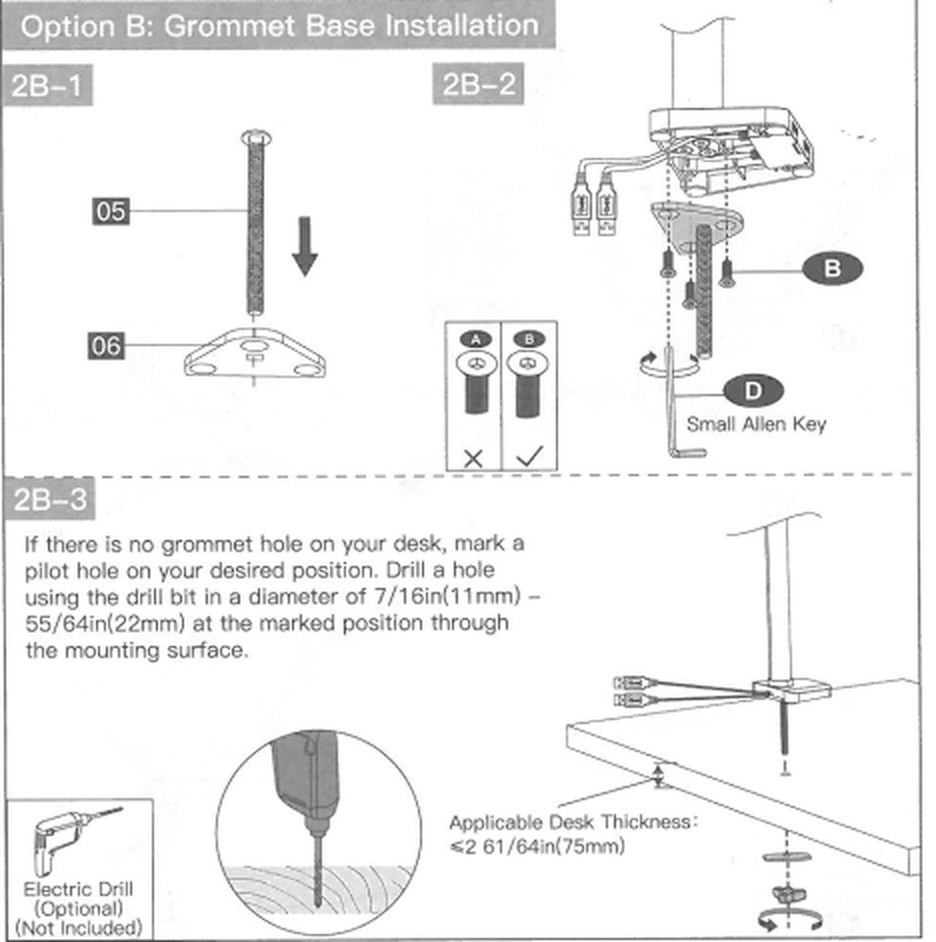
If the desk has no cable hole, mark the spot and drill a hole of 11–22 mm through the desktop. The desktop can be up to 75 mm thick.
- Push the grommet bolt (05) down through the grommet plate (06) (fig. 2B-1).
- Bolt the plate with the bolt to the underside of the base with the three M6 × 12 mm bolts (B), using the 4 mm Allen key (D) (fig. 2B-2).
- Stand the base on the desk with the bolt through the hole, slide the locking plate (07) onto the bolt from below and tighten the knob (08) until the base stands firm (fig. 2B-3).
Step 3 — Fit the arms
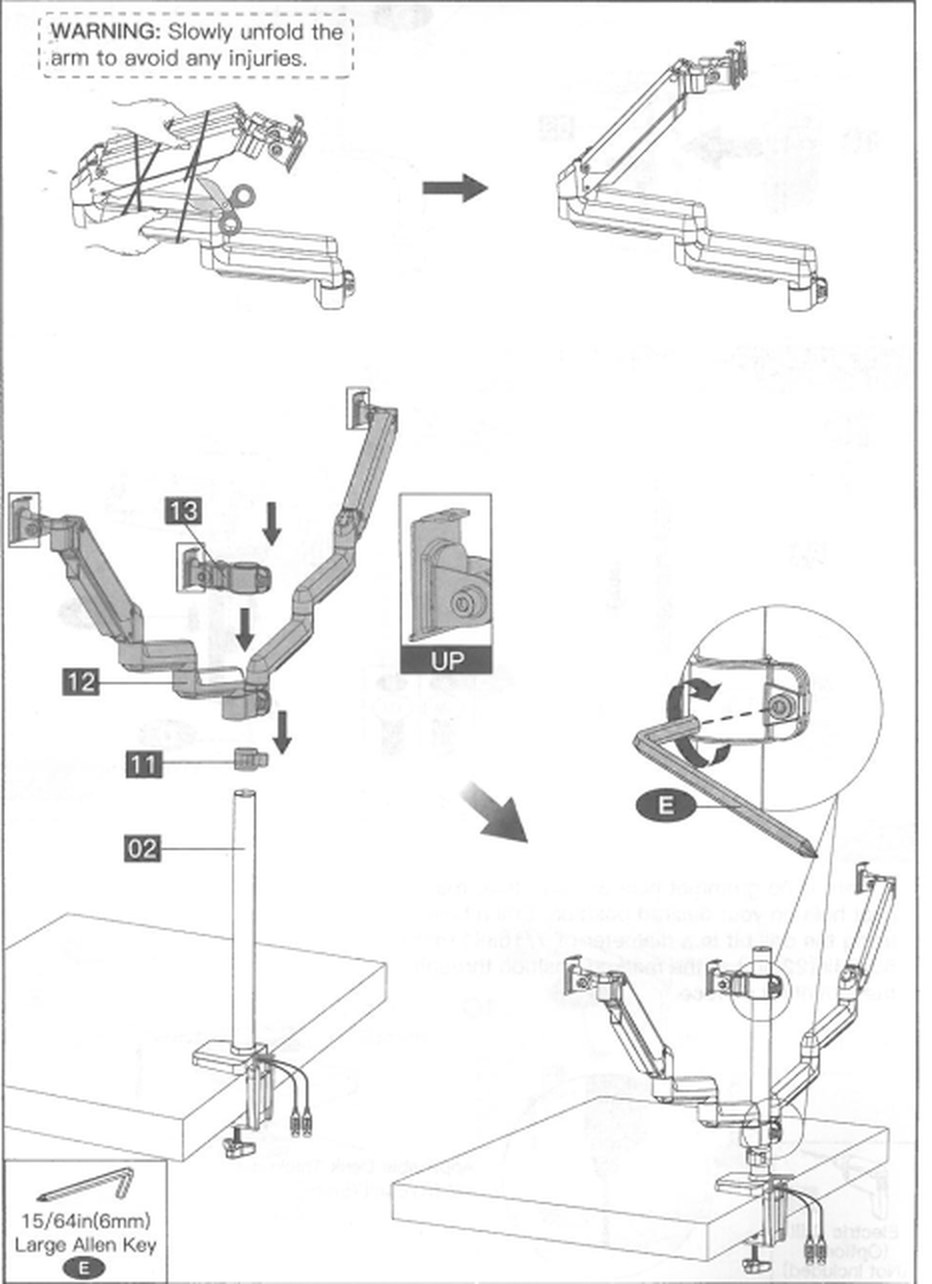
The arms are folded and strapped for transport — unfold them slowly, they are under spring tension.
- Slide the cable clip (11) onto the pole (02).
- Slide the arm assembly (12) onto the pole and then the centre monitor head (13) on top of it, with its UP mark upwards.
- Tighten the collar screws of the arms and the head with the 6 mm Allen key (E) so that nothing slides down the pole.
Step 4 — Fit the plates to the monitors
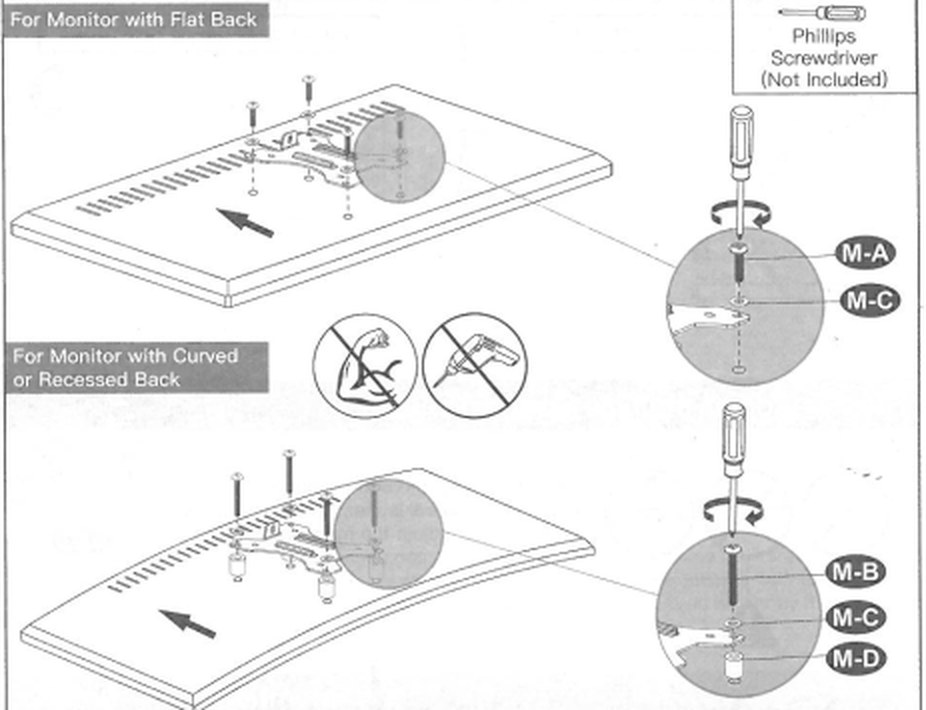
- Monitor with a flat back: screw a monitor plate (14) to each monitor with four M4 × 12 mm bolts (M-A) and the M4 washers (M-C).
- Monitor with a curved or recessed back: use the four M4 × 30 mm bolts (M-B) with the washers (M-C) and the spacers (M-D), so that the plate sits flat.
- Tighten the bolts by hand with a Phillips screwdriver — not with a power tool and not with force.
Step 5 — Hang the monitors
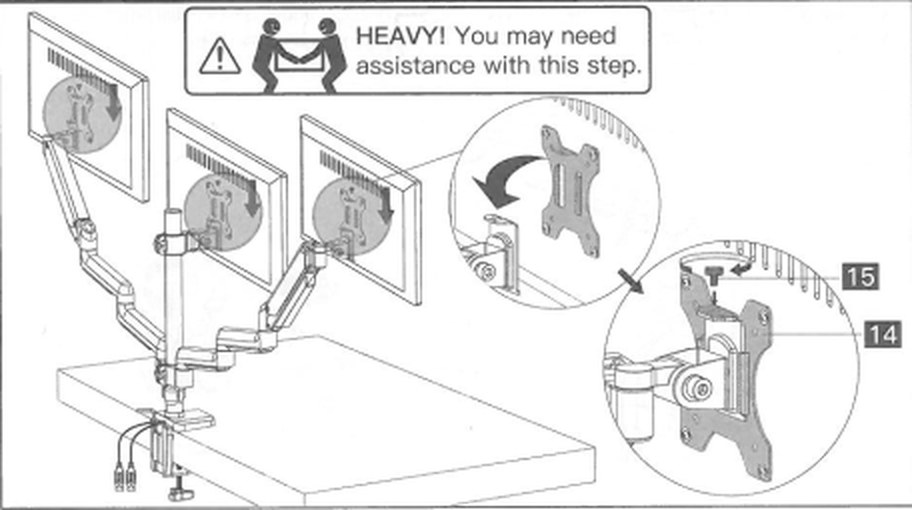
- With a second person holding the monitor, hook its plate (14) onto the head of the arm from above as shown.
- Lock each plate with the thumb screw (15) on top of the head so that the monitor cannot lift off.
Do not let go of a monitor until its thumb screw (15) is tightened.
Step 6 — Rotation limit
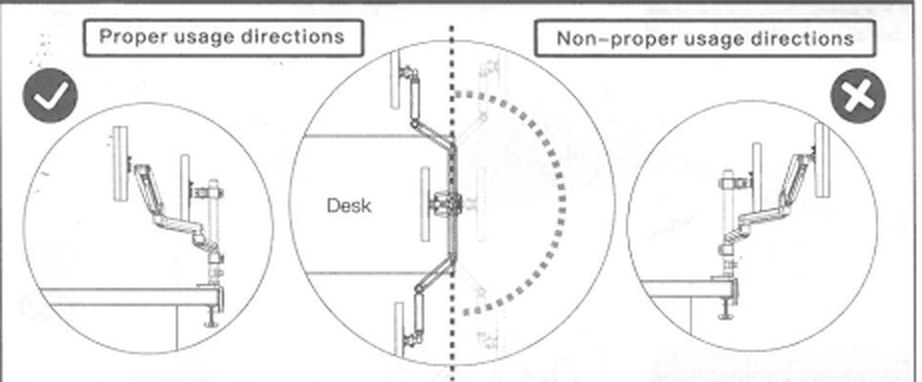
Keep the monitors above the desktop. Do not swing an arm out beyond the edge of the desk — the mount becomes unstable and can tip over.
Step 7 — Set the gas spring tension
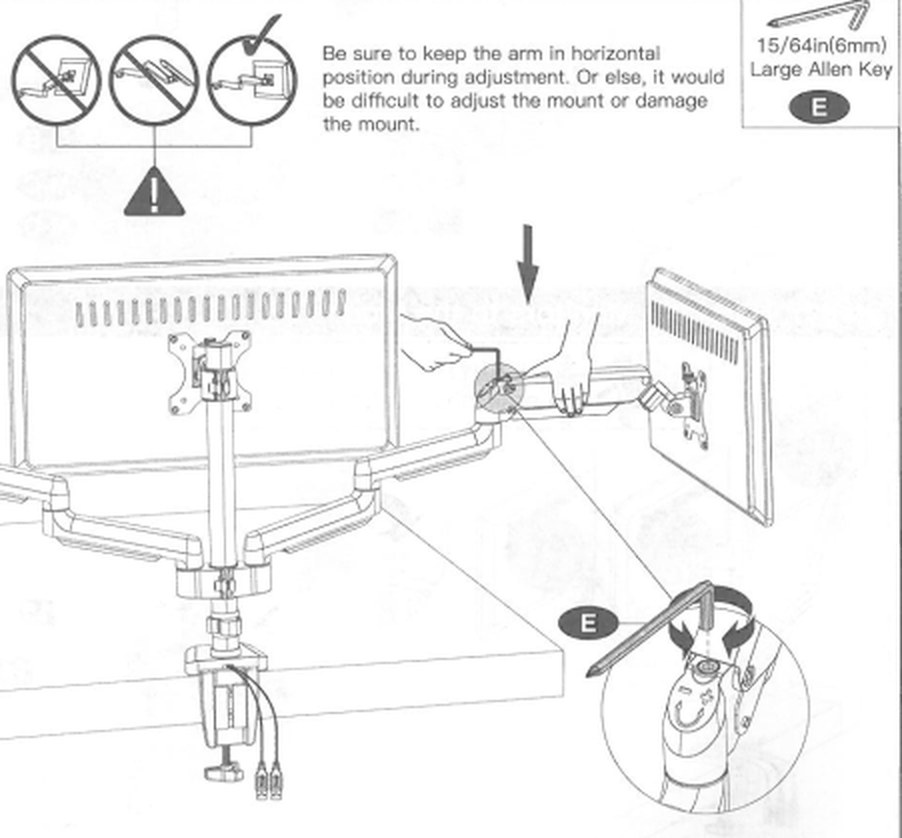
Adjust the tension only after the monitors are mounted — never with an empty arm. Hold the arm horizontal while you turn the screw with the 6 mm Allen key (E); otherwise the adjustment is hard and can damage the mechanism. The screw sits in the arm next to the head joint:
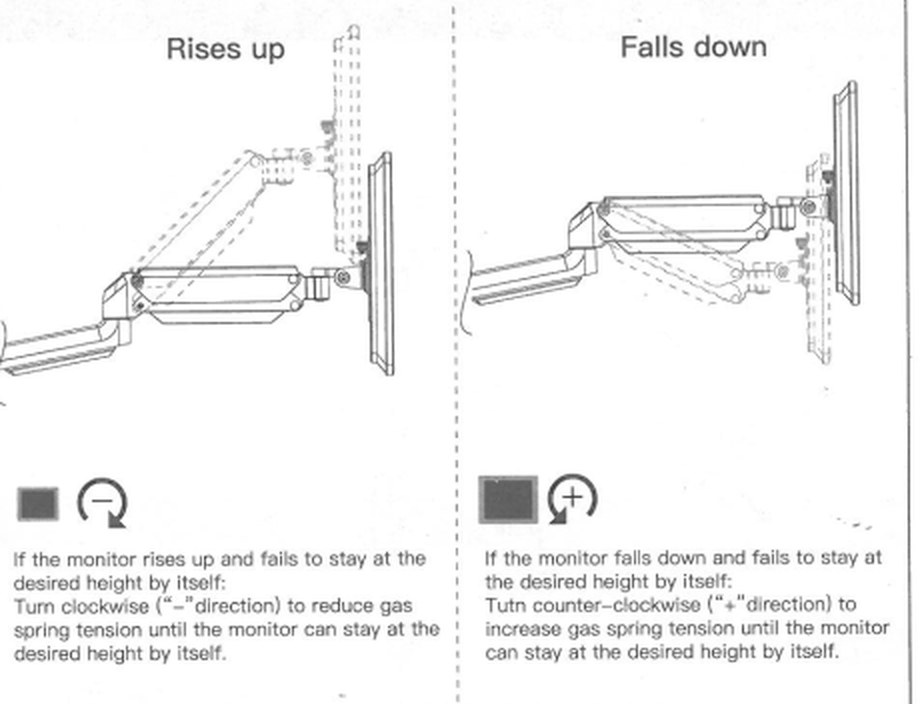
- The monitor rises and does not stay at the height you set: turn clockwise (−) to reduce the tension until the arm holds the position.
- The monitor sinks and does not stay at the height you set: turn counter-clockwise (+) to increase the tension until the arm holds the monitor.
Step 8 — Set the tilt
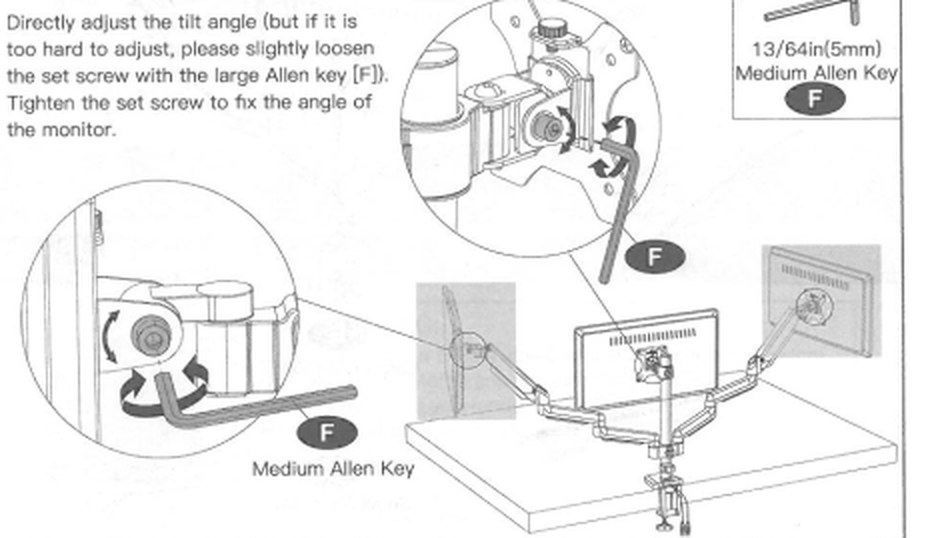
Tilt the monitor by hand. If it is too stiff or too loose, loosen or tighten the adjustment screw on the head slightly with the 5 mm Allen key (F), then tighten it to hold the angle.
Using the mount
Once the tension is set, each of the three screens is adjusted independently by hand:
- Height — take the screen and move it; the gas spring holds it in place
- Swivel — the arms turn 360° around the pole, the heads ±90°
- Tilt — ±45°
- Rotation — ±90°, so any screen can be turned to portrait
- Load — 2 to 8 kg per arm; readjust the tension screw when you change a monitor
- Keep the screens above the desktop — never swing an arm out beyond the edge
Frequently asked questions
What is the maximum screen size the SolidHand-SG03 supports?
How is the SolidHand-SG03 mounted to the desk?
Can each monitor be adjusted independently?
Can I put a curved monitor on it?
An arm sinks or rises on its own — what should I do?
Does the mount have USB ports?
Downloads
The manuals and datasheets in PDF, in case an offline copy is needed. Everything in them is on this page as well.