Desk monitor mount with manual adjustment, SolidHand-UM01
GTIN: 5907614661939 · SKU: SolidHand-UM01
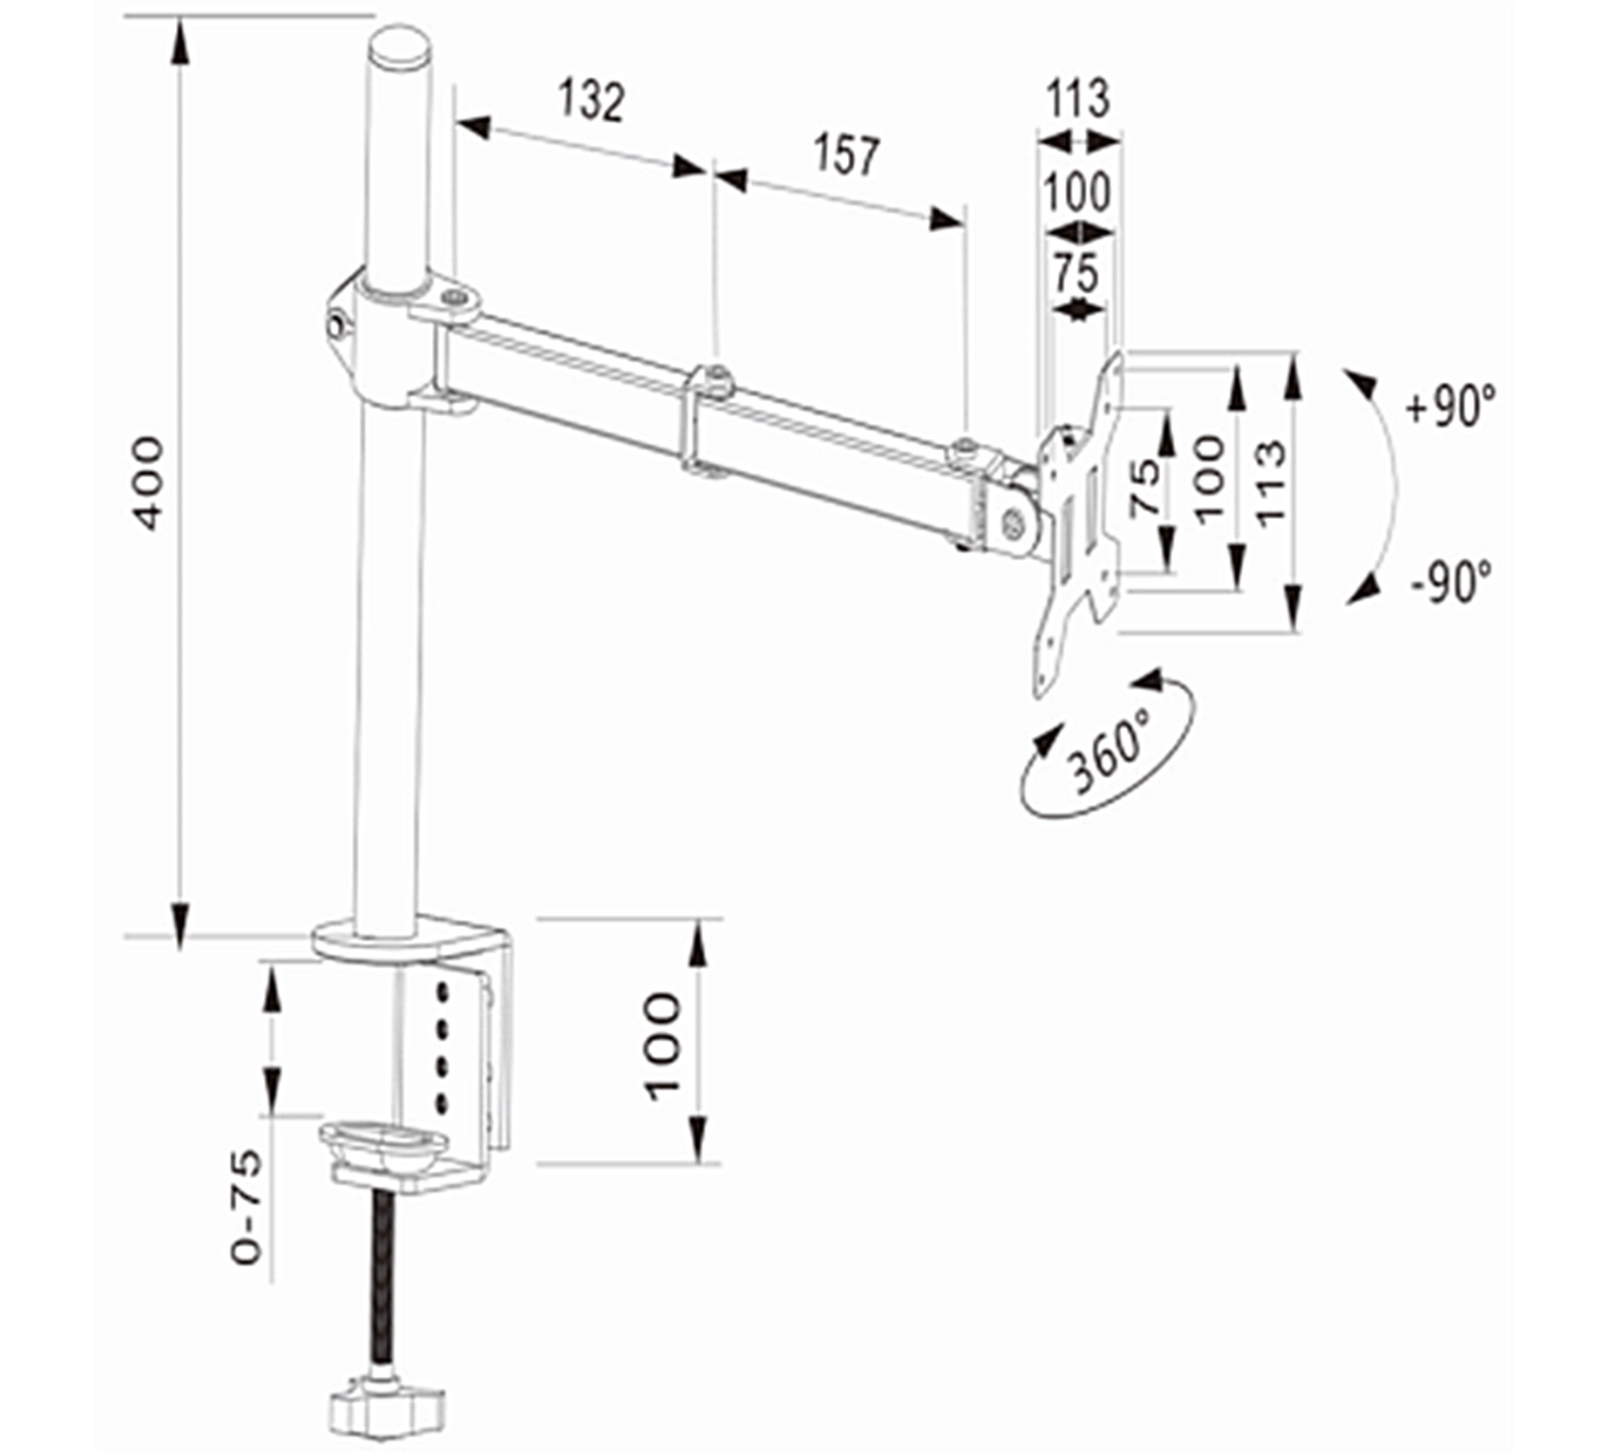
The SolidHand-UM01 holds one monitor of 13 to 27 inches, up to 8 kg, on a two-part arm 289 mm long carried by a steel post. The post is clamped to the edge of the desk and the arm is set on it at any height between 100 and 400 mm above the desktop with an Allen key. The screen turns ±90°, tilts ±90° and swings through a full 360° on the arm; clips along the arm and the post keep the cables tidy.
Table of contents
Specifications
- Colour: black
- Material: steel
- Number of monitors: 1
- Screen size: 13–27 inches
- VESA pattern: 75 × 75 mm, 100 × 100 mm
- Monitor weight: up to 8 kg
- Height adjustment: manual, with tools
- Arm swivel range: 360°
- Monitor rotation range: −90° ~ 90°
- Monitor tilt range: −90° ~ 90°
- Arm height range: 100–400 mm above the desktop
- Arm length: 289 mm (two sections, 132 + 157 mm)
- Mounting: desk clamp, desktop up to 75 mm thick
- Package dimensions: 440 × 130 × 100 mm
- Product weight: 1.8 kg
- Weight with packaging: 2.6 kg
Kit contents
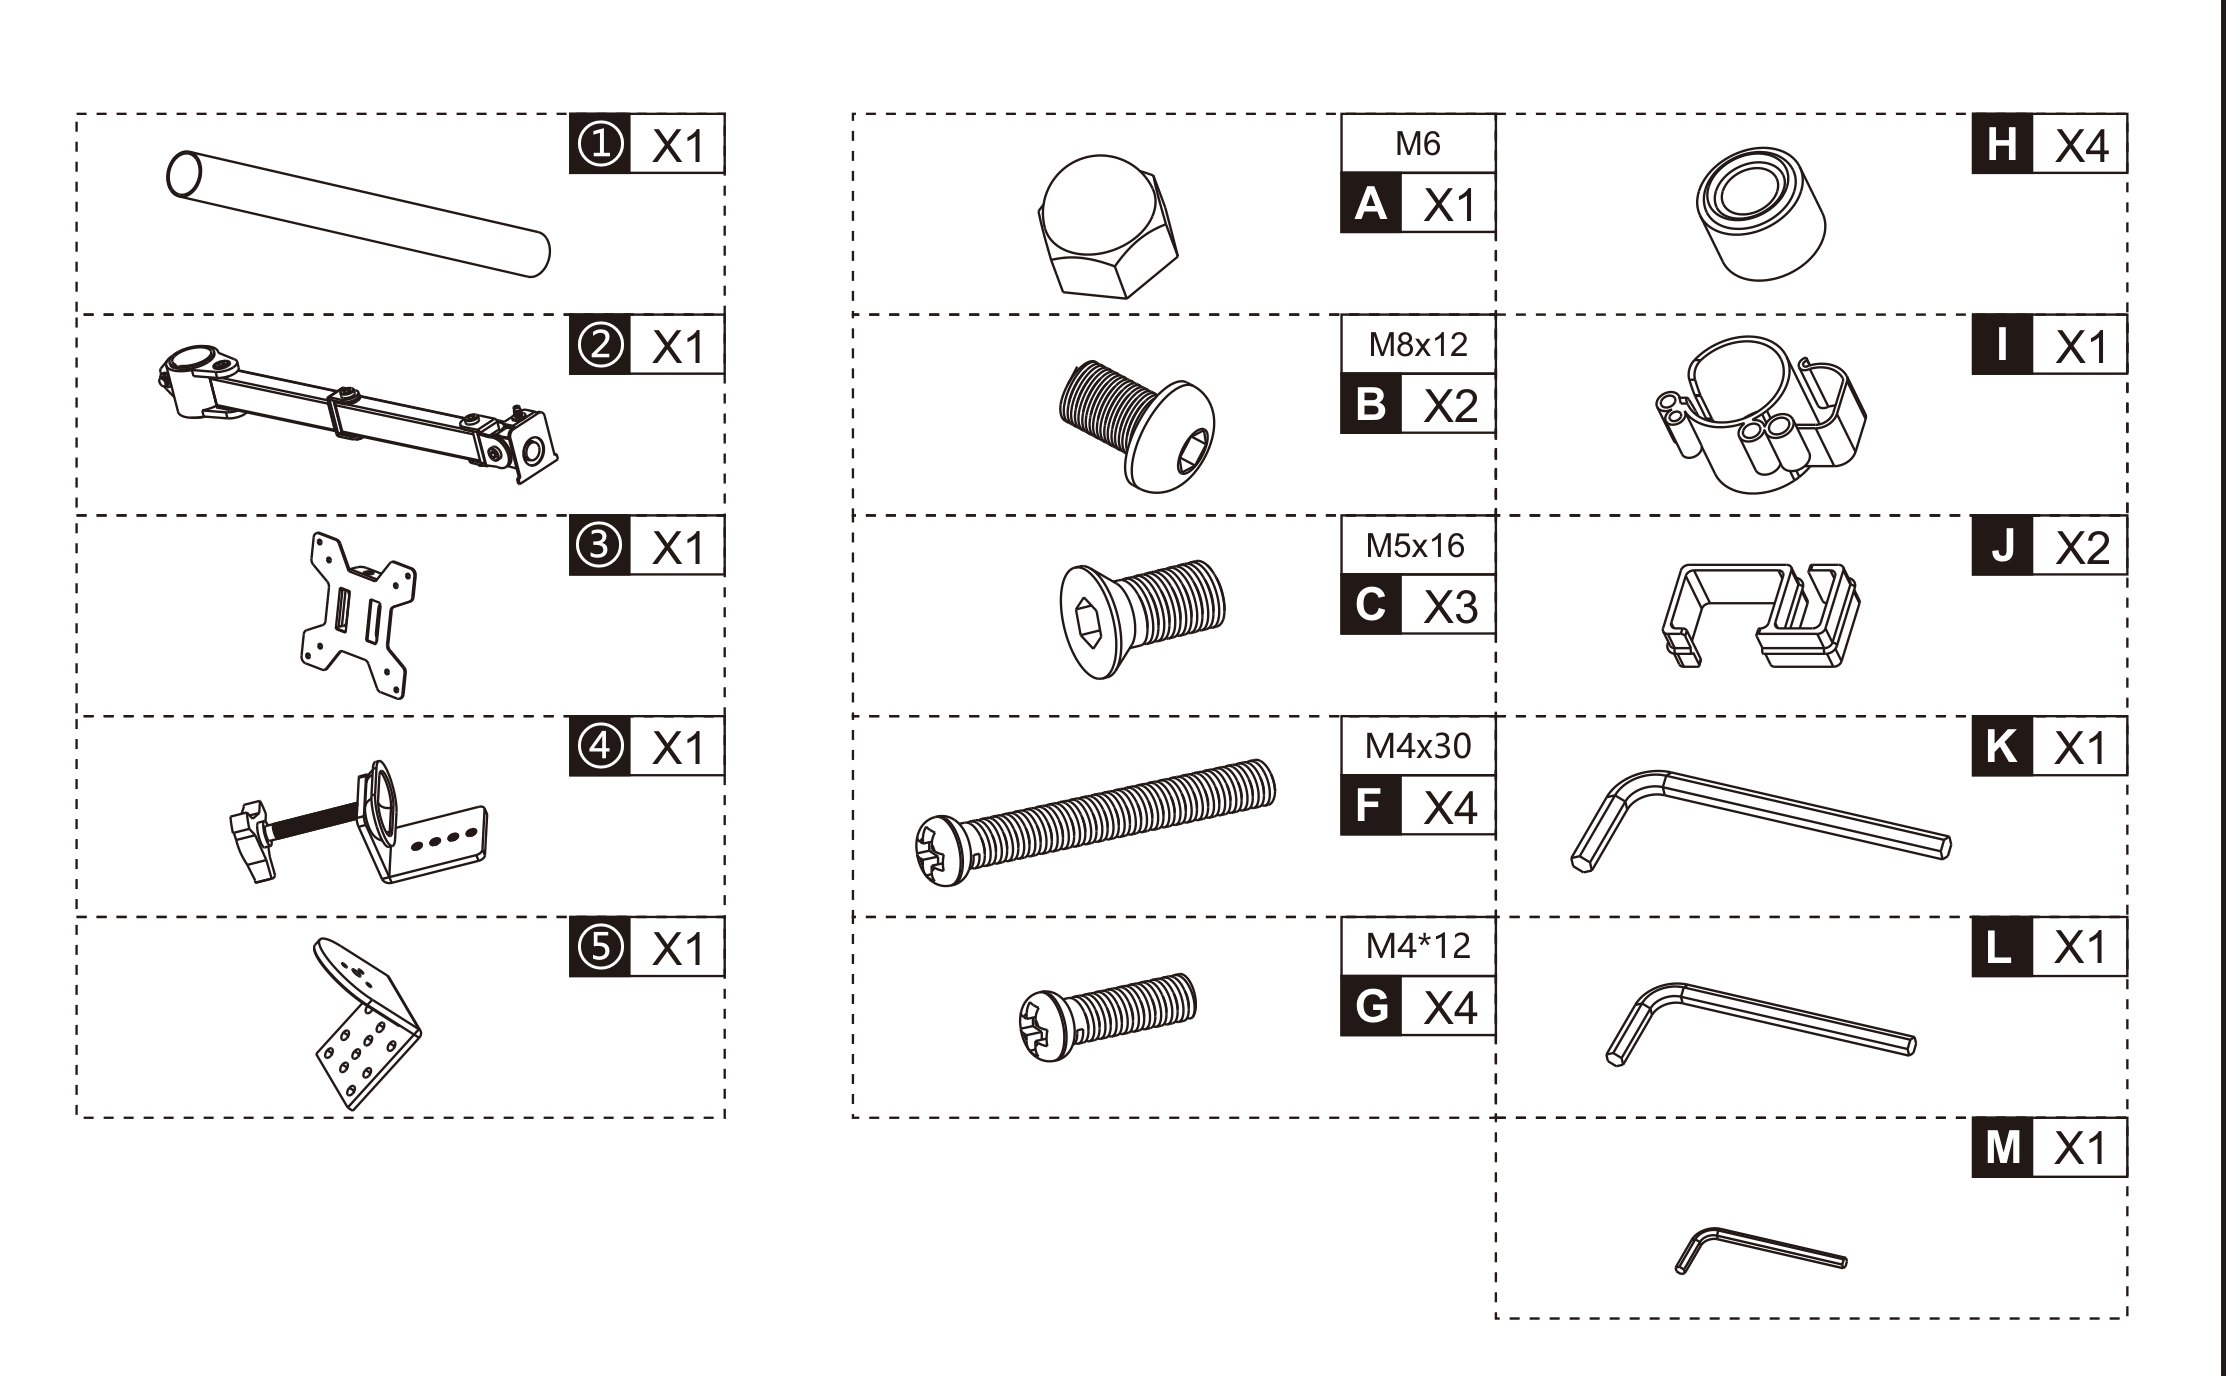
- ① — post (× 1)
- ② — two-part arm with VESA joint (× 1)
- ③ — VESA plate (× 1)
- ④ — desk clamp (× 1)
- ⑤ — base bracket (× 1)
- A — M6 nut (× 1)
- B — M8 × 12 screw (× 2)
- C — M5 × 16 screw (× 3)
- F — M4 × 30 monitor screw (× 4)
- G — M4 × 12 monitor screw (× 4)
- H — spacer (× 4)
- I — cable clip for the post (× 1)
- J — cable clip for the arm (× 2)
- K — Allen key for the arm collar (× 1)
- L — Allen key for the clamp and the joints (× 1)
- M — Allen key for the base bracket (× 1)
The monitor screws F and G are alternatives: use G (M4 × 12) on a monitor with a flat back, or F (M4 × 30) together with the four spacers (H) when the back of the monitor is curved or the VESA holes are recessed.
Before you start
Assembly takes about fifteen minutes. Prepare the following:
- A second person — hanging the monitor on the arm is a two-person job
- A Phillips screwdriver for the monitor screws; all three Allen keys are in the kit
- A free desk edge with a desktop no thicker than 75 mm, solid enough to carry the mount with the screen
- A check that the monitor weighs no more than 8 kg and has VESA 75 × 75 or 100 × 100 holes
Check that you have received all the parts listed above before you start. If anything is missing or damaged, contact us before assembling the mount.
Assembly
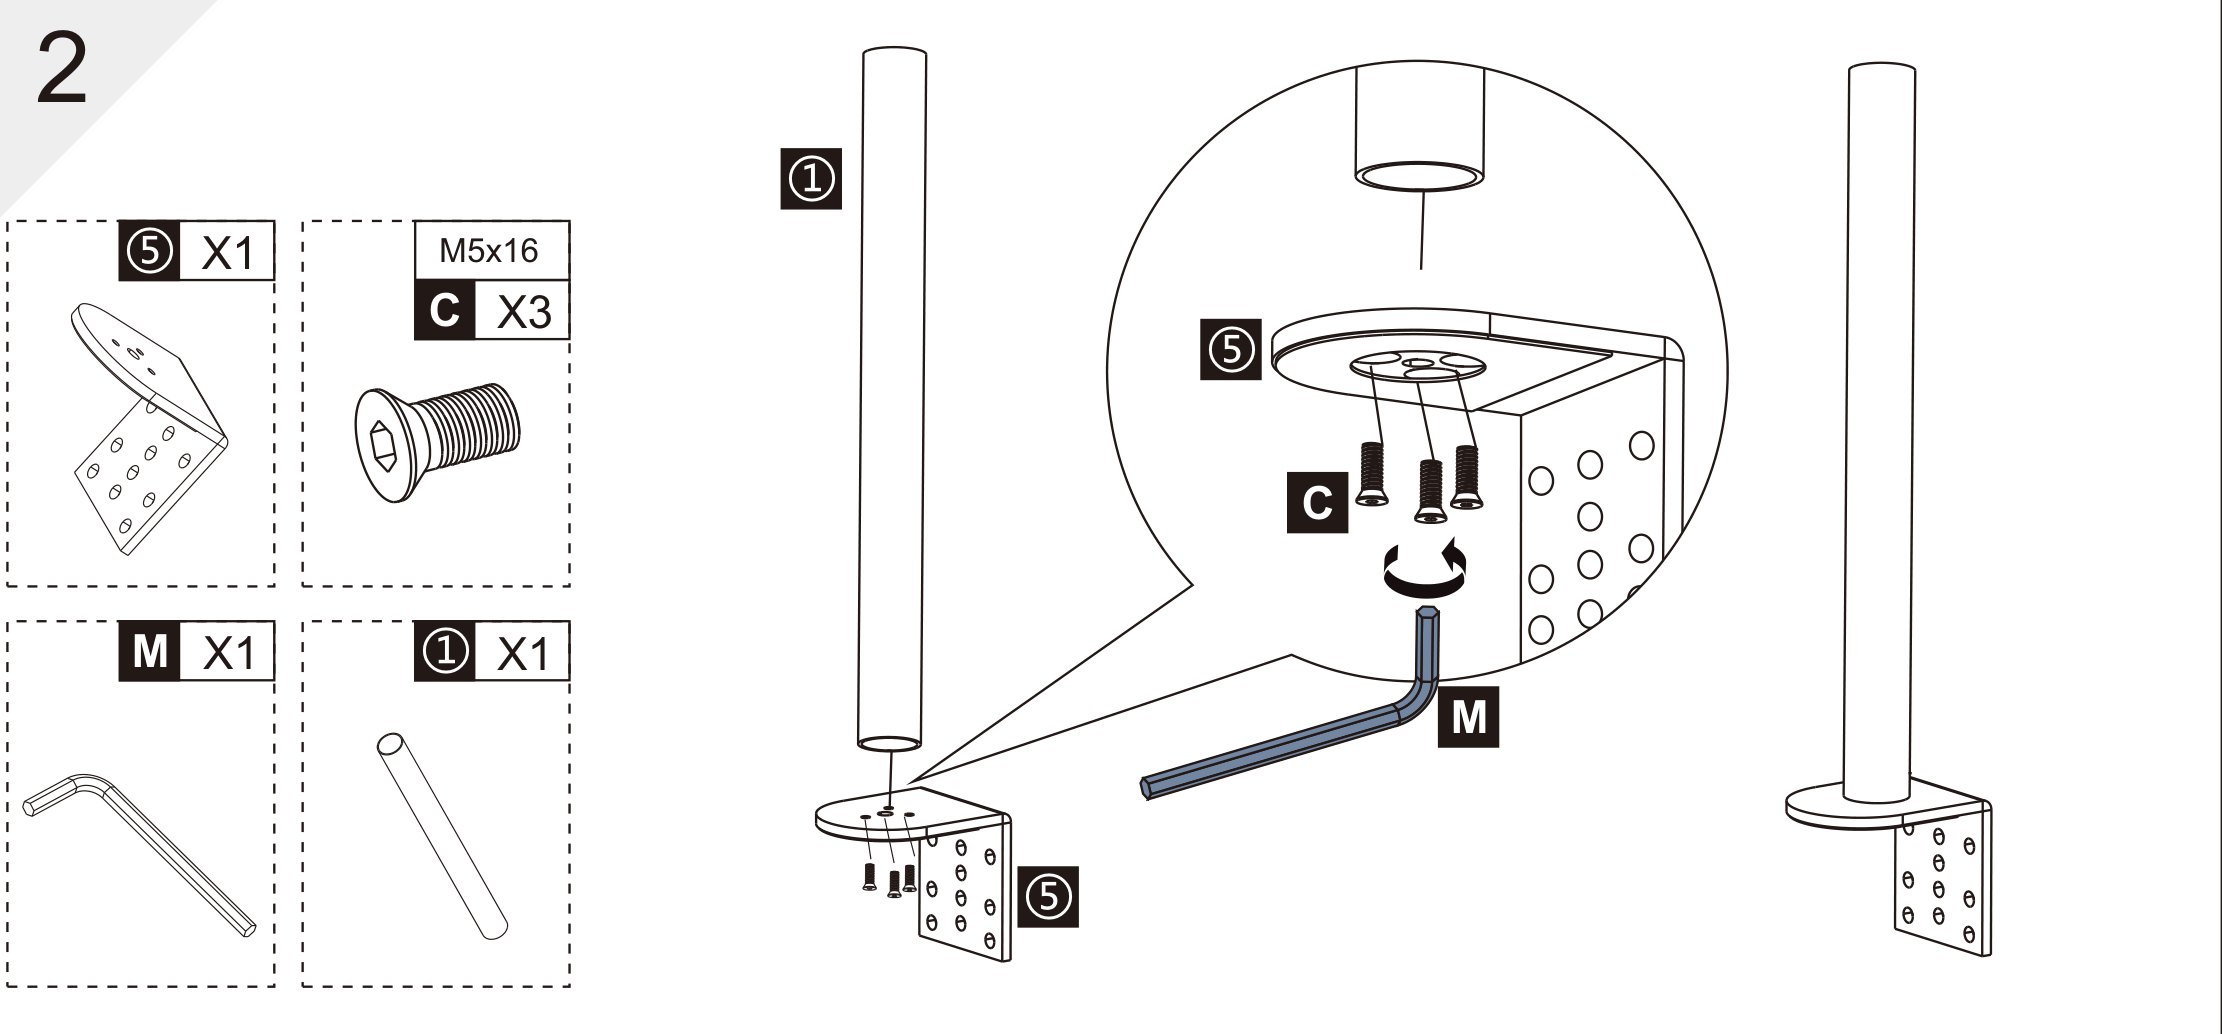
Step 1 — Bolt the base bracket to the post
- Stand the post (①) on the base bracket (⑤) so that the flange of the post sits flat on the bracket.
- Fix them together from underneath with the three M5 × 16 screws (C), using the Allen key (M).
- Tighten the three screws evenly — the post must stand square to the bracket.
Step 2 — Clamp the post to the desk
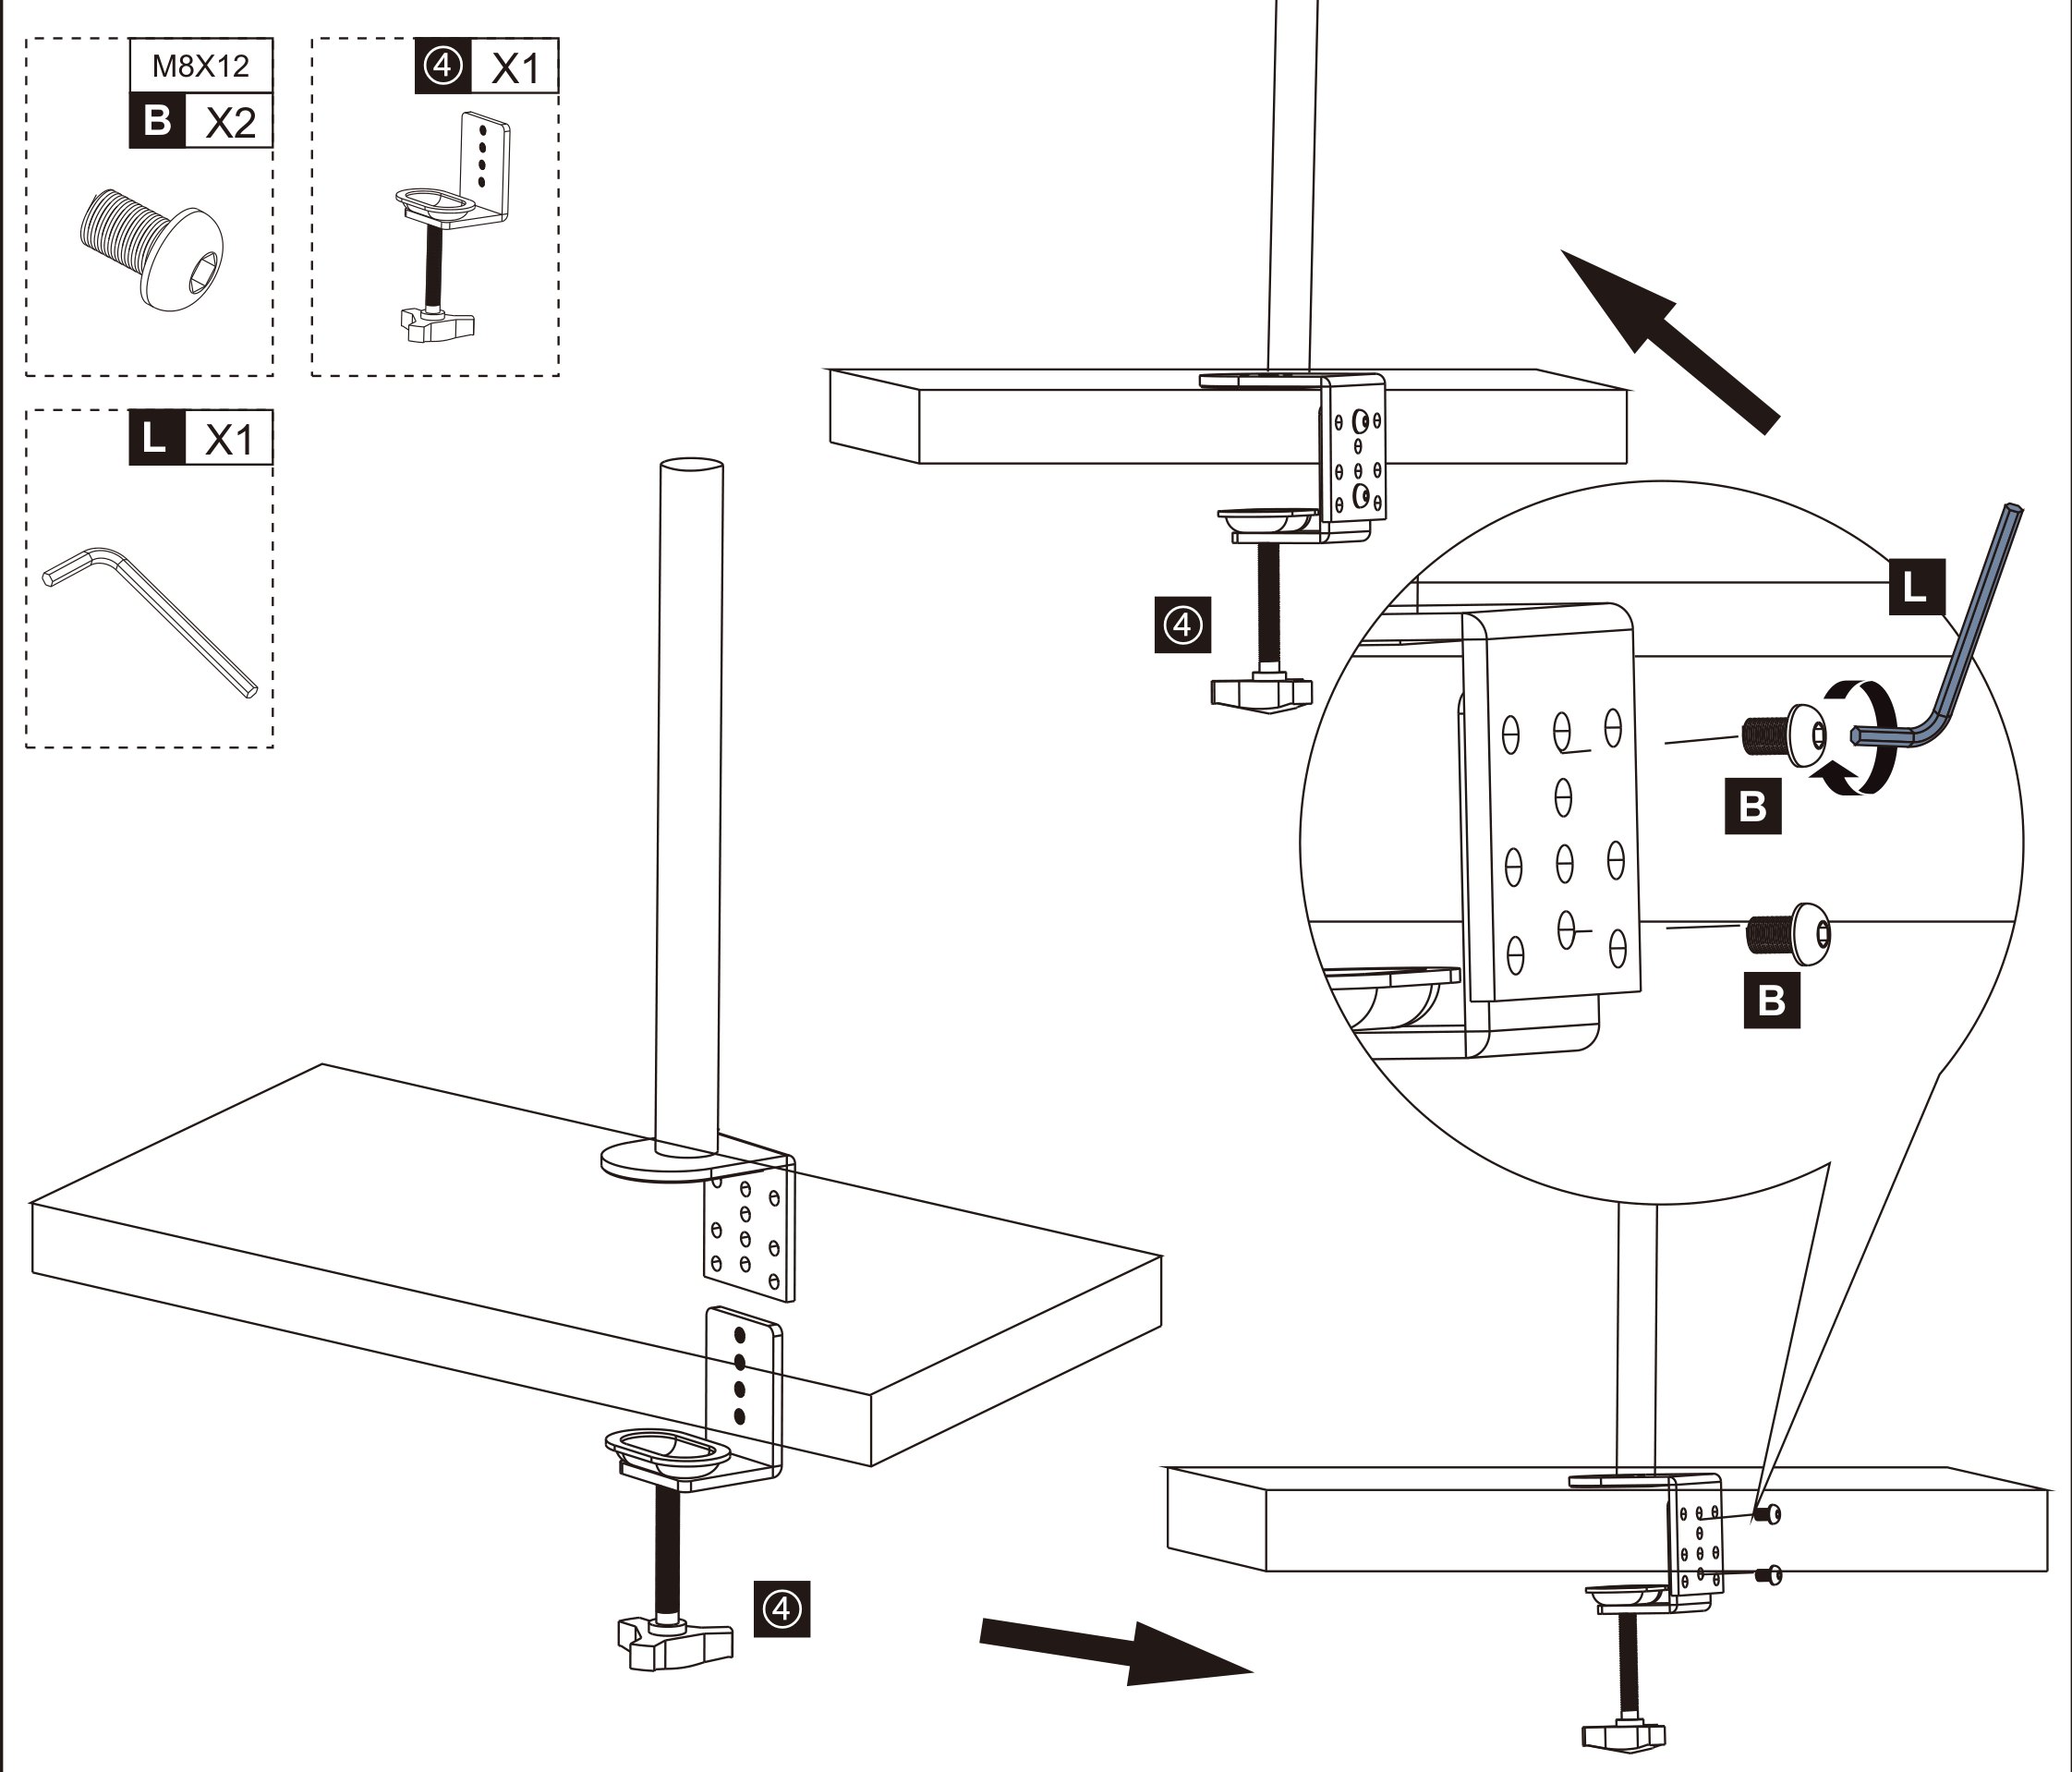
The base bracket has several pairs of holes, so the clamp can be bolted on at the height that matches your desktop.
- Hold the bracket against the edge of the desk and pick the pair of holes that puts the jaw of the clamp (④) just under the desktop.
- Screw the clamp to the bracket with the two M8 × 12 screws (B), using the Allen key (L).
- Put the assembly on the desk edge and turn the clamp screw until its pad presses firmly against the underside of the desktop.
- Check that the post stands vertical and that the mount does not move on the desk.
The desktop may be up to 75 mm thick. The manufacturer's drawings show the clamp mounting only; the shop descriptions also mention fixing the mount through a hole drilled in the desktop using the clamp screw — the kit does not contain a separate grommet plate.
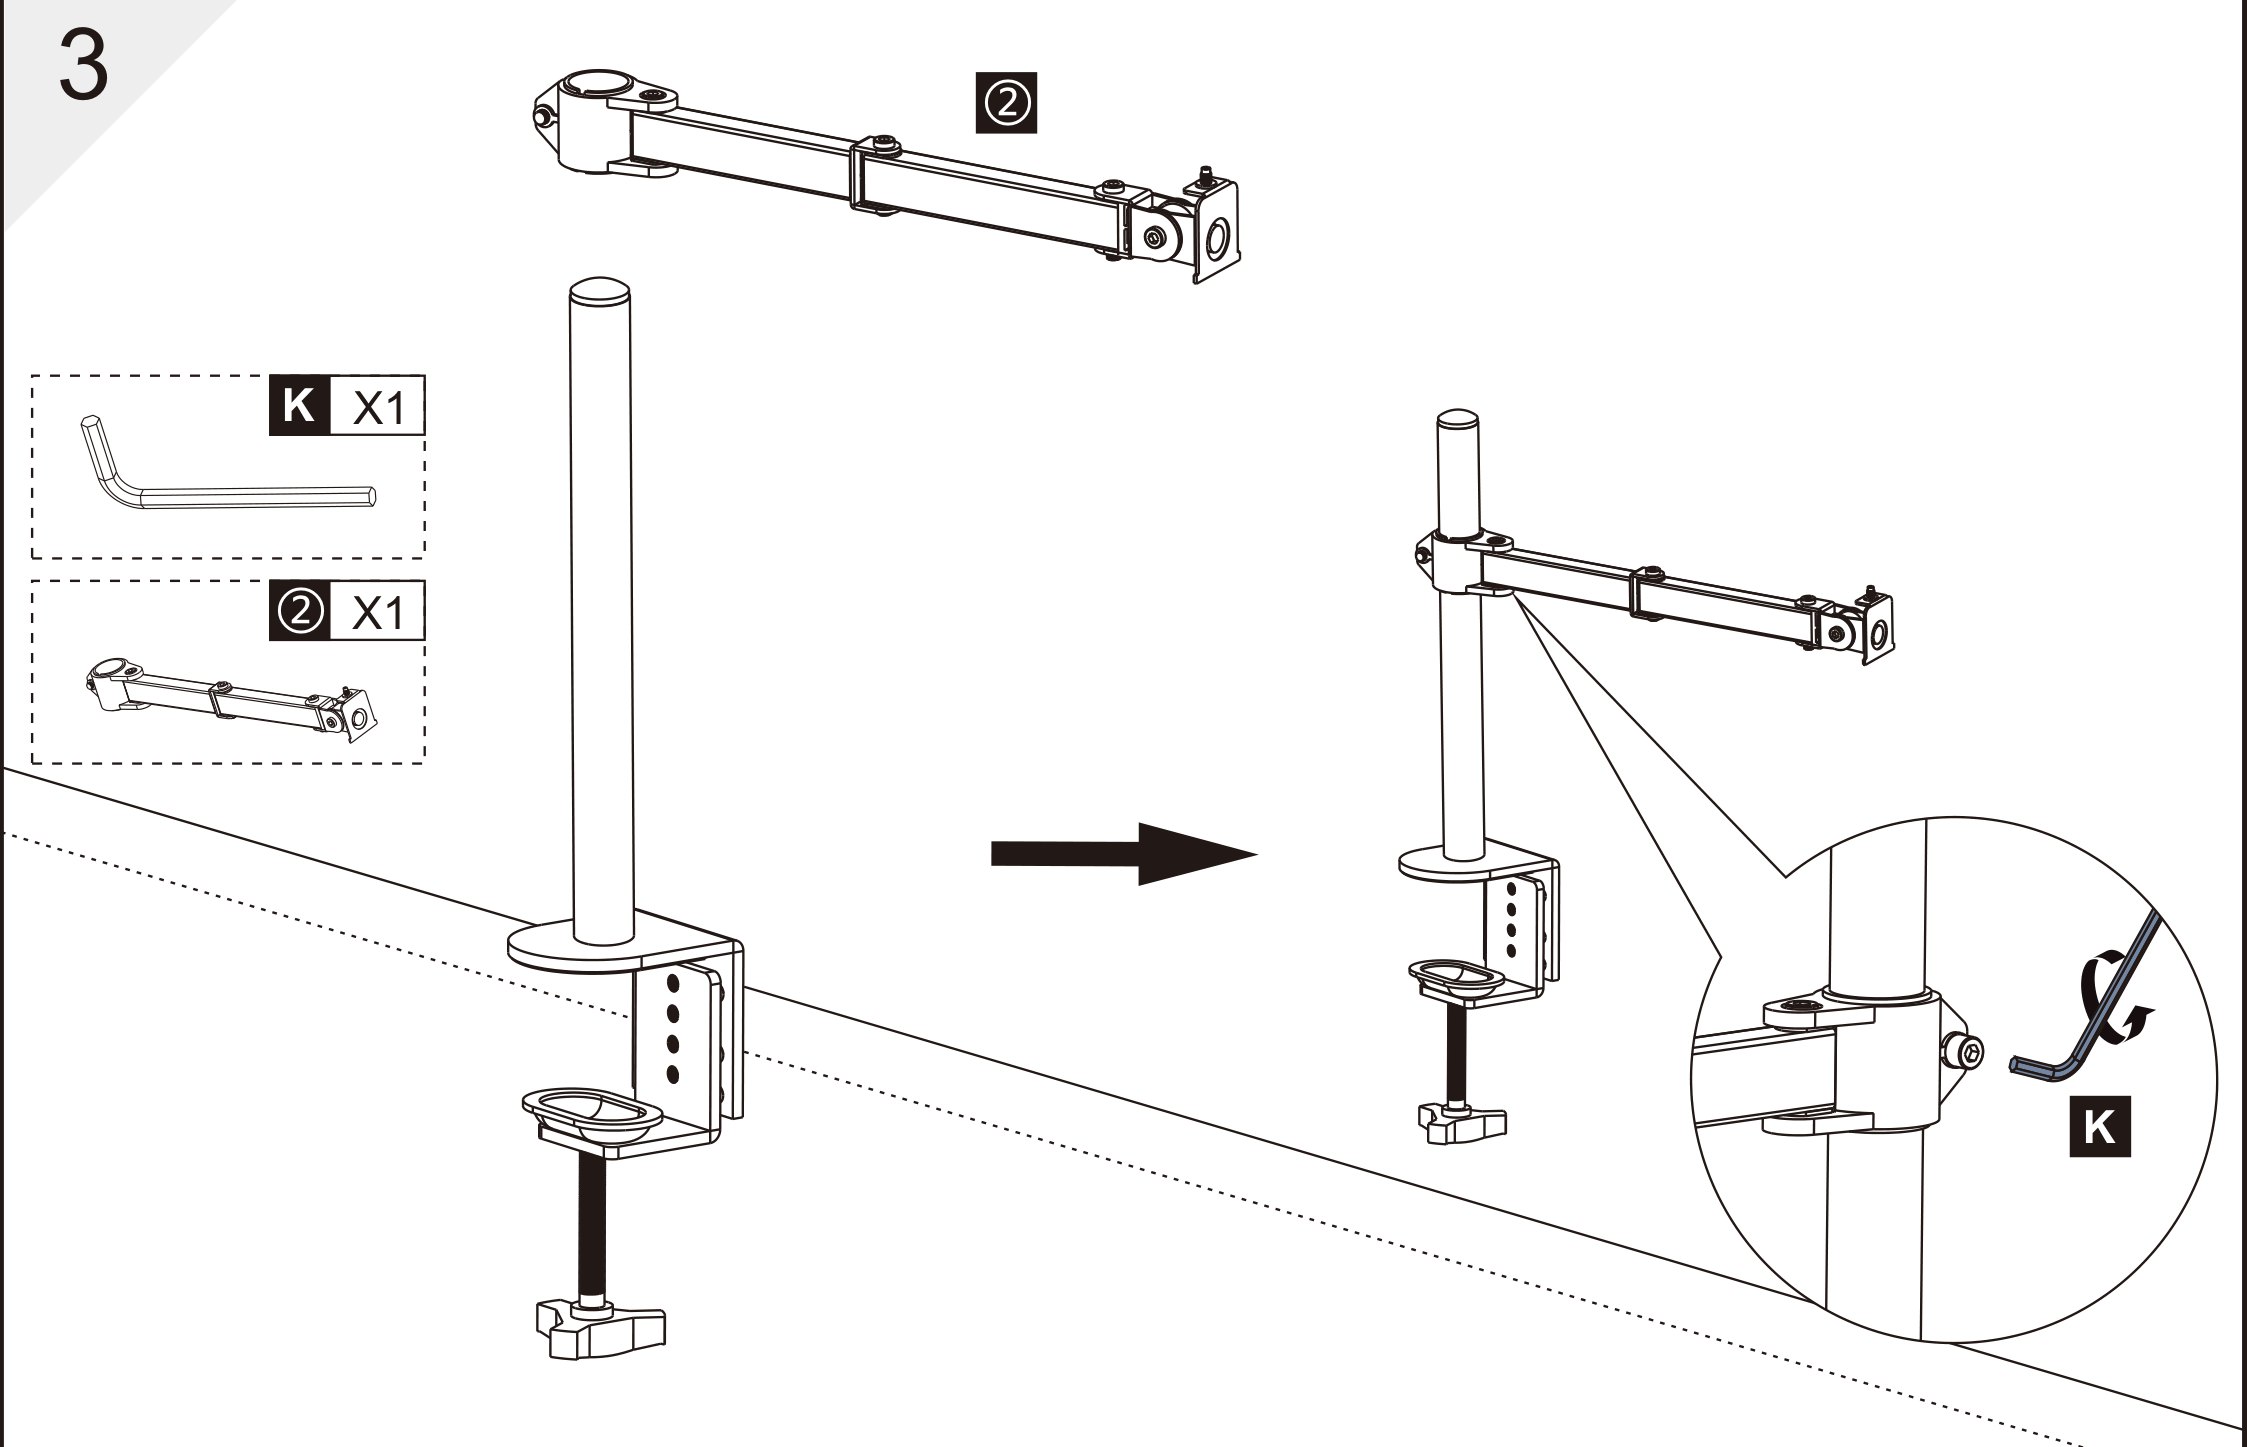
Step 3 — Fit the arm
- Slide the arm (②) onto the post from the top, with the VESA joint pointing away from the desk.
- Set the arm at the working height — anywhere between 100 and 400 mm above the desktop.
- Lock it with the screw in the collar of the arm, using the Allen key (K).
Set the height so that the top edge of the screen will be roughly at eye level once the monitor hangs on the arm. The height is changed only with the Allen key, so it is worth taking a moment over it.
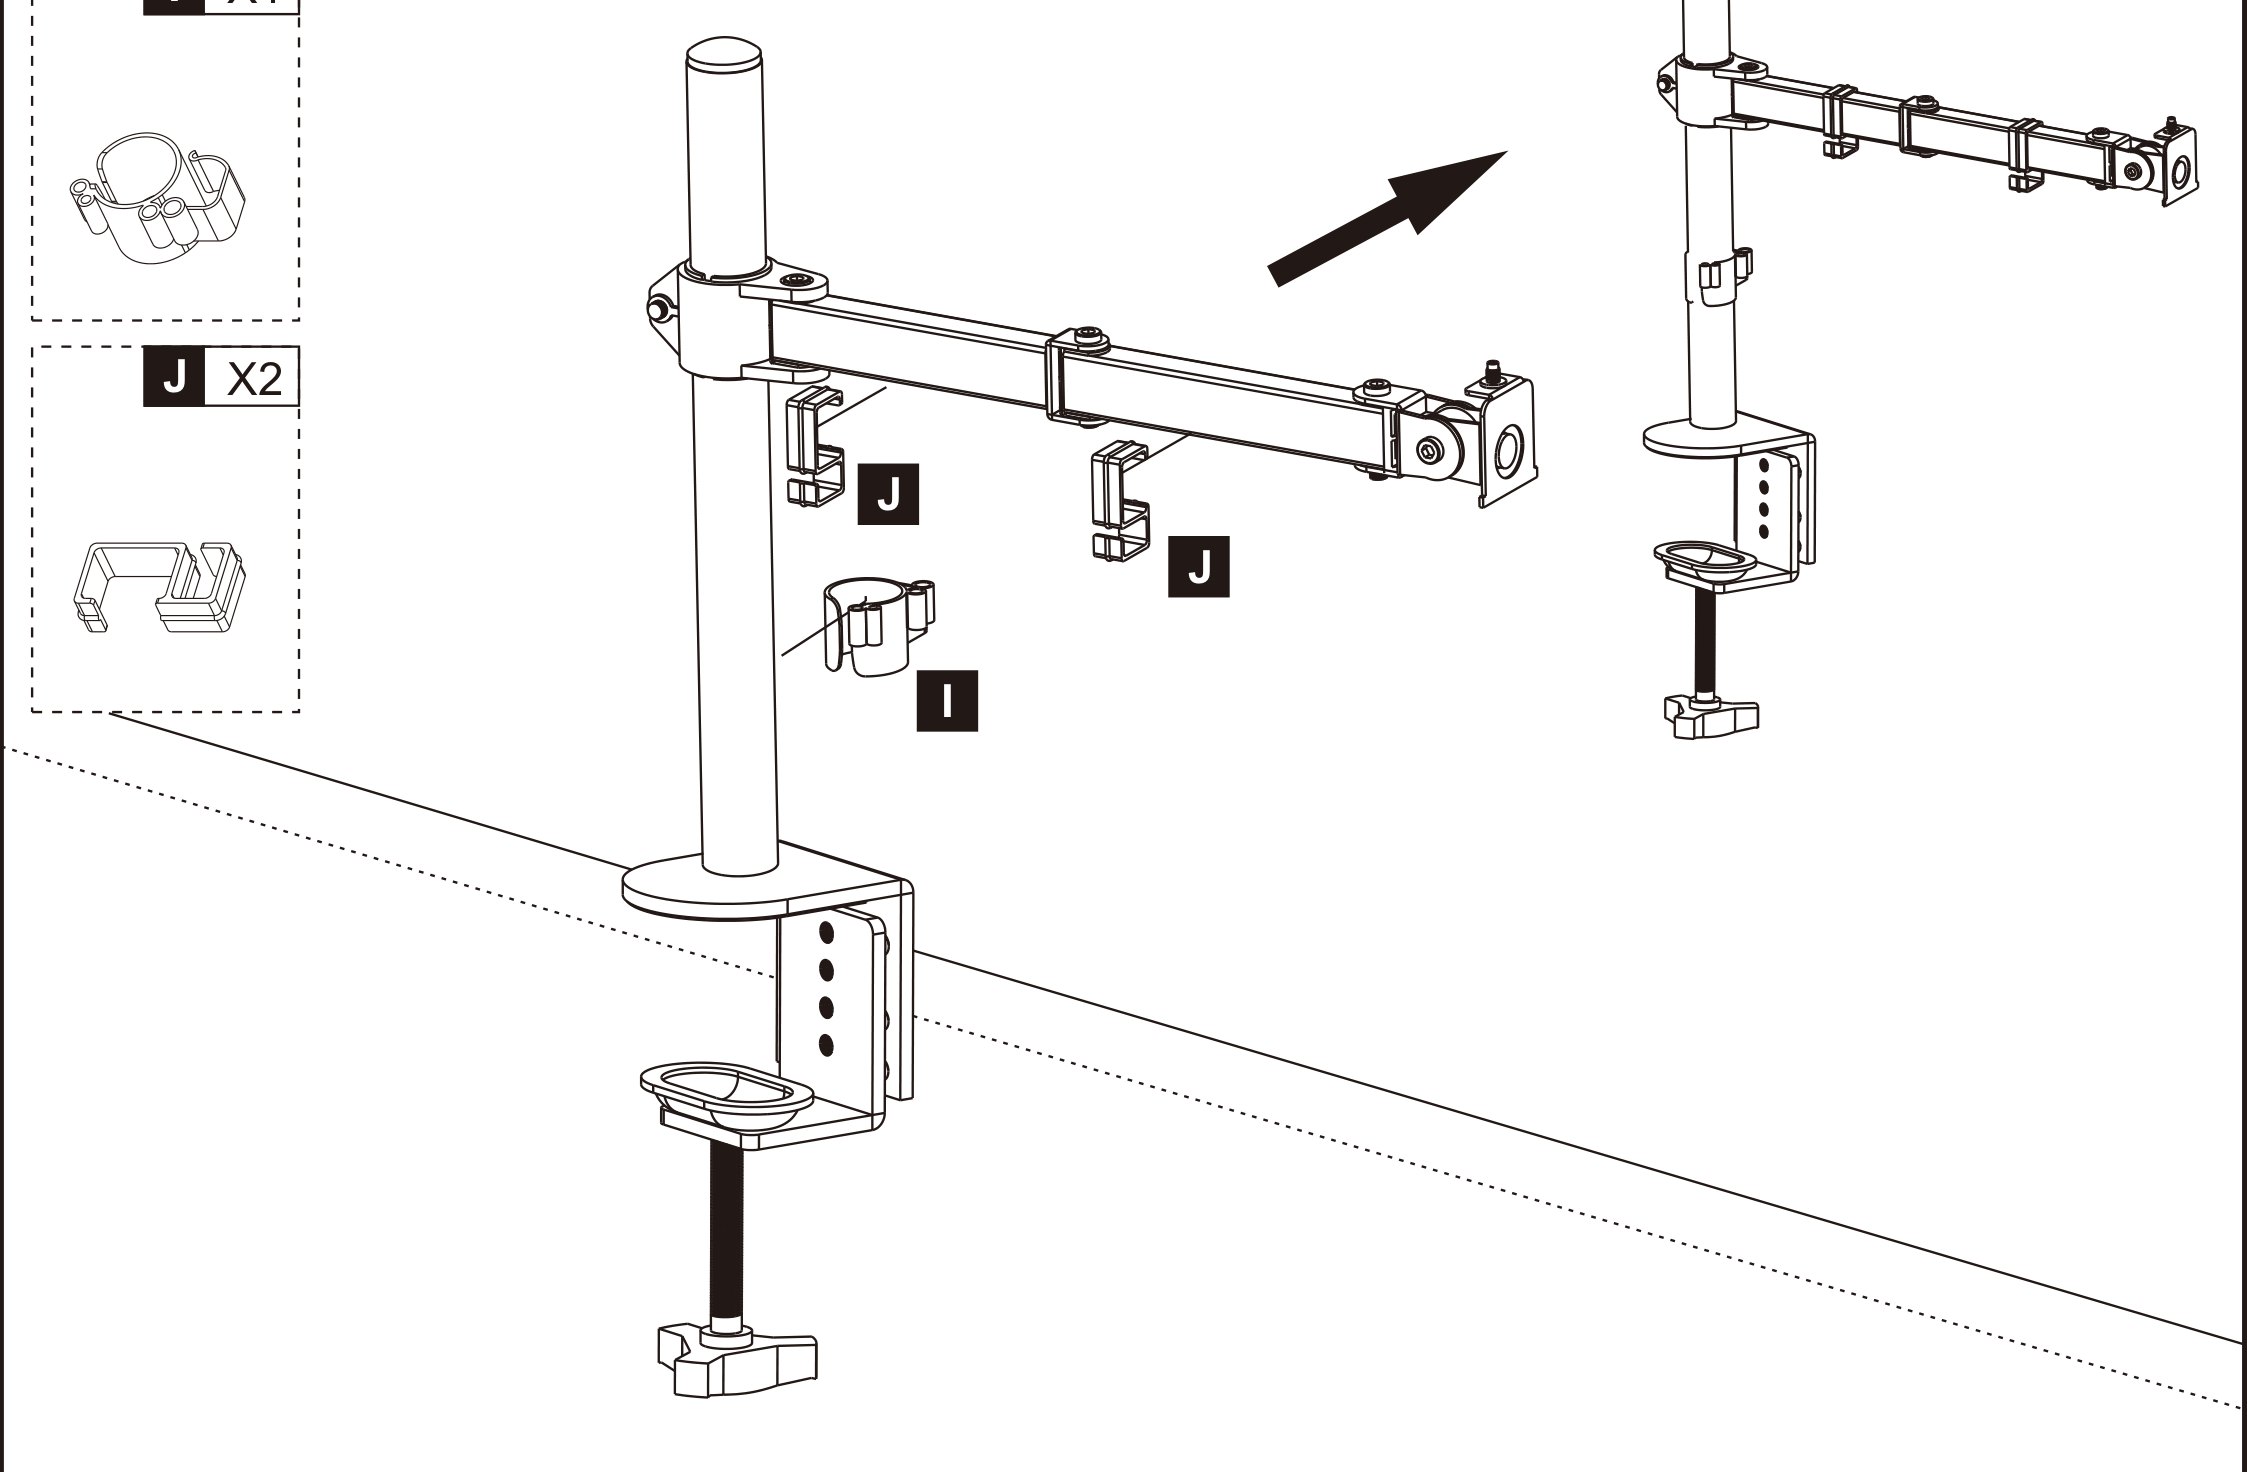
Step 4 — Fit the cable clips
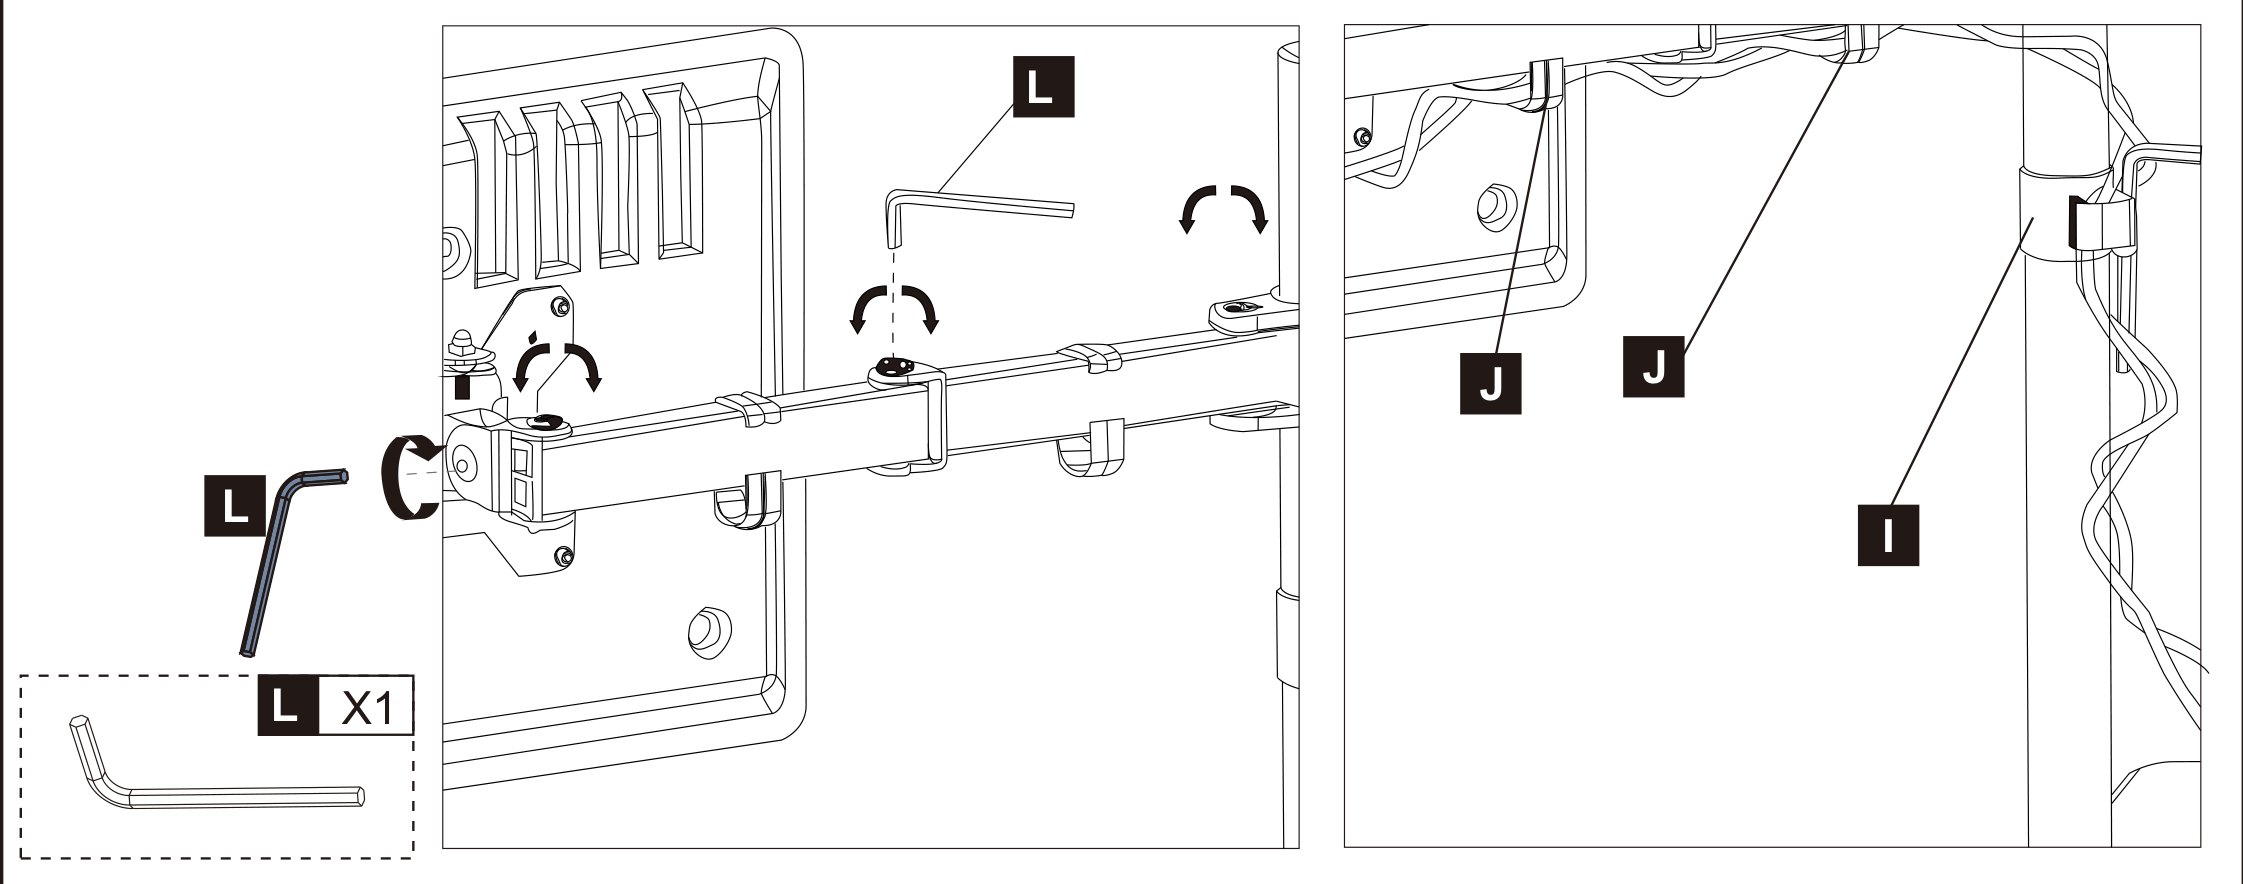
- Clip the cable clip (I) onto the post, below the arm.
- Clip the two clips (J) onto the arm — one on each section.
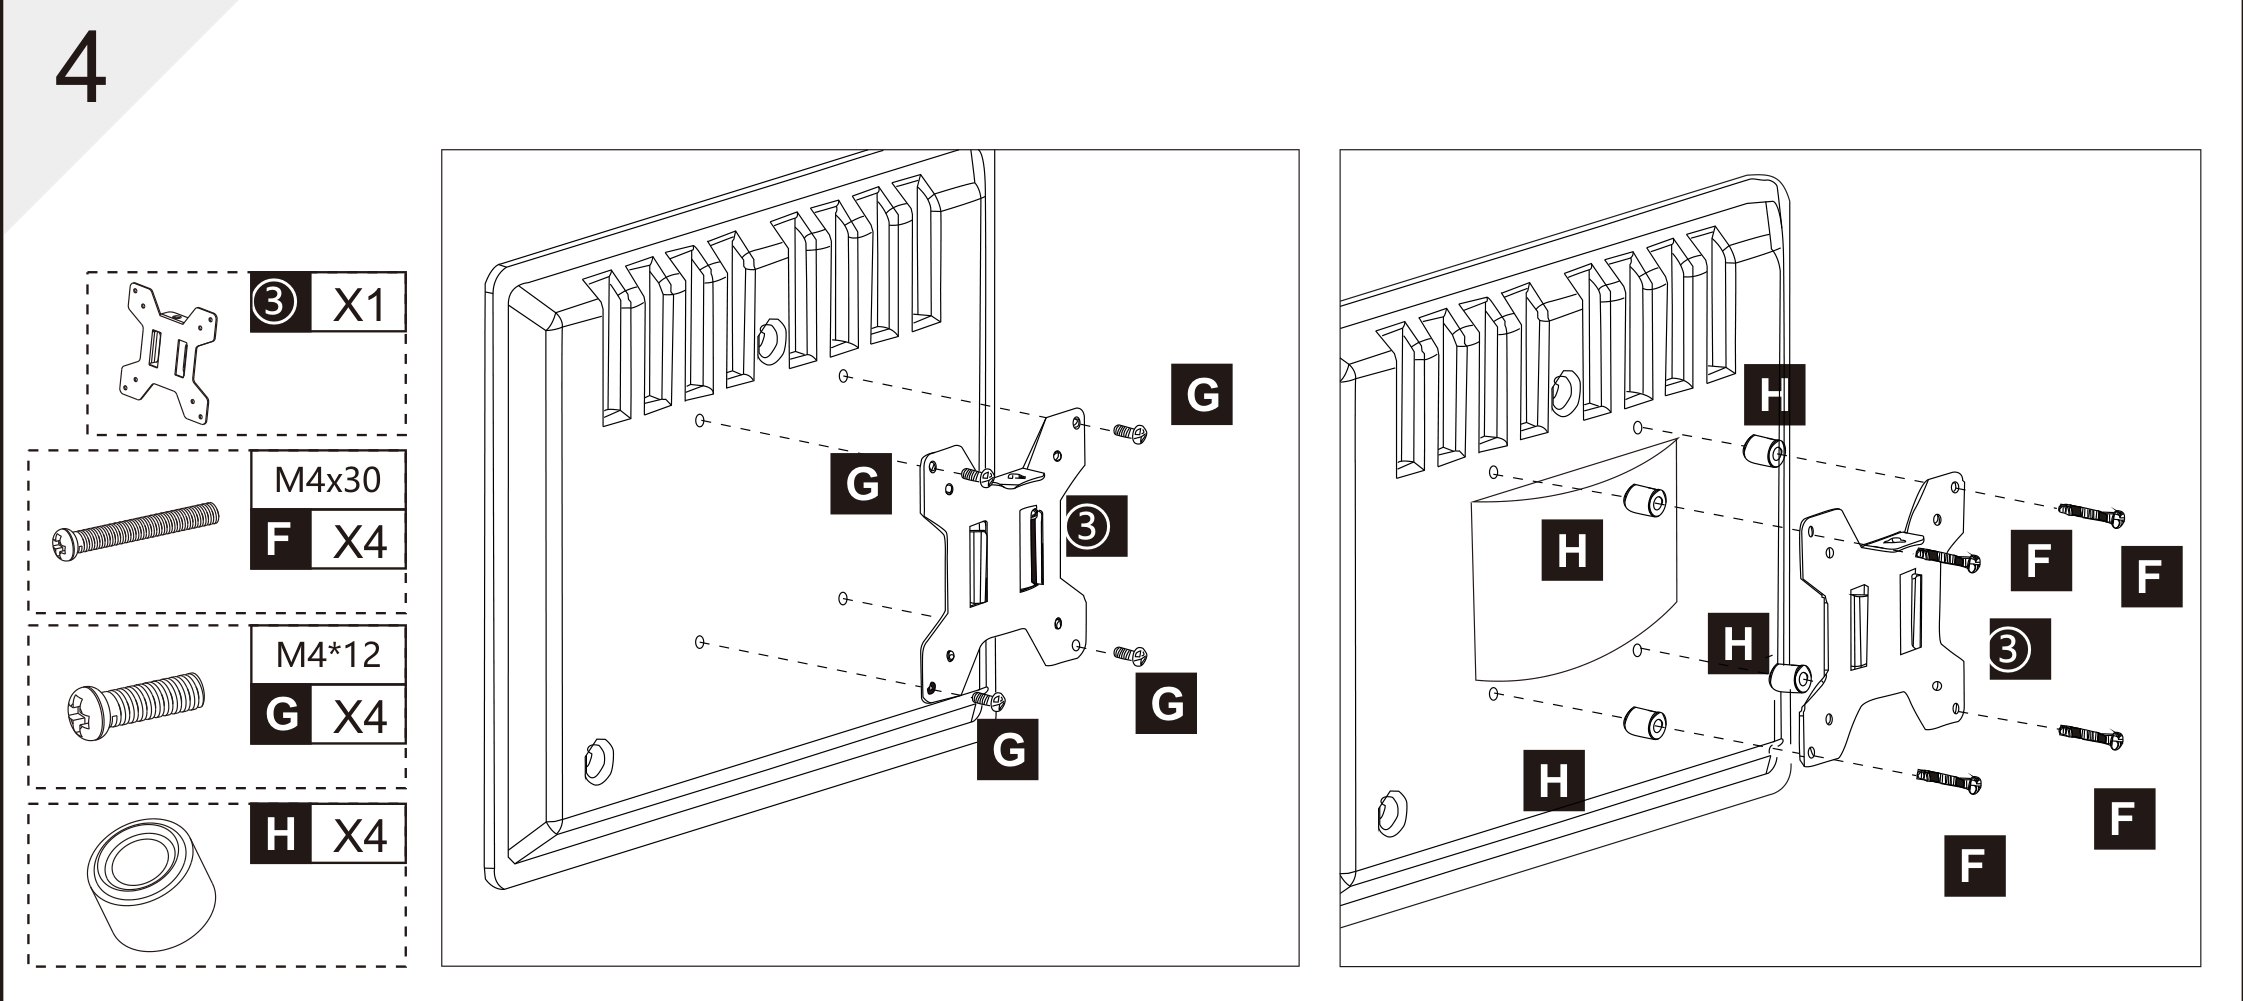
Step 5 — Screw the VESA plate to the monitor
Lay the monitor face down on a soft, clean surface and fit the plate (③) to its VESA holes — 75 × 75 mm or 100 × 100 mm.
Monitor with a flat back
- Screw the plate straight onto the back of the monitor with four M4 × 12 screws (G).
Monitor with a curved or recessed back
- Put one spacer (H) between the plate and the monitor at each of the four holes.
- Screw the plate on with four M4 × 30 screws (F), which are long enough to reach through the spacers.
Tighten the four screws evenly and do not overtighten them — the thread is in the monitor housing.
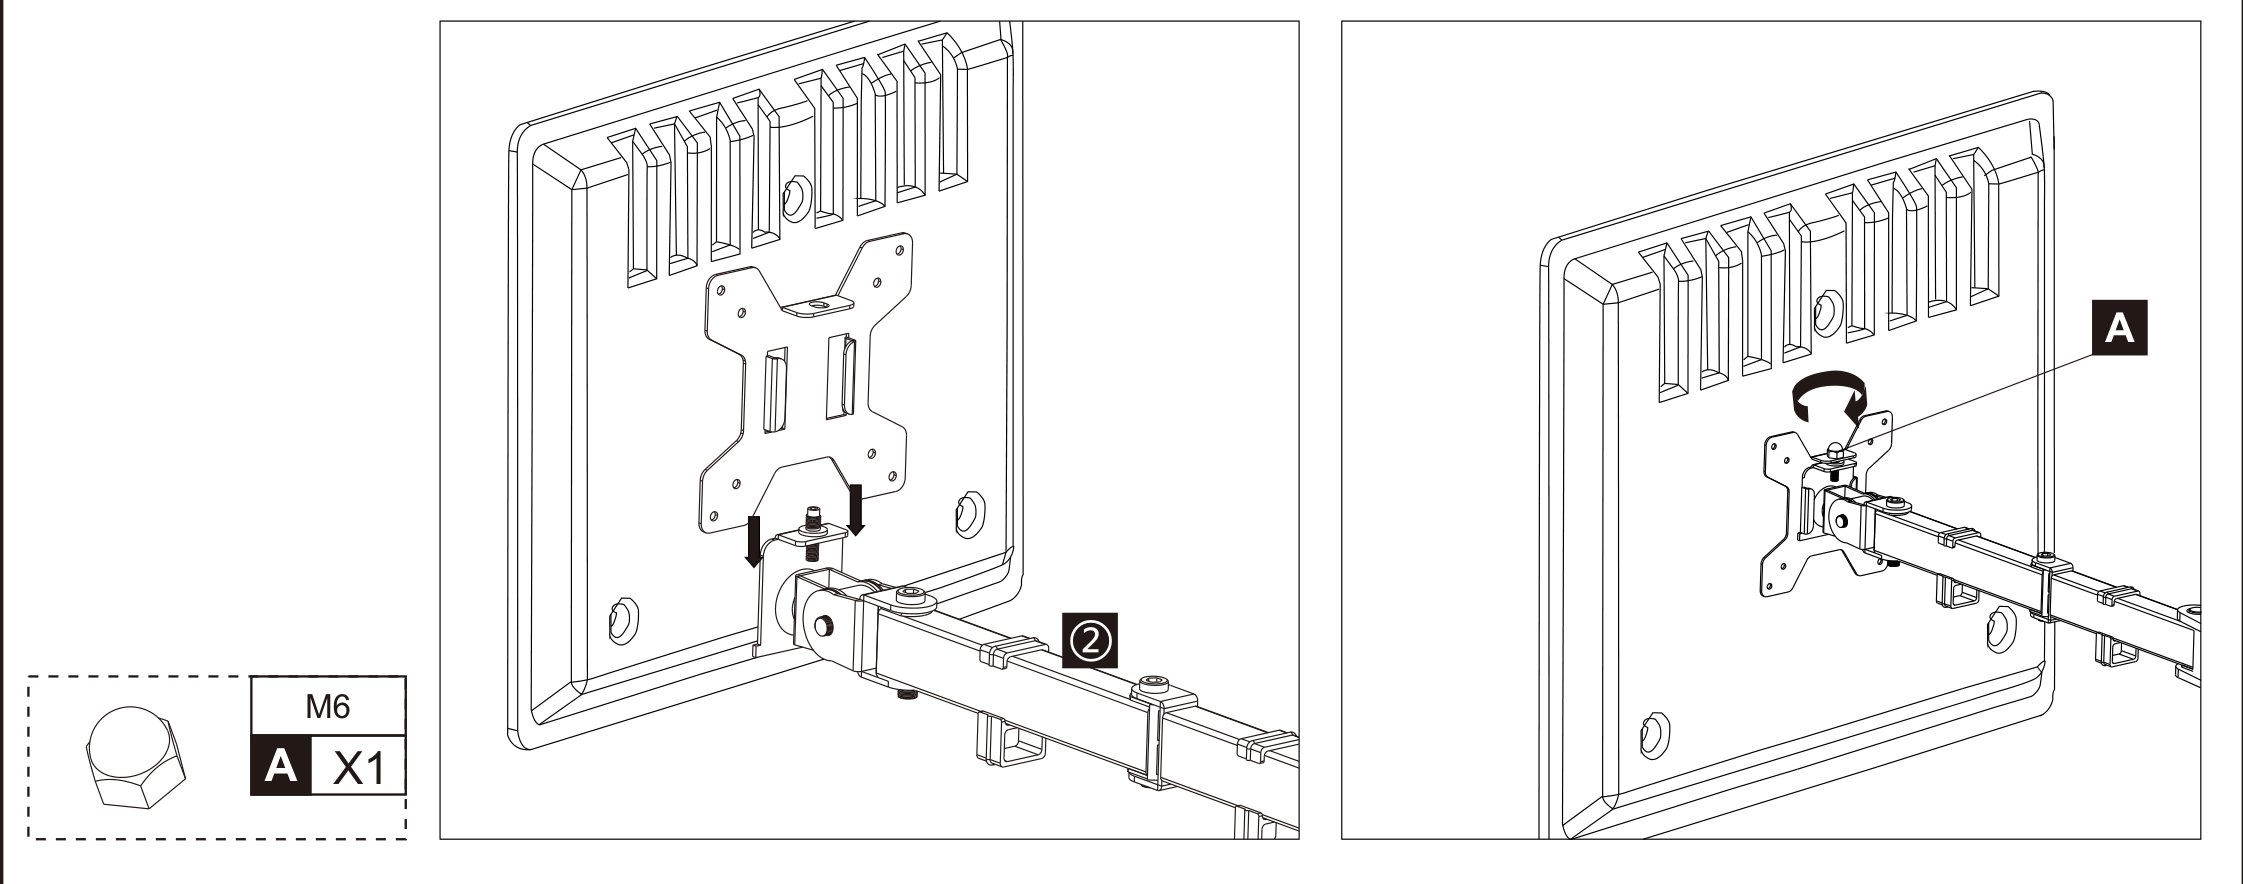
Step 6 — Hang the monitor on the arm
- With a second person holding the monitor, put the pin of the VESA plate (③) into the joint at the end of the arm (②).
- Screw the M6 nut (A) onto the pin from above and tighten it firmly by hand.
- Let go of the monitor only when the nut is tight, and check that the screen hangs level.
Do not let go of the screen before the nut (A) is tightened — an unsecured monitor can slide off the joint.
Step 7 — Adjust the joints and route the cables
- Set the resistance of the joints of the arm with the Allen key (L): tighten a joint if the screen sags under its own weight, loosen it if it is hard to move.
- Aim for a setting where the screen holds the position you leave it in, but still moves with one hand.
- Lay the monitor cables in the clips (J) along the arm and in the clip (I) on the post, then run them down to the desk.
Using the mount
Once the monitor hangs on the arm and the joints are set, the screen is positioned by hand:
- Height — 100 to 400 mm above the desktop, set on the post with the Allen key (K)
- Reach — up to 289 mm from the post, over two arm sections of 132 and 157 mm
- Arm swivel — a full 360° around the post
- Screen rotation — −90° to 90°, so the screen turns to portrait
- Screen tilt — −90° to 90°
Safety instructions
Failure to read, understand and follow all instructions can result in serious personal injury or damage to equipment.
- Using the mount with a monitor heavier than the rated 8 kg makes it unstable and can lead to injury or damage to the screen.
- Follow the assembly instructions exactly. Incorrect installation can cause damage or serious personal injury.
- Make sure the desk can safely carry the combined weight of the mount and the monitor, and that the desktop is no thicker than 75 mm at the clamp.
- Use the supplied screws and do not overtighten them.
- The product contains small parts that can be a choking hazard if swallowed. Keep them away from children.
- The product is intended for indoor use only. Outdoor use can damage it.
- Check at least every three months that the clamp and the screws are still tight.
Frequently asked questions
Which monitors fit the SolidHand-UM01?
Does the mount come with a gas spring?
Can I rotate the monitor into portrait mode?
Is cable management included?
How thick a desktop does the clamp take?
Downloads
The manufacturer's manuals and datasheets in PDF, in case an offline copy is needed. Everything in them is on this page as well.