Pocket jeweller's scale up to 500 g with 0.01 g resolution, wagPRO-A500GD
GTIN: 5907614667351 · SKU: wagPRO-A500GD
Table of contents
Specifications
- Material: steel, ABS
- Maximum load: 500 g
- Measurement accuracy: 0.01 g
- Legal-for-trade verification: no
- Display: 5-digit LCD with blue backlight
- Additional functions: display hold, tare, unit switching, automatic switch-off, low battery and overload indication
- Available weighing units: g, lb, oz
- Power supply: 2 × 1.5 V AAA battery
- Device dimensions: 16.5 × 10 × 2 cm
- Package dimensions: 18 × 10.5 × 2.5 cm
- Device weight: 250 g
- Weight with packaging: 270 g
Kit contents
- wagPRO-A500GD scale
- 2 × AAA battery
Control panel
The scale is built into a flip case: the lid protects the steel platform, and the display and keys sit along the front edge.
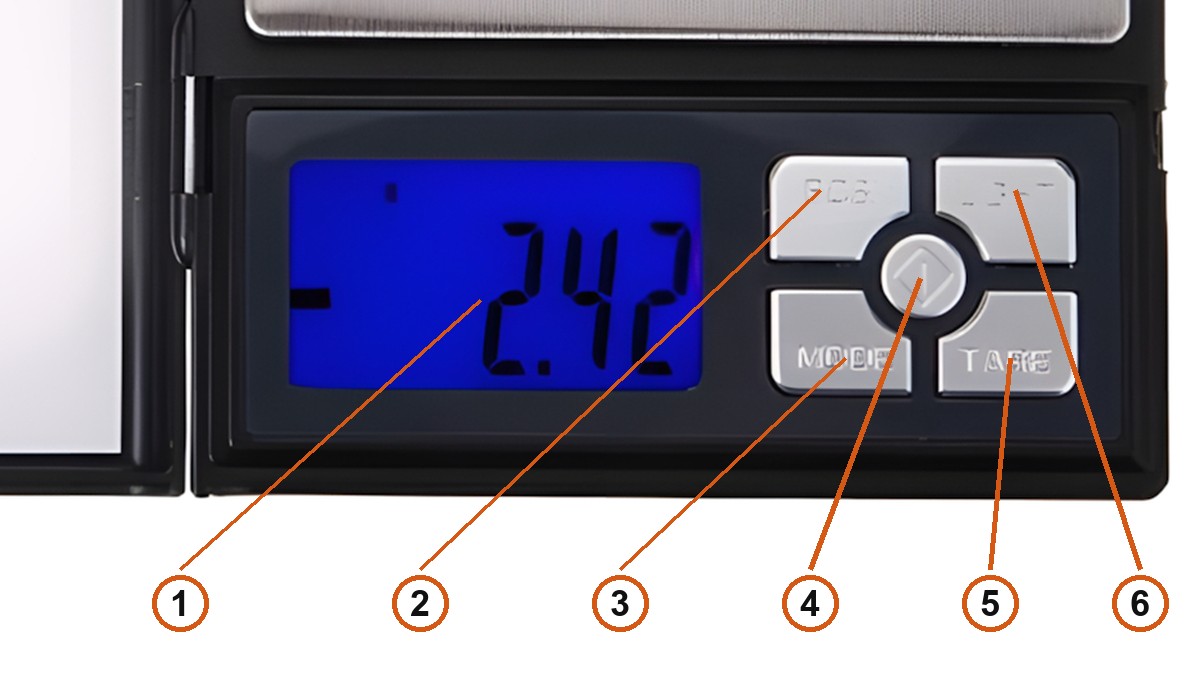
- LCD display — 5 digits with a blue backlight.
- PCS — piece counting.
- MODE — changes the weighing unit.
- Power key (round, in the middle) — switches the scale on and off.
- TARE — tares the scale and resets the reading to zero.
- LIGHT — switches the backlight on and off.
Using the scale
Switching on
Press and hold the power key. The display shows HELLO and then settles at 0.00, at which point the scale is ready to weigh.
Let the scale acclimatise to room temperature for about an hour before use, and give it around 30 seconds to warm up — the internal components need that time to stabilise. At 0.01 g both matter.
Changing the unit
Press MODE to cycle through the units; the symbol of the active one appears at the top of the display. The scale offers grams (g), ounces (oz) and pounds (lb).
Taring
Put the tray or container on the platform and press TARE. The display returns to 0.00, which means the weight of the container has been subtracted and only the contents will be weighed.
Backlight
LIGHT switches the blue backlight on and off.
Piece counting
Piece counting works out how many identical items are on the platform from the weight of a sample:
- Switch the scale on and wait for
0.0. - Put a counted sample on the platform — 25, 50, 75 or 100 pieces.
- Press and hold PCS for 2 seconds. The display shows a sample size, for example
100. - Select the sample size that matches what you put on the platform, using MODE.
- Press PCS to confirm. The display now shows the piece count.
- Take the sample off the platform.
From then on the scale shows the number of pieces for whatever you put on it. Press PCS to move between weighing and counting.
The manual names a UNITS key for selecting the sample size, but there is no such key on the device — the keypad has PCS, MODE, TARE, LIGHT and the power key. MODE is the key that fits that step.
Calibration
- Reset the scale with the power key.
- Wait for
0.0, then press and hold MODE for 3 seconds until the display showsCAL, and release it. - Press MODE again — the display shows
CALand then the required calibration weight. - Put that weight on the platform. The display shows
PASSand returns to normal weighing. - Take the weight off and switch the scale off with the power key. Calibration is complete.
Display messages
| Message | Meaning |
|---|---|
HELLO | Start-up — the scale is initialising |
0.00 / 0.0 | Zero, ready to weigh |
CAL | Calibration mode |
PASS | Calibration completed successfully |
The scale also signals a flat battery and an overloaded platform.
Safety and care
- Never load the scale beyond 500 g. Overloading can damage it permanently.
- Avoid extreme heat and cold — the scale works best at normal room temperature.
- Let the scale acclimatise to room temperature for at least an hour before use, and allow about 30 seconds of warm-up before calibrating.
- Keep the scale in a clean place. Dust, dirt, damp, vibration, draughts and nearby electronics all affect its accuracy and reliability.
- Place items on the platform gently.
- Do not shake or drop the scale. Rough handling can permanently damage the internal sensor.
- Use the scale only on a stable, vibration-free surface.
Frequently asked questions
What is the maximum capacity of the wagPRO-A500GD?
What units of measurement does the scale support?
How does the auto-tare function work?
How many keys does the scale have?
How do I count pieces instead of weighing them?
How do I calibrate the scale?
Why does the reading drift or differ between weighings?
What batteries does the scale take?
Files to download
The manual and the datasheet in PDF, in case you need an offline copy. Everything they contain is also on this page.