Working time recorder with fingerprint and RFID, TimeLok-200NWEPI
GTIN: 5907614664985 · SKU: TimeLok-200NWEPI
Table of contents
Specifications
- Material: ABS
- Identification methods: fingerprint, RFID card or key fob, PIN
- RFID frequencies: 125 kHz and 13.56 MHz
- Maximum number of employees: 1000
- Maximum number of fingerprints: 1000
- Maximum number of PINs: 1000
- Log capacity: 100 000 entries
- False acceptance rate: 1/1 000 000
- Display: 2.4" TFT LCD
- Keypad: 16 keys
- Menu language: English
- Communication: WiFi, LAN, USB, web, P2P
- Power supply: 12 V DC adapter
- Operating temperature: −10 to 60 °C
- Operating humidity: 20–80%
- Device dimensions: 17.5 × 12.5 × 4 cm
- Package dimensions: 19.5 × 15 × 10.5 cm
- Device weight: 350 g
- Weight with packaging: 450 g
Kit contents
- TimeLok-200NWEPI working time recorder
- Mains adapter
- Access-control wiring harness
- Mounting screws
- Wall bracket (attached to the back of the recorder)
Panel
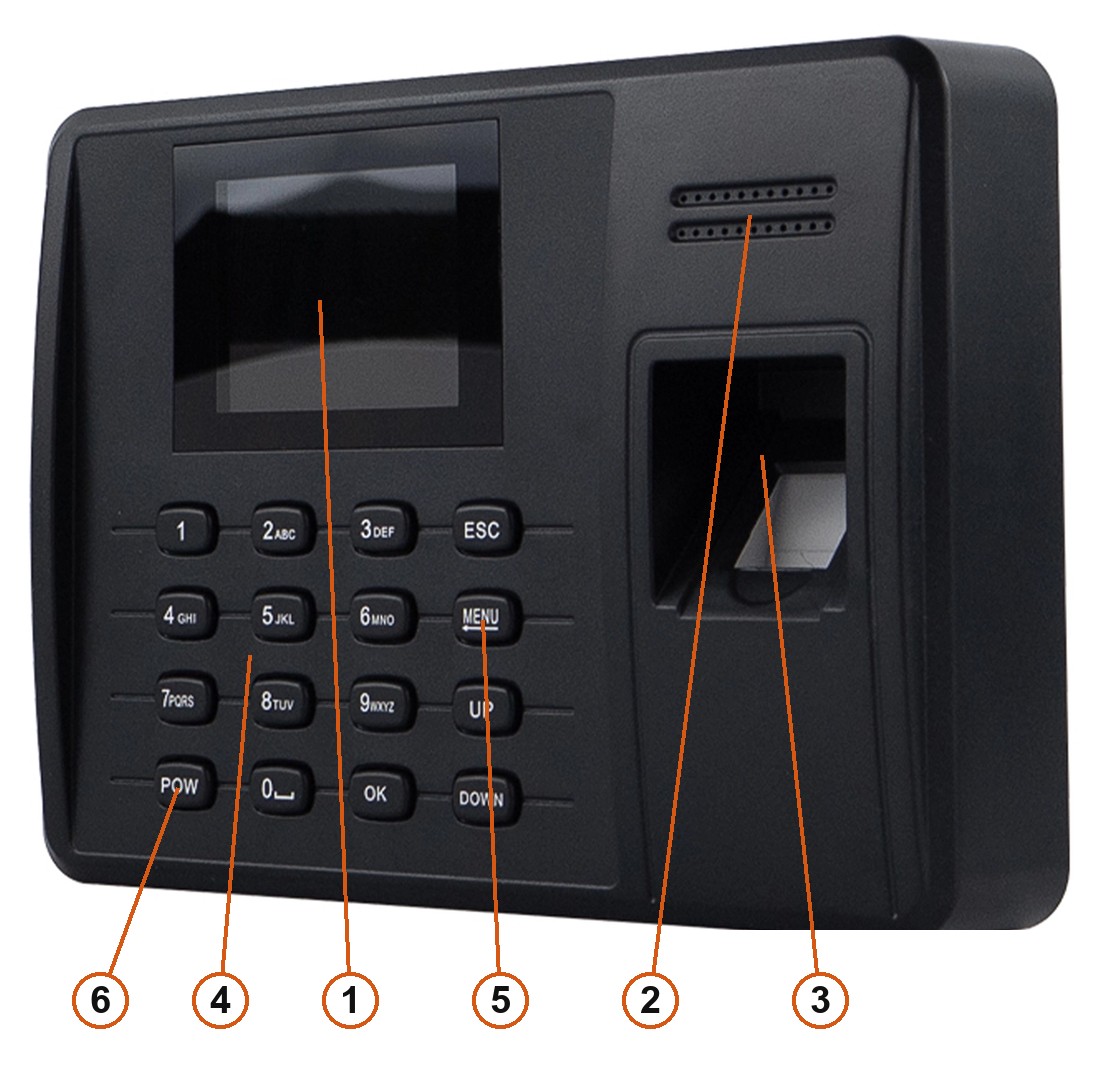
- Display — 2.4" colour TFT LCD showing the clock, the verification result and the menu.
- Speaker — voice prompts and the bell signal.
- Fingerprint sensor — optical, reads the finger placed on it.
- Numeric keys 0–9 — employee ID, PIN and text entry.
- Navigation keys — ESC, MENU, UP, DOWN and OK.
- POW — switches the recorder on and off.
What each key does
| Key | Function |
|---|---|
| 0–9 | Enter digits; also letters when a name is being typed |
| 0 | Held before a letter key, enters that letter as a capital |
| ESC | Cancel, go back one level |
| MENU | Open the main menu |
| UP / DOWN | Move the cursor between items |
| OK | Confirm the selection or the entered value |
| POW | Short press switches the recorder on; hold for over 4 seconds to switch it off |
Special characters are entered by switching the input mode with POW while a text field is open. Each numeric key then produces the symbol printed for it.
Ports
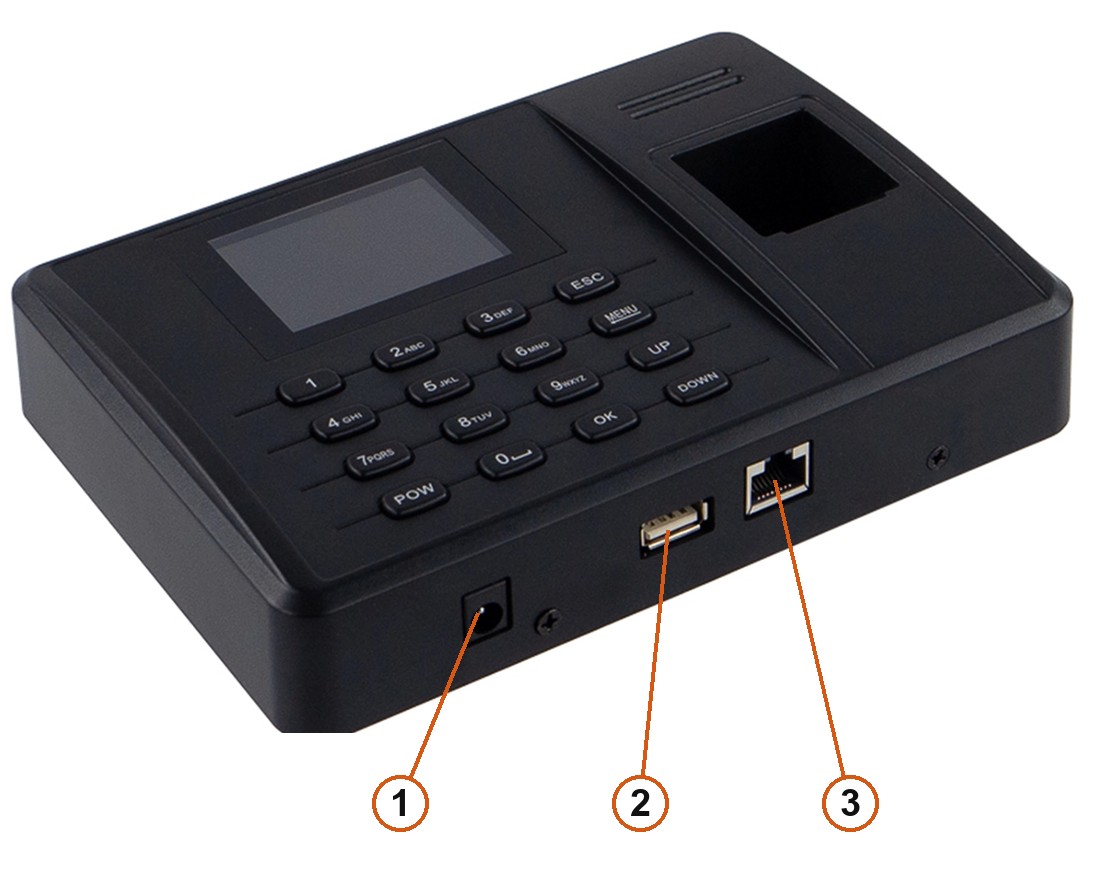
- Power — 12 V DC from the supplied adapter.
- USB-A — a flash drive for exporting logs and importing users, and for firmware updates.
- RJ45 — LAN. WiFi is built in and configured from the menu, so the cable is optional.
The access-control terminals — door lock, exit button, door sensor, bell and the Wiegand lines — are on a separate connector inside the housing, reached by the supplied wiring harness. See Access control and Wiegand wiring.
Mounting
- Fix the metal bracket from the back of the recorder to the wall, about 1.4 m above the floor.
- Hang the recorder on the bracket and secure it with the supplied screws.
- Connect the adapter, and the LAN cable or the access-control harness if you use them.
Do not mount the recorder where strong light falls on the fingerprint sensor. The sensor is optical, and direct sunlight or a bright lamp shining into it markedly reduces recognition. A spot away from windows and out of direct light gives the best results.
Switching on and off
Connect the adapter and press POW — the recorder starts and shows the home screen with the date, the time and the connection status. To switch it off, hold POW for more than 4 seconds.
The recorder can also switch itself off or go to sleep after a set idle time, and switch off at a scheduled hour — see Power management. If the power key is locked, the only way to switch the device off is to unplug the adapter.
Users
Privileges
Every person in the database is either a user, who can only clock in and out, or a manager / super manager, who can also open the menu. Once at least one manager exists, opening the menu requires manager verification — this is what stops employees from changing the settings.
Every person needs a unique employee ID, from 1 to 99999999. That ID has to match the one used in the attendance software, because reports are matched by it.
Enrolling a user
- Press MENU → User → Enroll.
- Type the employee ID and confirm with OK.
- Set the privilege level — user, manager or super manager — with UP / DOWN and confirm.
- Choose what to enrol: fingerprint, card or password.
- Fingerprint — place the same finger on the sensor three times; the recorder builds one template from the three reads.
- Card — hold the RFID card or key fob to the reader; its number is read automatically.
- Password — enter a PIN of up to 4 digits (1–9999) and repeat it.
- Confirm with OK.
Each person can have up to 3 fingerprints, 1 PIN and 1 card.
Enrol at least two fingers per employee. If someone's finger is injured, worn or heavily calloused, the second finger keeps them working without a visit to the administrator.
Deleting a user
Press MENU → User → Delete, type the employee ID and confirm with OK. The recorder then asks what to remove — the fingerprint, the card, the password or the whole record.
Verification modes
The verification mode decides what an employee has to present at the recorder. It is set in MENU → Setting → Advanced → Verification mode:
| Mode | What the employee does |
|---|---|
fp/rf/pwd | Any one of the three: finger, card or PIN |
rf+fp | Card and finger |
fp+pwd | Finger and PIN |
rf+pwd | Card and PIN |
fp+rf+pwd | All three |
fp/rf/pwd is the everyday setting for attendance. The combined modes are for doors where a lost card must not be enough to get in.
Clocking in and out
On the home screen, place a finger on the sensor, hold the card to the reader, or press 0 to open the ID field, type the employee ID, confirm with OK, then type the PIN and confirm again.
A successful verification shows the employee's details on the display, plays the "thank you" prompt and writes the entry to memory. A failed one shows Access denied, press finger again. If the recorder drives a door lock, a successful verification also releases it.
Clocking statuses
The recorder can label each entry with a status, so the report shows not only when someone clocked in but what kind of event it was. Six statuses are available: duty on, duty off, overtime on, overtime off, go out on and go out off. Up to 10 time zones can be defined in MENU → Setting → Power management → TR schedule, and each of them switches the recorder to one of the statuses automatically.
Re-verification time
To stop one person from registering several times in a row, set a re-verification time of 1 to 255 minutes. With 3 minutes set, a second verification by the same employee within 3 minutes is not written to the log. The default is off.
Menu structure
Press MENU to open the main menu. It has four tiles:
| Tile | What it holds |
|---|---|
| User | Enrolling and deleting employees |
| Setting | Basic, advanced, power, communication, log and access-control settings, and the self-test |
| USB disk | Export and import of records over a flash drive |
| Sys info | Memory usage, device information and record search |
Basic settings
Date and time, the date and time format, the menu language, the voice prompts, the volume and the key beep.
Advanced settings
The verification mode, the number of managers (0–10, five by default), the touch sensor, the sensor adjustment, the firmware update, restoring factory settings, and deleting all records or all management logs.
- Touch sensor — with it on, the fingerprint sensor powers down after an idle period and wakes when a finger touches it. This extends the life of the sensor.
- Sensor adjustment — matches the sensor to the light level in the room. Run it when recognition gets worse.
- Restore factory settings — resets the settings, but leaves the enrolled users and the attendance records alone.
Deleting all records is irreversible — the entries cannot be recovered afterwards. Download the data before you use it.
Power management
- Bell schedule — up to 12 bell times per day.
- Ring count — how many times the bell repeats, 1 to 255. With the count at zero the bell stays silent even if a time is set.
- TR schedule — the 10 time zones that set the clocking status automatically.
- Idle settings — the idle time after which the recorder sleeps or switches off. A finger on the sensor or any key wakes it from sleep.
- Power off — a scheduled switch-off time.
- Power key lock — with it on, POW switches the recorder on but not off. Use it where the recorder drives a door lock, so nobody switches it off by accident.
Communication settings
The network parameters: IP address, subnet mask, gateway, DHCP on or off, the port number, and the WiFi and web-server settings. The last item is the communication password, which keeps other people's software from connecting to the recorder — change it the first time you set the device up.
Log settings
Two warning thresholds:
- Management log (slog) warning — warns when fewer than the set number of management-log entries remain. Default 100, range 1–255, or off.
- Attendance log (glog) warning — warns when fewer than the set number of attendance entries remain. Default 1000, range 1–1500, or off.
When either warning appears, download the data and clear the log.
Self-test
MENU → Setting → Auto test checks the hardware: memory, LCD, voice, fingerprint sensor, keypad and the real-time clock. Run it when something behaves oddly — an unresponsive key, for instance — to tell a hardware fault from a settings problem.
Network setup
The recorder needs an address on the same subnet as the computer or the router. For example, with the computer at 192.168.0.100, the recorder can be at 192.168.0.224 — the first three groups must match.
- MENU → Setting → Communication → TCP/IP.
- Either turn DHCP on to take an address from the router automatically, or enter the IP address, the subnet mask and the gateway by hand.
- Confirm with OK.
For WiFi, choose Communication → WiFi → Scan WiFi Hub, pick the network, enter the password and confirm. Capital letters in a WiFi password are entered by pressing 0 before the letter key.
Connecting to BeepClock
BeepClock is HDWR's cloud application — nothing to install, and the recorder syncs employees and records with it on its own. Full instructions are on the BeepClock page.
- On the recorder: MENU → Setting → Communication → Web server URL.
- Enter
wss://timelok.beepclock.comand confirm with OK. - Read the serial number from MENU → Sys info → Device info → Serial Number (it is also on the sticker on the back of the housing).
- Log in at app.beepclock.com, open Devices and click Add new device.
- Enter the serial number, name the device (for example "main entrance") and save.
Employees added in BeepClock sync to the recorder automatically, and so do administrator rights.
If BeepClock shows Connection: NO, check two things: that the server address reads exactly wss://timelok.beepclock.com, and that the serial number in the app matches the one on the device.
Exporting data over USB
MENU → USB disk handles both directions:
- Download attendance records — writes the clock-ins and clock-outs to a text file that any editor opens and the attendance software reads.
- Download enrolment data — writes the users, all of them or one ID at a time. This file is encrypted and can only be read back by another recorder, which is how you copy staff to a second device.
- Download management log — a text file with the record of setting changes.
- Upload enrolment data — reads users back from the flash drive.
Download the records at least twice a month. They are kept in flash memory and survive a power cut, but a copy in the software is what protects you from a failed device.
Access control and Wiegand wiring
The recorder can drive an electric strike or a magnetic lock, and it works both as a Wiegand controller (with an external reader) and as a Wiegand reader for another controller.
Terminals
| Pin | Signal | Purpose |
|---|---|---|
| 1 | Door sensor | Input from the door contact |
| 2 | Exit | Exit button input |
| 3 | WGout-0 | Wiegand data 0, output |
| 4 | WGout-1 | Wiegand data 1, output |
| 5 | Lock-NO | Lock relay, normally open |
| 6 | Lock-NC | Lock relay, normally closed |
| 7 | Lock-COM | Lock relay, common |
| 8 | Bell-NO | Bell output, normally open |
| 9 | Lock-COM | Lock relay, common |
| 10 | GND | Ground |
| 11 | POW | Power |
The second connector takes an external reader: 5 V, WGin1, WGin0 and GND.
External reader
A reader connected to the Wiegand input is wired by six wires:
| Wire | Signal | Goes to |
|---|---|---|
| 1 | Data 1 | WGin1 on the recorder |
| 2 | GND | GND |
| 3 | Data 0 | WGin0 on the recorder |
| 4 | LED | Recorder or left unconnected |
| 5 | Buzzer | Recorder or left unconnected |
| 6 | +12 V | Power supply |
Power the lock and the external reader from the same 12 V supply as the recorder, and take the common ground from one point.
Door settings
MENU → Setting → Access control holds the door parameters:
- Time zones — up to 50 sets, each with an entry and exit time for every day from Monday to Sunday plus holidays.
- User access — up to 5 time zones per employee. Several zones add up: with zone 1 as 9:00–18:00 and zone 2 as 19:00–23:00, an employee assigned both may enter during either.
- Door sensor type — normally open or normally closed, matching the contact you fitted.
- Door-open alarm — how long the door may stay open before the recorder sounds an alarm, so nobody can prop it open and let an unauthorised person in.
Records and memory
The recorder keeps three kinds of data in flash memory, so a power cut does not lose them:
| Data | What it holds |
|---|---|
| glog | The attendance entries — clock-ins and clock-outs |
| slog | The management log — every settings change |
| Enrolment | The employees: IDs, fingerprint templates, cards and PINs |
MENU → Sys info shows how much of each is used — a fingerprint reading of 1/1000 means one of the thousand templates is taken. Device info shows the production date, the serial number, the model, the fingerprint algorithm and the firmware version; the serial number is what support asks for.
Troubleshooting
| Problem | Cause | What to do |
|---|---|---|
| One employee's fingerprint is never recognised | The fingerprint is worn, creased or peeling | Delete it and enrol a different finger; enrol two fingers per person |
Please press finger again right after switching on | The sensor is dirty | Clean the sensor with a little alcohol |
| The sensor cable is loose | Contact customer service | |
| Recognition got much worse after the recorder was moved | Strong light falls on the optical sensor | Move the recorder away from the window or the lamp |
| The software cannot reach the recorder | Wrong device number | Set the same device number in the recorder and in the software |
| The recorder is not on the same subnet | Check the IP address, the mask and the gateway | |
| The communication password does not match | Enter the same password on both sides | |
| Nothing on the display, or only half of it | Faulty LCD or mainboard | Contact customer service |
| Nobody can open the menu — the administrator has left | Every manager account is gone | Clear the administrator from the attendance software; it changes the manager back to a regular user |
| A remote download of two weeks of data fails, a few days work | The router closes the connection too early | Download in shorter ranges, or raise the router's timeout |
Frequently asked questions
How many employees and how many entries does the TimeLok-200NWEPI hold?
Which RFID cards work with this recorder?
Do I need an internet connection to use the recorder?
How do I connect the recorder to BeepClock?
How does an employee clock in with a PIN?
How do I stop employees from changing the settings?
The fingerprint sensor stopped recognising people well — what can I do?
Can the recorder open a door?
What software do I use to read the records?
Downloads
Original manufacturer PDF manuals kept available as a legacy reference. Everything from them is already covered on this page — use the PDFs only if you need an offline copy.
- TimeLok-200NWEPI user manual — Polish (PDF)
- TimeLok-200NWEPI datasheet — Polish (PDF)
- TimeLok-200NWEPI user manual — English (PDF)
- TimeLok-200NWEPI datasheet — English (PDF)
- TimeLok-200NWEPI user manual — German (PDF)
- TimeLok-200NWEPI datasheet — German (PDF)
- Connecting the recorder to BeepClock — Polish (PDF)
- Wiegand wiring diagrams — Polish (PDF)
- Attendance Tracker software manual — Polish (PDF)
The Windows installer of the Attendance Tracker software (about 228 MB):